Sunshine on a Plate: The Ultimate Creamy Lemon Squares
You know that moment when you need a little burst of joy? Maybe it’s a gray Tuesday or you’re expecting friends and want to bring something that makes people smile. For me, that’s when I head to the kitchen to make these creamy lemon squares. They’re not just a dessert; they’re a portable, edible ray of sunshine. The first time I made them, my neighbor declared them “the best thing she’d ever tasted,” and let me tell you, that recipe card is now stained with lime juice and love. It’s a recipe I turn to again and again, and today, I’m sharing all my secrets with you.
A Slice of Zesty History: From Lemon Bars to Lime Love
The classic lemon bar is a staple of American potlucks and bake sales, believed to have evolved from traditional lemon curd recipes. My version takes a little tropical detour by welcoming lime into the mix. I started experimenting after a friend gifted me a bag of limes from her tree. Combining them with lemon created a more complex, vibrant flavor—less straightforwardly sour and more intriguingly tart with a floral note. This creamy lemon squares recipe honors the classic but adds a modern, zesty twist that feels both familiar and excitingly new.
Why You’ll Fall in Love With This Recipe
If you’re looking for a dessert that’s impossibly easy yet looks and tastes like you spent all day in the kitchen, this is it. The filling comes together in one bowl with just a whisk, and the crust is a simple press-in situation—no rolling pin required! The contrast is magical: a crisp, nutty, slightly savory crust gives way to a velvety, intensely citrus filling that’s both tart and sweet. It’s the kind of treat that appeals to everyone, from kids who love the sweetness to adults who appreciate the sophisticated punch of citrus.
The Perfect Occasion for Creamy Lemon Squares
These squares are the ultimate crowd-pleaser for any gathering. They are absolutely perfect for spring brunches, summer picnics, and baby or bridal showers—their bright yellow color just feels celebratory. I always make them for our Fourth of July BBQ; they offer a refreshing counterpoint to all the smoky, savory food. They also make wonderful edible gifts. Stack a few in a pretty box lined with parchment paper, and you’ve got a present that says, “I think you’re wonderful.”
Gathering Your Ingredients
Here’s what you’ll need to create this burst of citrus heaven. The beauty is in its simplicity!
- For the Crust:
- 4 tablespoons (1/2 stick) unsalted butter, melted and cooled, plus extra for greasing
- 2/3 cup almond flour or ground walnuts
- 1 cup (4 oz) graham cracker crumbs
- 1/4 teaspoon sugar
- 1 tablespoon fresh lime zest
- For the Filling:
- 2 large egg yolks
- 1 can (14 oz) sweetened condensed milk
- 1/2 cup fresh lime juice (about 5 medium limes)
- 2 tablespoons fresh lemon juice (about 1 medium lemon)
Smart Substitution Options
Don’t have every ingredient? No problem! Here are some easy swaps:
- Nut Flour: Almond flour and ground walnuts are interchangeable here. You can also use store-bought graham cracker crumbs only for a simpler crust—just use 1.5 cups total and add the zest.
- Citrus: Out of limes? Use all lemon juice (3/4 cup total). For a unique twist, try Meyer lemon juice for a sweeter, less acidic flavor.
- Dairy-Free: Use a plant-based butter stick and vegan sweetened condensed coconut milk. The texture will be slightly different but still delicious.
- Gluten-Free: Ensure your graham cracker crumbs are certified gluten-free, or substitute with crushed gluten-free shortbread cookies.
Crafting Your Creamy Lemon Squares: A Step-by-Step Journey
Step 1: Preparing Your Pan and Oven
First things first, preheat your oven to 350°F (175°C). Now, let’s get that pan ready. Take an 8-inch square baking dish and give it a good buttering. This isn’t just a formality—it’s your insurance policy for perfect, clean removal later. Next, line the bottom with a sheet of parchment paper, letting about 2 inches hang over each side. These “handles” will be your best friend when it’s time to lift out the whole slab of lemony goodness. You’ll thank yourself later, I promise!
Step 2: Making the Nutty, Zesty Crust
In a medium bowl, combine your almond flour (or ground walnuts), graham cracker crumbs, that tiny bit of sugar, and the fragrant lime zest. Stir them together and breathe in that citrusy, sweet aroma. Now, pour in the melted, cooled butter. Mix it until every crumb is moistened and the mixture looks like wet sand. Dump it into your prepared pan and use your fingers or the bottom of a cup to press it firmly and evenly across the bottom and about an inch up the sides. Bake this for 8 to 12 minutes until it’s just lightly golden and smells toasty. Then, let it cool completely—about 30 minutes. A cold crust is key for the right texture contrast.
Step 3: Whisking Up the Magical Filling
While the crust cools, let’s make the magic happen. In a large bowl, place the two egg yolks and the entire can of sweetened condensed milk. Whisk them together until they’re smooth and beautifully pale yellow. Now, for the star of the show: slowly whisk in the fresh lime and lemon juice. Watch as the mixture instantly thickens and becomes luxuriously creamy—this is the chemical magic of citrus and dairy at work! Pro tip: Use freshly squeezed juice. The bottled stuff just doesn’t have the same bright, vibrant flavor. Pour this luscious filling over your cooled crust and gently tilt the pan to spread it evenly to the edges.
Step 4: Baking, Cooling, and the Big Reveal
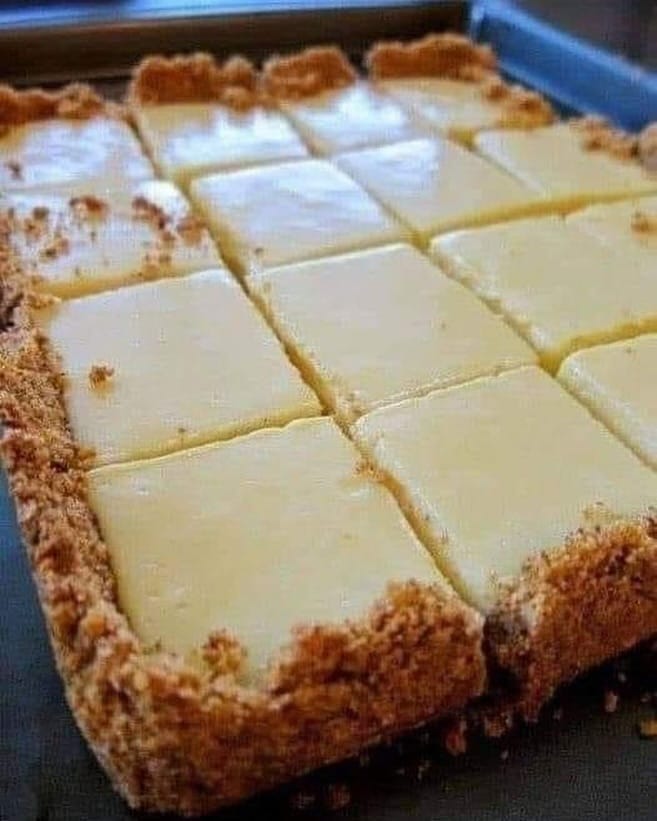
Slide the pan back into the oven. Bake for about 15 minutes. The filling won’t brown, but it will set. It should be firm to a gentle touch in the center. Place the pan on a wire rack and let it cool to room temperature. This patience is important! Once cooled, cover it and refrigerate for at least one hour, though overnight is even better. This chilling firms everything up perfectly. When ready to serve, use those parchment paper handles to gently lift the entire square out onto a cutting board. Chef’s tip: Use a sharp, thin serrated knife, and wipe it clean with a damp paper towel between each cut. This gives you those stunning, clean-edged squares that look professionally made.
Your Creamy Lemon Squares Timeline
Let’s break down the clock so you can plan your baking bliss:
- Prep Time: 20 minutes (plus 30 minutes crust cooling)
- Cook Time: 27 minutes total (crust + filling)
- Chill Time: 1 hour minimum (overnight is best)
- Total Time: About 2 hours, 17 minutes (not including extended chilling)
- Yields: 16 perfect little squares of joy
The Chef’s Secret for the Silkiest Filling
Here’s my little secret for an extra-silky, professional texture: strain your citrus juice. After you squeeze your limes and lemons, pour the juice through a fine-mesh sieve to catch any pulp or seeds. This ensures your filling is flawlessly smooth, without any tiny bitter bits. It’s a simple 30-second step that makes a world of difference in the final mouthfeel.
A Zesty Fact: The Power of Condensed Milk
That can of sweetened condensed milk is the hero of this recipe. Invented in the 19th century as a way to preserve milk without refrigeration, it’s milk that has had about 60% of its water removed and is heavily sweetened. When combined with acid (like our citrus juice), it thickens naturally without needing to be cooked on the stove—a process called “chemical cooking.” This is why our filling sets so beautifully with just a short bake. It’s a brilliant bit of food science in your kitchen!
Your Simple Toolkit
You don’t need fancy gear! Just gather:
- 8-inch square baking dish (metal or glass)
- Mixing bowls (one medium, one large)
- Whisk
- Microplane or fine grater (for zesting)
- Juicer or reamer (for juicing)
- Fine-mesh sieve (optional, but recommended)
- Serrated knife and cutting board
Keeping Your Squares Fresh and Fabulous
Proper storage is key to maintaining the perfect texture of your creamy lemon squares. These treats are best enjoyed within a few days, but they’re so good they rarely last that long!
First, always store them in the refrigerator. Place the squares in a single layer in an airtight container. If you need to stack them, separate the layers with sheets of parchment or wax paper to prevent sticking and protect the delicate tops. The fridge will keep them firm and fresh for up to 5 days.
For longer storage, you can freeze them. Arrange the fully cooled and cut squares on a parchment-lined baking sheet and freeze until solid—about 2 hours. Then, transfer the frozen squares to a freezer-safe bag or container. They will keep for up to 2 months. Thaw overnight in the refrigerator before serving. This is a fantastic way to always have a delicious dessert on hand for unexpected guests!
Tips and Advice for Baking Success
- Room Temp is Your Friend: Let your egg yolks and condensed milk sit out for 15 minutes before mixing. This helps them blend more smoothly.
- Zest First, Juice Later: Always zest your citrus before you juice them. It’s nearly impossible to zest a squeezed-out lime!
- The Chill is Non-Negotiable: Don’t try to cut these before they’re fully chilled. The clean, neat slices depend on it.
- Graham Cracker Crumb Hack: No store-bought crumbs? Pulse about 9 full-sheet graham crackers in a food processor until fine.
Presentation Ideas to Make Them Shine
Dress these beauties up for any party!
- Dust the tops with a light snowfall of powdered sugar just before serving.
- Add a tiny twist of fresh lime zest or a thin curl of lemon peel on top of each square.
- Serve on a platter lined with edible flowers or lemon leaves for a stunning, natural look.
- For individual servings at a sit-down dinner, plate each square with a dollop of lightly sweetened whipped cream and a fresh berry.
6 Delicious Recipe Variations to Try
Love this recipe? Mix it up with these fun twists:
- Coconut-Lime Dream: Add 1/2 cup of toasted coconut flakes to the crust mixture and use all lime juice. Top finished squares with more toasted coconut.
- Berry Swirl Surprise: Before baking, drop small spoonfuls of seedless raspberry or strawberry jam onto the filling and gently swirl with a toothpick for a marbled effect.
- Ginger Snap Crust: Replace the graham crackers with crushed ginger snap cookies for a spicy, warm crust that pairs wonderfully with the citrus.
- Meyer Lemon & Thyme: Use all Meyer lemon juice and add 1 teaspoon of finely chopped fresh thyme to the crust for an herby, sophisticated note.
- Chocolate-Dipped Delight: Once chilled, dip one corner of each square into melted dark chocolate and let it set on parchment paper. Elegant and decadent!
- Mini Tartlets: Press the crust mixture into mini muffin tins to form cups. Bake, cool, then fill and bake again for adorable, two-bite individual desserts.
Common Mistakes to Avoid With Creamy Lemon Squares
Mistake 1: Using Bottled Citrus Juice
This is the number one flavor killer. Bottled lime or lemon juice often contains preservatives and lacks the fresh, vibrant acidity of freshly squeezed fruit. Your squares will taste flat and vaguely artificial. Always take the few extra minutes to zest and juice real lemons and limes. The difference in fragrance and taste is not subtle—it’s the soul of the recipe. Your taste buds will know immediately.
Mistake 2: Skipping the Parchment Paper Liner
You might think, “It’s a non-stick pan, I’ll be fine.” Trust me, you won’t. The creamy filling bonds to the pan as it bakes and chills. Trying to pry out the squares without parchment paper will result in a crumbly, broken mess and a frustrating clean-up job. Taking 30 seconds to butter the pan and lay down the parchment with overhanging edges guarantees you can lift out the entire batch in one perfect piece for clean, beautiful cuts.
Mistake 3: Not Letting the Crust Cool Before Adding Filling
Impatience leads to a soggy bottom—and not in a good way! If you pour the cool, liquid filling onto a warm or even hot crust, it starts to “cook” and absorb into the base immediately. This compromises the distinct, crisp textural layer that makes these squares so special. Let the crust cool on a rack for a full 30 minutes after baking. It needs to be completely at room temperature to provide a solid foundation for the creamy layer.
Mistake 4: Overbaking the Filling
We bake the filling to set it, not to cook it through like a cake. The magic thickening happens with the acid and condensed milk. If you leave it in the oven too long (looking for browning or puffing), the filling can become rubbery, weep moisture, or develop a slightly eggy taste. Bake just until the center is set. It should still jiggle slightly as a whole when you gently shake the pan, but your finger should leave no indentation when you touch the center lightly.
Mistake 5: Cutting With the Wrong Knife and Not Cleaning It
A blunt knife or a straight-edged chef’s knife will crush the crust and drag the creamy filling, creating ragged, messy edges. A sharp, thin serrated knife used with a gentle sawing motion is perfect. Most importantly, wipe the blade clean with a damp paper towel after every single cut. This removes any sticky filling buildup, ensuring each subsequent cut is as clean and picture-perfect as the first.
Your Creamy Lemon Squares Questions, Answered
Can I make these creamy lemon squares ahead of time?
Absolutely, and I highly recommend it! These squares actually taste better the next day. The flavors have more time to meld and the texture firms up perfectly. You can bake and cool them completely, then cover the pan tightly with plastic wrap and refrigerate for up to 2 days before cutting and serving. For longer storage, see the freezing instructions in the storage section. Making them ahead takes the pressure off when you’re hosting.
Why is my filling not setting? It’s still runny after baking and chilling.
A runny filling usually points to one of two issues. First, you may not have baked it long enough. Even though it sets quickly, 15 minutes is a guideline—your oven might run cool. Bake until the center is no longer liquid and looks matte, not glossy. Second, and more likely, is inaccurate measuring of the citrus juice. If you used significantly less than 1/2 cup lime + 2 tbsp lemon, there wasn’t enough acid to react with the condensed milk. Always use a liquid measuring cup for the juice. If it’s still too soft after proper chilling, it will still taste delicious—just serve it with a spoon!
Can I use whole eggs instead of just egg yolks?
I don’t recommend it for this specific recipe. The egg yolks provide a rich, custardy fat that creates the signature dense, creamy texture. Egg whites contain more water and protein, which would make the filling lighter, potentially spongy, and could cause it to weep or separate. If you only have whole eggs, you could use one whole egg in place of the two yolks, but the texture and color will be different—less rich and less yellow. Save the whites for a meringue or an omelet!
My crust is too crumbly and falls apart when I cut. What happened?
A crumbly crust typically needs more “glue.” This could mean you didn’t incorporate the melted butter evenly, or you might have packed the crust too loosely into the pan. Make sure every crumb is coated with butter before pressing. When you press it into the pan, use firm, even pressure with the bottom of a cup or measuring cup. Really compact it, especially in the corners and up the sides. A well-packed crust holds together beautifully when cut.
Is there a way to make these less sweet?
The sweetened condensed milk is inherently very sweet, so reducing sugar is tricky. However, you can balance the sweetness by increasing the tartness. Use all fresh lemon juice instead of the lime-lemon mix, as lemon is generally more tart. You could also add an extra tablespoon of citrus juice. Another option is to use a low-fat or a “less sugar” version of sweetened condensed milk if you can find it. Finally, avoid dusting with powdered sugar before serving, and the bright citrus will shine through more.
What’s the best way to zest a lime without a microplane?
No microplane? No problem! The small holes on a standard box grater work just fine—use the side with the smallest holes. Be careful of your knuckles! You can also use a vegetable peeler to peel off thin strips of just the green zest (avoid the white pith, it’s bitter), and then very finely chop those strips with a knife. The goal is tiny, fragrant flecks, not chunks. Remember, zest before you juice the fruit!
Can I double this recipe for a crowd?
Yes, you can easily double it for a 9×13 inch rectangular baking dish. Simply double all the ingredients. The crust may need a minute or two longer to bake to a light golden brown. For the filling, baking time in the larger pan might be closer to 18-20 minutes—still watch for the center to be set. All other instructions remain the same. This is a fantastic way to feed a party!
Why did my filling crack on top?
A few small surface cracks are normal and nothing to worry about—they often vanish under a dusting of powdered sugar. Significant cracking usually means the squares were overbaked. The proteins in the eggs and milk tighten too much when cooked too long or at too high a temperature, causing them to contract and split. Ensure your oven temperature is accurate with an oven thermometer, and stick to the minimum baking time, checking for set-ness rather than waiting for browning.
Are these creamy lemon squares the same as lemon bars?
They’re close cousins! Traditional lemon bars often have a shortbread-like crust and a filling that’s more like a lemon curd, made with whole eggs, sugar, and butter cooked on the stove or baked longer. This recipe is a simpler, no-cook-curd version. The crust is nuttier and crispier thanks to the graham crackers, and the filling is denser, creamier, and sets via the chemical reaction with condensed milk. It’s a easier, foolproof method with a uniquely lush texture.
How do I get really clean, sharp corners when cutting?
Clean corners are all about the knife and the chill. First, ensure the squares are fully chilled—overnight is ideal. Use a sharp, thin serrated knife. Start by making one long, clean cut down the middle to create two rectangles. Then cut each rectangle into bars. Don’t press straight down; use a gentle back-and-forth sawing motion. And the golden rule: wipe the knife blade clean with a damp, hot paper towel after every single cut. This keeps the creamy filling from smearing and ensures every square is a masterpiece.
The Final Slice
So there you have it—my go-to recipe for pure, unadulterated joy in a square. These creamy lemon squares are more than just a dessert; they’re a little kitchen project that’s guaranteed to bring smiles. They’ve saved my potluck reputation, been the star of countless family dinners, and have even mended a bad day or two. I hope you’ll give them a try and make them your own. Grab those limes, squeeze with gusto, and get ready for the compliments to roll in. Happy baking!
Pumpkin Pecan Delight
Ingredients
Equipment
Method
- Preheat your oven to 350°F (175°C) and grease an 8-inch square baking dish.
- Line the bottom with parchment paper, letting the edges hang over.
- In a medium bowl, mix almond flour (or ground walnuts), graham cracker crumbs, sugar, and lime zest.
- Add the melted butter and mix until combined.
- Press the mixture firmly into the bottom and up the sides of the prepared pan.
- Bake for 8 to 12 minutes until lightly golden, then let cool for about 30 minutes.
- In a large bowl, whisk together egg yolks and sweetened condensed milk until smooth.
- Gradually whisk in lime and lemon juice until the mixture is creamy.
- Pour the filling over the cooled crust and spread evenly.
- Bake for about 15 minutes until the filling is set.
- Cool to room temperature, then refrigerate for at least one hour before serving.
- Use parchment paper to lift out the squares onto a cutting board and cut into pieces.