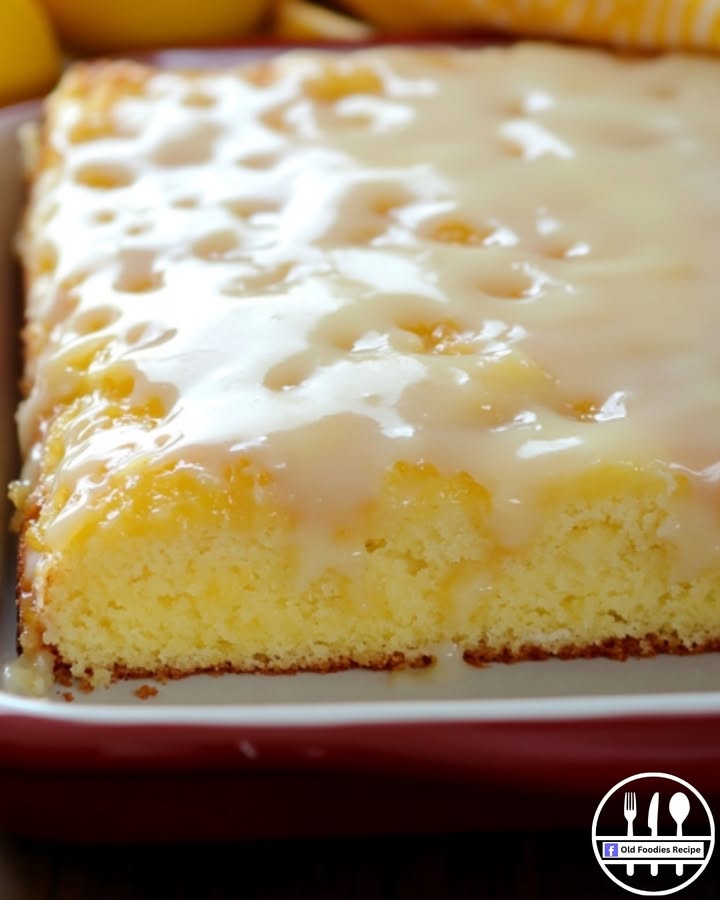
Lemonies: Your New Favorite Zesty Lemon Brownies
Let me tell you, I thought I had tried every sweet treat under the sun. Then, a friend brought over a pan of something she called “Lemonies.” One bite and I was hooked. They weren’t dark chocolate brownies, of course, but they had that same wonderfully dense, fudgy texture. Instead of rich cocoa, they burst with bright, sunny lemon flavor. It was pure magic in a square. I knew right then I had to master the recipe. Now, it’s my go-to for whenever I need a dessert that makes everyone’s eyes light up.
A Bite of Sunshine: The Story Behind Lemonies
The classic brownie is a chocolate lover’s dream, but a few clever bakers asked a brilliant question: what if we swapped the cocoa for citrus? Thus, the “lemon brownie” or “Lemonie” was born. It’s a modern twist that takes the beloved chewy, soft texture we adore and gives it a sunny makeover. It’s less about a deep history and more about delicious innovation. In my kitchen, they’ve become a tradition of their own—a sign that spring has sprung, or that we need a little extra cheer on a rainy day.
Why You’ll Fall Head Over Heels for This Lemon Brownie Recipe
You’ll love this recipe because it’s incredibly simple but tastes like you spent hours. The flavor is a perfect balance: not too sweet, with a wonderful tang from fresh lemon. The texture is the real star—dense, moist, and slightly gooey, just like a perfect brownie should be. They are also so quick to whip up! You probably have all the ingredients in your pantry right now. Plus, that glossy lemon glaze on top? It adds an extra punch of flavor and makes them look so professional.
The Best Moments to Bake a Batch of Lemonies
Lemonies are the perfect versatile dessert. Here are my favorite times to bake them:
- Spring and Summer Gatherings: Their bright flavor is ideal for picnics, BBQs, and garden parties.
- After-School or Work Treat: A small square with a cup of tea is the perfect pick-me-up.
- Potlucks and Bake Sales: They travel well, don’t need refrigeration immediately, and always get rave reviews.
- Just Because: Sometimes, you just need a little sunshine on a plate on a random Tuesday.
What You’ll Need: Lemonies Ingredients
The ingredient list is beautifully short. Gathering everything before you start is my secret for stress-free baking.
For the Lemon Brownies:
- 1 cup all purpose flour
- 1 cup granulated sugar
- ¼ teaspoon salt
- ½ cup (1 stick) butter, softened
- 2 large eggs, room temperature
- 2 tablespoons fresh lemon juice
- 1 teaspoon lemon zest, grated
For the Lemon Glaze:
- 1 cup powdered sugar
- 2 tablespoons lemon juice
- 1 teaspoon lemon zest
No Problem! Handy Ingredient Substitutions
Out of something? Don’t worry, here are some easy swaps:
- Butter: You can use an equal amount of margarine. For a dairy-free version, a good vegan butter works well.
- Fresh Lemon Juice: In a pinch, bottled lemon juice will work, but fresh gives the best, brightest flavor.
- All-Purpose Flour: For a gluten-free version, use a 1:1 gluten-free baking flour blend.
Baking Your Perfect Pan of Lemonies
Ready to make your kitchen smell amazing? Let’s get started.
Step 1: Prep Your Pan and Oven
First, turn your oven on to 350°F (180°C). This gives it time to get perfectly hot. While it heats, grab your 8-inch square baking pan. Grease it lightly with butter or a spray, or line it with parchment paper. I love parchment paper because you can just lift the whole batch out for easy glazing and cutting later. A little prep now saves a big mess later!
Step 2: Mix the Dry Ingredients
In a large mixing bowl, whisk together the flour, granulated sugar, and salt. You want to see everything evenly distributed—no little clumps of flour hiding. The sugar and salt will look like tiny crystals mixed in with the soft, white flour. Whisking them first helps ensure your lemon brownie batter will be smooth and uniform, which is key for that perfect, even texture.
Step 3: Combine the Wet Ingredients
In a separate medium bowl, crack in the two eggs. Use your whisk to beat them until the yolks and whites are just combined. Now, add the fresh lemon juice and grated lemon zest. The smell when you zest the lemon is incredible! It’s like bottled sunshine. As you whisk, the mixture will turn a lovely pale yellow and become slightly frothy. Pro tip: Room temperature eggs mix in more smoothly, making for a better batter.
Step 4: Bring the Batter Together
Pour your egg and lemon mixture into the bowl with the dry ingredients. Add the softened butter in chunks as well. Now, start whisking! Go from the center outwards, pulling the dry ingredients into the wet. Keep going until you have a thick, smooth, and glossy batter. It should be a beautiful creamy yellow color with little specks of lemon zest visible. You shouldn’t see any streaks of flour or butter when you’re done.
Step 5: Bake to Golden Perfection
Pour the thick batter into your prepared pan. Use a spatula to spread it into an even layer, getting it right into the corners. Slide the pan into your preheated oven. Bake for about 25 minutes. You’re looking for the edges to just start pulling away from the pan and the top to turn a light, golden color. A toothpick inserted near the center should come out with just a few moist crumbs, not wet batter. Chef’s tip: Do not overbake! These lemonies set up as they cool, so they should seem a tiny bit underdone when you take them out.
Step 6: Cool and Prepare the Glaze
Take the pan out and let it cool completely on a wire rack. This might be the hardest part—waiting! While it cools, make the simple glaze. In a small bowl, combine the powdered sugar, lemon juice, and lemon zest. Stir with a spoon or small whisk until it’s completely smooth and has a thick, pourable consistency. If it’s too thick, add a tiny drop more lemon juice. Too thin? Add a bit more powdered sugar.
Step 7: Glaze, Set, and Serve!
Once the lemon brownies are completely cool, pour the glaze over the top. Tilt the pan gently to help it spread, or use an offset spatula for a neat, even layer. Now, let the glaze set for at least 30 minutes. You’ll see it go from shiny-wet to a lovely, firm, matte finish. Finally, use a sharp knife to cut them into squares. Wiping the knife clean between cuts gives you beautifully clean edges for picture-perfect lemonies.
Your Lemon Brownie Timeline
Here’s a quick look at how your time will be spent:
- Prep Time: 15 minutes (mostly zesting and juicing!)
- Cook Time: 25 minutes
- Cooling & Glaze Setting Time: 1 hour
- Total Time: 1 hour 40 minutes
My Secret for the Most Lemony Flavor
The secret is in the zest! Before you even juice your lemons, zest them. The fragrant oils in the yellow part of the peel (the zest) hold the most intense lemon flavor. Rubbing the sugar with the zest before mixing can help release even more of those oils. But honestly, just making sure you use both zest AND juice in both the brownie and the glaze is the key to a flavor that’s bold and bright, not just sour.
A Zesty Little Fact
Did you know a lemon can produce about 3 tablespoons of juice? That’s why this recipe usually calls for one large, juicy lemon for both the brownies and the glaze. Roll your lemon on the counter firmly with the palm of your hand before cutting and juicing—it helps break down the membranes inside so you get every last precious drop!
Gear You’ll Need in Your Kitchen
No fancy equipment needed!
- 8-inch square baking pan
- Large mixing bowl
- Medium mixing bowl
- Whisk
- Spatula
- Microplane or fine grater (for zesting)
- Juicer or a fork (for juicing)
- Wire cooling rack
Keeping Your Lemonies Fresh and Delicious
Because of the glaze, the best way to store lemonies is in a single layer. Place them in an airtight container separated by parchment paper if you need to stack them. They can sit at room temperature for up to 2 days.
For longer storage, you can keep them in the refrigerator. The cool environment will firm them up even more and they’ll stay fresh for about 5-7 days. Let them come to room temperature for about 15 minutes before serving for the best texture and flavor.
Yes, you can freeze them! Freeze the unglazed brownie slab whole, tightly wrapped. Or, freeze individual glazed squares on a baking sheet before transferring to a freezer bag. Thaw at room temperature. If you froze them unglazed, simply make your fresh glaze and apply it after thawing.
My Top Tips for Lemon Brownie Success
- Fresh is Best: Always use fresh lemon juice and zest. It makes a world of difference in flavor.
- Room Temp Matters: Softened butter and room-temperature eggs create a smoother, more emulsified batter.
- Don’t Overmix: Once you add the flour, mix just until combined. Overmixing can lead to tough brownies.
- Cool Completely: I know it’s hard, but glazing a warm brownie will cause the glaze to melt and slide right off.
Pretty Ways to Present Your Lemon Brownies
- Dust with a little extra powdered sugar right before serving.
- Place each square on a small, colorful napkin or dessert plate.
- Garnish with a tiny, fresh raspberry or blueberry on top.
- Add a thin twist of lemon peel on the side for a fancy touch.
6 Fun Twists on the Classic Lemonie Recipe
Once you’ve mastered the basic recipe, try these tasty variations!
- Blueberry Lemon Swirl: Fold ½ cup of fresh blueberries into the batter before baking for juicy bursts of berry flavor.
- Coconut Lemon Dream: Add ½ cup of shredded sweetened coconut to the batter and sprinkle a little on top of the glaze.
- Lavender Lemon Elegance: Add ½ teaspoon of culinary dried lavender to the dry ingredients for a subtle floral note.
- Lemon Poppyseed: Stir 1 tablespoon of poppy seeds into the batter for a delightful little crunch in every bite.
- Cream Cheese Swirl: Drop spoonfuls of sweetened cream cheese mixture onto the batter and swirl with a knife before baking.
- Iced Tea Lemonies: Add 1 tablespoon of powdered iced tea mix (like lemon-flavored) to the dry ingredients for an extra zing.
Common Mistakes to Avoid When Making Lemon Brownies
Mistake 1: Using Cold Butter and Eggs
This is probably the number one reason batter can look curdled or separate. Cold butter won’t blend smoothly into the flour, and cold eggs won’t emulsify properly. Your batter should be creamy, not lumpy. Always plan ahead and take your butter and eggs out about an hour before you bake. If you forget, you can quickly warm eggs in a bowl of warm water. For butter, microwave it in short bursts at low power until just soft, not melted.
Mistake 2: Overbaking the Pan
Lemonies are meant to be dense and fudgy, not cakey and dry. Because they continue to cook and set as they cool, taking them out at the perfect moment is key. If you wait until a toothpick comes out completely clean, they’ll be overdone. Look for visual cues: golden edges and a top that’s set but not hard. The toothpick test should yield a few moist crumbs clinging to it. Remember, they firm up a lot as they cool on the rack.
Mistake 3: Glazing While Warm
It’s so tempting to speed up the process, but pouring that beautiful glaze onto a warm brownie is a recipe for disaster. The heat will melt the powdered sugar, causing the glaze to become thin, runny, and soak right into the top. Instead of a lovely white, set frosting, you’ll get a sticky, transparent mess. Practice patience. Let the pan cool completely on a wire rack. This ensures the glaze sits perfectly on top and sets with a gorgeous finish.
Mistake 4: Not Zesting the Lemon Properly
If you skip the zest or use dried zest from a jar, you’re missing out on the true magic. The vibrant lemon oil is in the zest, not the juice. The juice gives tang, but the zest gives that deep, fragrant lemon flavor. Also, be sure to only grate the bright yellow skin. The white pith underneath is bitter and can ruin the taste of your lovely lemon brownies. A fine Microplane grater is the perfect tool for this job.
Your Lemon Brownie Questions, Answered
Can I double this lemon brownie recipe?
Absolutely! Doubling the recipe works perfectly. You will need to use a larger baking dish, like a 9×13 inch pan. Keep a close eye on the baking time, as it may need a few extra minutes. To test, still use the toothpick method—look for moist crumbs, not wet batter. The golden edges and a set top are still your best visual guides. A double batch is fantastic for a large party or if you simply want to keep a bigger stash for your family.
Why are my lemonies cakey and not fudgy?
A cakey texture usually means the batter was overmixed after the flour was added, or the lemon brownies were overbaked. When you mix the flour, gluten develops. Too much mixing makes the gluten strong, leading to a tougher, more bread-like texture. Mix just until you no longer see dry flour streaks. Also, double-check your oven temperature with an oven thermometer. An oven that runs hot will bake them faster and dry them out, stealing that wonderful dense, fudgy quality we love.
Can I make these lemon brownies without the glaze?
You sure can! The lemon brownies are delicious all on their own. They will be slightly less sweet and the lemon flavor will be a bit more subtle without the sugary punch of the glaze. If you skip it, you might want to dust the top with a little powdered sugar before serving for a pretty finish. Some people even enjoy them plain with a dollop of whipped cream or a scoop of vanilla ice cream on the side. The glaze adds shine and extra flavor, but it’s not a must for a tasty treat.
My glaze is too runny/thick. How do I fix it?
Glaze consistency is easy to adjust. The perfect glaze should be thick enough to coat the back of a spoon but thin enough to pour and spread easily. If it’s too runny, simply add more powdered sugar, a tablespoon at a time, and stir until it thickens up. If it’s too thick and pasty, add more liquid. Start with just a few drops of extra lemon juice (or even milk or water) and stir vigorously. Go slowly, as it’s much easier to thin a glaze than to thicken it back up again.
How do I get clean cuts without ruining the glaze?
This is a common frustration. The trick is a very sharp knife and a quick cleaning method. Use a long, sharp chef’s knife or a serrated knife. After each cut, wipe the blade completely clean with a damp paper towel or cloth. This removes any sticky glaze and batter bits that would otherwise drag and tear the beautiful top of your next square. For the absolute cleanest cuts, you can even chill the glazed brownie slab in the fridge for 20 minutes before cutting.
Can I use bottled lemon juice instead of fresh?
While fresh lemon juice is highly recommended for the brightest flavor, bottled lemon juice will work in a pinch. The taste difference is noticeable—bottled juice can have a slightly flatter, more processed taste and may lack the vibrant aroma of fresh. If you must use bottled, be extra sure to use plenty of fresh lemon zest in both the brownie and the glaze. The zest will help make up for the lack of fresh juice flavor. For the best results, fresh is always the winner.
What’s the best way to zest a lemon?
The best tool is a fine Microplane grater or zester. Wash and dry your lemon first. Gently rub the lemon against the tiny blades, turning it as you go. You only want the bright yellow outer skin. The white pith underneath is bitter. If you don’t have a Microplane, the smallest holes on a box grater will work. Be careful of your knuckles! You can zest the lemon directly over your mixing bowl to catch every bit of those precious, oily citrus specks.
Are lemon brownies supposed to be gooey in the middle?
They should be dense, moist, and fudgy, but not raw or liquidy in the center. When you do the toothpick test, you want it to come out with a few sticky, moist crumbs attached. If it comes out with wet, batter-like goo, they need a few more minutes. Remember, they continue to set up as they cool. So that perfect “just baked” fudginess will become the ideal chewy texture once they’ve cooled and been glazed. It’s a fine line between underbaked and perfectly fudgy.
Can I add other citrus flavors?
This recipe is wonderful for experimenting with other citrus fruits! You can make “Lime-ies” with lime juice and zest for a more tropical twist. Orange brownies would be sweeter and mellower—use orange juice and zest. For a grown-up version, a tiny bit of grapefruit zest could be interesting. Just keep the total amount of liquid the same. The acidity in different citrus fruits can vary, so the flavor profile will change, but the basic method remains the same. Have fun with it!
How far in advance can I make these for a party?
Lemonies are a great make-ahead dessert. You can bake the brownie slab, let it cool, wrap it tightly, and store it at room temperature for one day before glazing. Or, you can freeze the unglazed slab for up to a month. The day before or the morning of your event, thaw (if frozen), make your fresh glaze, apply it, and let it set. Fully glazed, they hold up beautifully at room temperature for 1-2 days. This makes them a stress-free, perfect choice for entertaining.
Go Bake Some Sunshine!
So there you have it—everything you need to bake a pan of these incredible, sunshiny lemon brownies. They really are such a joyful treat. Simple enough for a beginner, but impressive enough for any special occasion. I hope you give them a try and that they bring as many smiles to your kitchen as they have to mine. Now, go grab those lemons and get baking. Your new favorite dessert is waiting!
Vanilla Custard Squares
Ingredients
Equipment
Method
- Preheat your oven to 350°F (180°C) and grease an 8-inch square baking pan or line it with parchment paper.
- In a large mixing bowl, whisk together the flour, granulated sugar, and salt until evenly combined.
- In a separate medium bowl, whisk the eggs until just combined, then add the lemon juice and zest until frothy.
- Pour the egg mixture into the dry ingredients, then add the softened butter in chunks. Whisk until a thick, smooth batter forms.
- Pour the batter into the prepared pan, spreading it evenly into the corners.
- Bake for about 25 minutes until the edges are golden and a toothpick inserted in the center comes out with a few moist crumbs.
- Allow the brownies to cool completely on a wire rack.
- In a small bowl, combine powdered sugar, lemon juice, and lemon zest for the glaze; mix until smooth.
- Pour the glaze over the cooled brownies, spreading it evenly. Let it sit for at least 30 minutes to set.
- Once set, cut the brownies into squares using a sharp knife.