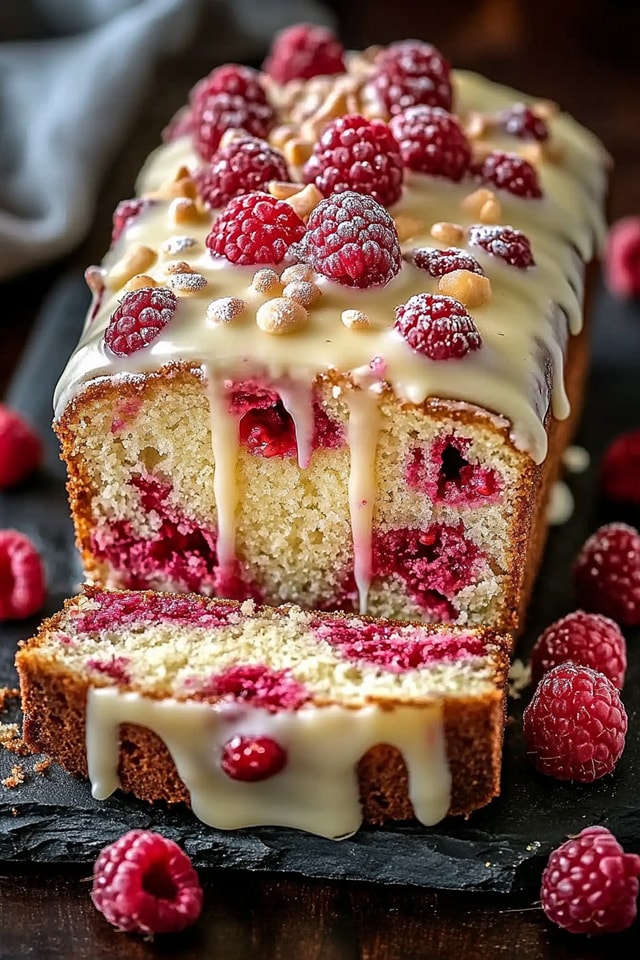
Heavenly White Chocolate Raspberry Cake: A Slice of Sweet Bliss
Have you ever had a cake so good it feels like a hug? That’s this cake. I first made it for my best friend’s bridal shower, desperate to impress her very fancy mother-in-law. The moment that white chocolate drizzle hit the warm, berry-studded loaf, I knew I had a winner. The room went quiet, then filled with happy sighs. It’s now my most requested treat. It’s not just a dessert; it’s a mood-lifter on a plate.
A Little Story Behind This Sweet Treat
This cake is my own happy accident! It started as a classic pound cake recipe from my grandma’s tattered cookbook. One summer, my raspberry bushes went wild, and I had a bar of white chocolate begging to be used. I threw them both into the batter, thinking, “Well, this will either be terrible or terrific.” Spoiler: It was terrific! It blends the homey comfort of a traditional loaf cake with a luxurious, modern twist. The tart pop of raspberry cutting through the sweet, creamy white chocolate feels both classic and brand new.
Why You Will Absolutely Adore This Raspberry Cake
You’ll love this recipe because it’s secretly simple but looks and tastes like you spent all day in a fancy bakery. The texture is wonderfully moist and tender. Every bite has a surprise burst of juicy raspberry. The sweet white chocolate glaze on top makes it extra special. It’s the perfect balance of flavors—not too sweet, not too tart. Plus, baking it in a loaf pan means no fancy layers to stack. It’s a forgiving recipe for bakers of all levels.
Perfect Occasions for Your Heavenly Cake
This cake is your new go-to for any gathering that needs a touch of sweetness. It’s elegant enough for a Mother’s Day brunch or an afternoon tea party. It’s cozy enough for a weekend family dessert. I’ve brought it to potlucks, book clubs, and even packaged slices for new neighbors. It’s a fantastic alternative to birthday cake or a stunning centerpiece for a holiday dessert table. Honestly, Tuesday night is a perfect occasion too!
Gathering Your Ingredients
Here’s what you’ll need to create this little piece of heaven. Having everything at room temperature (butter, eggs, milk) is the first secret to success!
- 1 ½ cups all-purpose flour
- 1 ½ teaspoons baking powder
- ½ teaspoon salt
- ½ cup unsalted butter, softened
- 1 cup granulated sugar
- 2 large eggs
- 1 teaspoon vanilla extract
- ½ cup milk
- 1 cup fresh raspberries
- 1 cup white chocolate, melted (for drizzle and cake)
No Problem! Handy Substitution Options
Don’t have an ingredient? No worries! Here are some easy swaps:
- Raspberries: Frozen raspberries work great! Do not thaw them—toss them in a bit of flour from the recipe to prevent sinking.
- Milk: Any milk you have—whole, 2%, or even a plain non-dairy milk like almond or oat.
- White Chocolate: High-quality white chocolate chips or a bar chopped up are best. In a pinch, you can use a vanilla almond bark, but the flavor will be different.
Let’s Bake: Your Step-by-Step Guide to Perfection
Step 1: Preheat & Prepare the Pan
First, get your oven warming up to a cozy 350°F (175°C). This ensures it’s perfectly hot when your batter is ready. Next, take your 9×5-inch loaf pan. Grease it generously with butter or baking spray. Then, dust it lightly with flour, tapping out the excess. This creates a non-stick barrier so your beautiful cake releases easily. A well-prepped pan is the best start!
Step 2: Mix Dry Ingredients
Grab a medium bowl. Add your fluffy all-purpose flour, baking powder, and salt. Now, take your whisk and give them a good, airy mix. Whisking does two important jobs. It combines everything evenly so you get a uniform crumb. More importantly, it aerates the flour, making your cake lighter. You should see the mixture become one uniform, pale color. Set this bowl aside for its grand entrance later.
Step 3: Cream Butter & Sugar
This is the magic step! In a large mixing bowl, beat your softened butter and granulated sugar together. Use an electric mixer on medium speed. Beat it for a good 3-5 minutes. You want it to become pale, fluffy, and almost creamy. It should look much lighter in color. Now, add your eggs one at a time. Beat well after each egg until it’s fully mixed in. Finally, pour in that lovely vanilla extract. Your kitchen will start to smell amazing already.
Pro tip: Your butter is perfectly soft when you can press your finger into it easily and leave a clear dent. Not melted, just soft!
Step 4: Combine Wet & Dry Ingredients
Time to bring the team together! With your mixer on low speed, add about one-third of your flour mixture to the butter bowl. Mix until it just disappears into the batter. Then, pour in half of your milk. Mix again. Repeat: flour, the rest of the milk, then the final portion of flour. Mix only until you stop seeing streaks of flour. Overmixing here is the enemy of a tender cake! The batter will be thick, lush, and beautifully smooth.
Step 5: Fold in Additions
Now for the fun part! Take half of your melted white chocolate and all of those gorgeous red raspberries. Add them to the batter. Put away your mixer. Use a gentle folding motion with a rubber spatula. Slide the spatula down the side of the bowl, lift, and turn over. You want to evenly distribute the berries and chocolate without crushing them. This gentle method keeps the batter light and protects the fruit. You’ll see lovely red swirls and white chocolate streaks forming.
Step 6: Bake to Golden Perfection
Carefully scrape every bit of your gorgeous batter into your prepared loaf pan. Use your spatula to smooth the top into an even layer. Place it in the center of your preheated oven. Now, the hard part: wait! Bake for 60-70 minutes. Start checking at 60 minutes. Your sign it’s done? The top will be a deep golden brown, and a toothpick poked right in the center will come out clean, maybe with a few moist crumbs, but no wet batter.
Step 7: Cool & Decorate
When your cake is perfectly baked, take it out. Let it rest in the pan on a wire rack for 10 minutes. This lets it firm up just enough so it won’t break. Then, run a knife around the edges and turn it out onto the rack to cool completely. Once it’s totally cool, re-melt the rest of your white chocolate. Drizzle it artistically over the top with a spoon or fork. Add a few fresh raspberries for a pop of color. Now, try to resist slicing it immediately!
Chef’s tip: For perfect drizzles, let the cake cool completely. Warm cake will make the white chocolate melt right in instead of setting into beautiful lines.
Timing Your Heavenly Creation
- Prep Time: 15 minutes (once you get good at it!)
- Cook Time: 60-70 minutes
- Cooling Time: About 1 hour (the hardest wait)
- Total Time: About 1 hour 45 minutes from start to first bite
My Chef’s Secret for the Best Raspberry Cake
My absolute secret? Toss those raspberries in a tablespoon of the measured flour before folding them in. It sounds too simple, but it works wonders. The light flour coating helps suspend the berries in the batter. This stops them from all sinking to the bottom during baking. You get beautiful, evenly distributed ruby jewels in every single slice.
A Sweet Little Extra Fact
Did you know the raspberry is not a true berry? It’s an “aggregate fruit” made up of many tiny drupelets, each with its own seed. That’s why they have that beautiful clustered look. And white chocolate? It’s not technically chocolate at all! It’s made from cocoa butter, milk solids, and sugar, but contains no cocoa solids. That’s why it has that uniquely sweet, creamy, and mild flavor that pairs so magically with tart fruit.
Necessary Equipment
You don’t need anything fancy! Here’s the short list:
- 9×5-inch loaf pan
- Medium and large mixing bowls
- Electric hand mixer or stand mixer
- Whisk
- Rubber spatula
- Measuring cups and spoons
- Wire cooling rack
- Toothpick or cake tester
Storing Your White Chocolate Raspberry Cake
After the cake has cooled completely and you’ve added the drizzle, you can store it. The best way is to place it on a cake plate and cover it loosely with a dome or plastic wrap. Make sure the wrap isn’t pressing into the beautiful drizzle. It will stay fresh and moist at room temperature for up to 2 days.
If you want to keep it longer, you can refrigerate it. Place it in an airtight container or wrap it tightly in plastic wrap. Chilling it will keep it fresh for up to 5 days. The texture will become a bit firmer when cold. I like to let a refrigerated slice sit at room temperature for 15 minutes before serving.
This cake also freezes beautifully! Wrap the completely cooled, undecorated loaf tightly in plastic wrap. Then, wrap it again in aluminum foil or place it in a freezer bag. It will keep for up to 3 months. Thaw it overnight in the refrigerator, then bring it to room temperature and add your white chocolate drizzle and fresh berries before serving.
Tips and Advice for Baking Success
- Always use room temperature ingredients. They blend together more smoothly, creating a better texture.
- Do not overmix the batter after adding the flour. Mix just until combined to avoid a tough, dense cake.
- If your raspberries are very large, you can halve them. This makes them easier to fold in and distribute.
- To melt white chocolate, do it gently. Use short bursts in the microwave, stirring in between, or use a double boiler. White chocolate burns easily.
Presentation Ideas to Make It Shine
- Slice it thick and serve on a simple white plate with a dusting of powdered sugar.
- For a dinner party, add a dollop of freshly whipped cream and a single perfect raspberry on the side.
- Drizzle each individual slice with a little extra melted white chocolate right before serving.
- Serve with a small scoop of vanilla bean ice cream for the ultimate dessert.
6 Dreamy Variations to Try
Love this base recipe? Mix it up! Here are six delicious twists.
- Lemon Raspberry Bliss: Add the zest of one lemon to the butter-sugar mixture. The lemon brightens all the flavors beautifully.
- White Chocolate Blueberry: Swap the raspberries for fresh blueberries. A classic, sweet combination.
- Almond Raspberry Cake: Substitute ¼ cup of the flour with almond flour. Add ½ teaspoon almond extract with the vanilla.
- Dark Chocolate Raspberry: Use dark chocolate chunks instead of white chocolate. The deeper flavor is incredibly rich.
- Gluten-Free Version: Use a trusted 1:1 gluten-free flour blend in place of the all-purpose flour. The result is just as tender.
- Mini Loaf Gifts: Bake the batter in four mini loaf pans. Reduce the baking time to about 35-45 minutes. Perfect for gifting!
Common Mistakes to Avoid
Mistake 1: Using Cold Ingredients
Starting with cold butter and eggs straight from the fridge is a common misstep. Cold butter won’t cream properly with the sugar. This means your cake won’t get that light, airy texture we love. Cold ingredients also don’t blend well, leading to a curdled-looking batter. Always plan ahead. Take your butter, eggs, and milk out about an hour before you start baking. Your batter will be smooth and happy.
Mistake 2: Overmixing the Batter
Once you add the flour, it’s time to be gentle. Overmixing develops the gluten in the flour. This makes your cake tough, chewy, and dense instead of soft and tender. Mix the dry and wet ingredients only until the last streak of flour disappears into the batter. It’s okay if it looks a little lumpy. When you fold in the berries and chocolate, use a light hand. Stop as soon as they are evenly distributed.
Mistake 3: Not Testing for Doneness Correctly
Pulling the cake out too early or too late is easy to do. Don’t just rely on the timer or the top looking brown. The top can brown before the center is cooked. Always use the toothpick test. Insert it into the very center of the loaf. If it comes out with wet batter, it needs more time. If it comes out with a few moist crumbs clinging to it, it’s perfect. A completely clean toothpick is also fine, but the moist crumbs mean maximum juiciness.
Mistake 4: Slicing the Cake While Hot
I know the wait is torture! Cutting into a warm cake is so tempting. But if you slice it before it has cooled and set, it will crumble and fall apart. The structure needs time to firm up as it cools. Let it rest in the pan for 10 minutes, then cool completely on a rack. This patience rewards you with neat, beautiful slices that hold their shape. The flavor also develops more as it cools.
Frequently Asked Questions
Can I use frozen raspberries in this cake?
Absolutely, you can! Frozen raspberries work well in this recipe. The key is to use them straight from the freezer. Do not thaw them first. Thawed berries release too much water and can turn your batter a strange color and make it soggy. Right before folding them in, toss the frozen berries in a little bit of the flour from your recipe. This light coating helps prevent them from sinking to the bottom of the pan during baking. Your baking time might need an extra 5 minutes or so.
Why did my white chocolate drizzle sink into the cake instead of staying on top?
This usually happens if the cake is still warm when you drizzle the chocolate. White chocolate has a lower melting point than dark chocolate. The residual heat from a warm cake will melt the drizzle on contact. To get those beautiful, defined lines of chocolate, you must let the cake cool completely. No warmth should be coming from it. You can even pop the cooled cake in the fridge for 15 minutes to make sure the surface is completely set and cool before you add your final decoration.
My cake is very brown on top but not done inside. What happened?
This is often a sign your oven is running too hot, or your pan is in the wrong spot. Oven temperatures can be off. I highly recommend using an inexpensive oven thermometer to check the actual temperature. Also, make sure your rack is in the center position. Baking in the top third of the oven can cause excessive browning. If you see the top browning too quickly, you can loosely tent a piece of aluminum foil over the loaf pan for the last 20-30 minutes of baking. This will shield it and let the center finish cooking without burning the top.
Can I make this recipe into cupcakes or a layer cake?
You sure can! For cupcakes, line a muffin tin with papers and fill each about ⅔ full. The baking time will be much shorter, around 18-22 minutes. For a layer cake, double the recipe and divide the batter between two 8-inch round cake pans that have been greased and lined with parchment paper. Bake the layers for about 25-35 minutes, or until a toothpick comes out clean. Let them cool completely before frosting. A white chocolate buttercream or cream cheese frosting would be heavenly between the layers and on top.
How do I prevent the raspberries from all sinking to the bottom?
This is the most common question, and the fix is easy! After you wash and dry your fresh raspberries (or take them from the freezer), put them in a small bowl. Take about one tablespoon of the flour from your measured dry ingredients and sprinkle it over the berries. Gently toss them until they have a very light, dusty coating. This tiny bit of flour creates a barrier and helps the berries “stick” to the batter instead of sinking straight down. Then, fold them in as the recipe directs. You’ll get beautiful distribution.
Is there a way to make this cake less sweet?
If you prefer a less sweet dessert, there are a couple of tweaks you can make. First, you can reduce the granulated sugar in the cake by 2-3 tablespoons. The raspberries provide natural tartness that will balance it. Second, you can reduce or even omit the white chocolate drizzle on top. Instead, a simple dusting of powdered sugar or a light glaze made with just a little powdered sugar and lemon juice can be lovely. You could also use a darker white chocolate or a “less sweet” variety if you can find it.
What’s the best way to melt white chocolate without seizing?
White chocolate is finicky and seizes (becomes grainy and solid) easily. The key is low, gentle heat and no moisture. Chop it into even pieces. Melt it in a heatproof bowl over a pot of barely simmering water (double boiler), making sure the bowl doesn’t touch the water. Stir constantly until smooth. In the microwave, use 30-second bursts at 50% power, stirring well between each burst. Stop when there are just a few small lumps and stir until they melt. Never get water in the bowl, as even a drop can cause seizing.
Can I prepare the batter ahead of time and bake it later?
It’s not recommended to let the finished batter sit for a long time before baking. The baking powder begins to activate as soon as it gets wet. If you let the batter sit, it can lose its rising power. This will result in a denser, flatter cake. The best “make-ahead” strategy is to bake the cake completely, let it cool, wrap it tightly, and freeze it (without the drizzle). Thaw and decorate the day you plan to serve it. You can also pre-measure your dry ingredients the night before to save time.
My cake is dense and gummy. Where did I go wrong?
A dense, gummy texture usually points to two issues. First, you may have overmixed the batter after adding the flour. Remember, mix just until combined. Second, the cake might be underbaked. Even if the top looks done, the center might still be raw. Always use the toothpick test in the absolute center. If it comes out with wet batter, it needs more time. An oven that runs too cool can also cause this, as the cake takes too long to set and becomes dense. Check your oven temperature with a thermometer.
What can I serve with this white chocolate raspberry cake?
This cake is wonderful all on its own! But if you want to dress it up, a few accompaniments are fantastic. A scoop of high-quality vanilla ice cream is a classic pairing. The cold creaminess is perfect with the warm cake. A dollop of freshly whipped cream sweetened with a bit of the same white chocolate is divine. For a contrast, try a small spoonful of tangy lemon curd on the side. A cup of strong coffee or a glass of cold milk are the best drinks to serve alongside a rich, sweet slice.
Your New Favorite Cake Awaits
So there you have it—my tried-and-true, heart-warming recipe for Heavenly White Chocolate Raspberry Cake. It’s more than just a list of ingredients and steps. It’s a promise of something wonderful to share. It’s the smell that fills your home, the smile it brings to someone’s face, and the pride of making something truly delicious from scratch. I hope this cake finds its way into your kitchen and becomes a cherished recipe in your own collection. Now, go preheat that oven and get baking. Your slice of sweet bliss is waiting!
Savory Salmon Choux
Ingredients
Equipment
Method
- Preheat the oven to 350°F (175°C) and prepare a 9x5-inch loaf pan with butter and flour.
- In a medium bowl, whisk together flour, baking powder, and salt.
- In a large mixing bowl, cream together softened butter and granulated sugar until pale and fluffy, about 3-5 minutes.
- Add eggs one at a time, beating well after each addition, then mix in vanilla extract.
- Gradually combine wet and dry ingredients, alternating with milk, until just mixed.
- Gently fold in half of the melted white chocolate and the raspberries until evenly distributed.
- Transfer the batter to the prepared loaf pan and smooth the top.
- Bake for 60-70 minutes, checking for doneness with a toothpick.
- Cool in the pan for 10 minutes, then transfer to a wire rack to cool completely.
- Drizzle with remaining melted white chocolate and top with fresh raspberries if desired.