The Caramel Oreo Explosion Cake: Your New No-Bake Obsession
You know that moment when you’re scrolling through desserts online, and something makes your mouth water instantly? That was me, the first time I saw a picture of this cake. I knew I had to make it for my daughter’s birthday. Let me tell you, the look on her face—and the silence that fell over the whole party when it was served—was pure magic. This isn’t just a cake; it’s an experience.
From Cookie Jar to Showstopper: The Story of This Cake
This Caramel Oreo Explosion Cake is a beautiful child of modern, no-bake dessert culture. It takes the universal love for Oreos and transforms it into a layered masterpiece. While it doesn’t have centuries of history, its brilliance lies in its simplicity. It’s the evolution of the classic icebox cake, where chilling does all the “cooking.” My version came about after a few happy kitchen experiments, tweaking layers until I got that perfect balance of crunchy, creamy, and dreamy. It’s now my go-to recipe when I need a guaranteed “wow.”
Why You’ll Absolutely Love This Oreo Explosion
First, there’s no oven required! That’s a huge win on hot days or when you’re short on time. Second, the textures are insane. You get the buttery crunch of the crust, the tangy cream cheese layer, the smooth chocolate pudding, the gooey caramel, and the fluffy whipped cream—all in one bite. It’s a party for your taste buds. Plus, you can make it a day ahead, which makes any host feel like a total genius.
Perfect Occasions for This Spectacular Dessert
This cake is a crowd-pleaser for any gathering. Think birthdays, potlucks, summer barbecues, or holiday parties. It’s rich enough for a celebration but casual enough for a family movie night. I’ve even brought it to work events, and it’s always the first empty plate. If you need a dessert that feeds a crowd and gets people talking, this is your golden ticket.
Gathering Your Ingredients for Success
Here’s what you’ll need to create this delicious masterpiece:
- 30 Oreo cookies, finely crushed (for the crust)
- 1/4 cup melted butter
- 1 cup caramel sauce, divided
- 8 oz cream cheese, softened
- 1/2 cup powdered sugar
- 1 tsp vanilla extract
- 2 cups chocolate pudding (pre-made or instant)
- 2 cups whipped cream (divided)
- 1/2 cup caramel chips, melted
- 10 Oreo cookies, halved (for garnish)
Easy Swaps and Substitutions
Don’t stress if you’re missing an item! This recipe is very flexible.
- Dairy-Free? Use your favorite dairy-free cream cheese alternative, non-dairy whipped topping, and plant-based butter.
- Caramel Chips: If you can’t find them, just skip them and use an extra 1/4 cup of caramel sauce for that layer.
- Chocolate Pudding: Any brand or homemade will work. Chocolate mousse is a fantastic, fluffier substitute.
- Oreos: Feel free to use a flavored Oreo for a fun twist!
Creating Your Caramel Oreo Masterpiece
Follow these steps for a perfectly layered, no-fuss dessert.
Step 1: The Crunchy Oreo Foundation
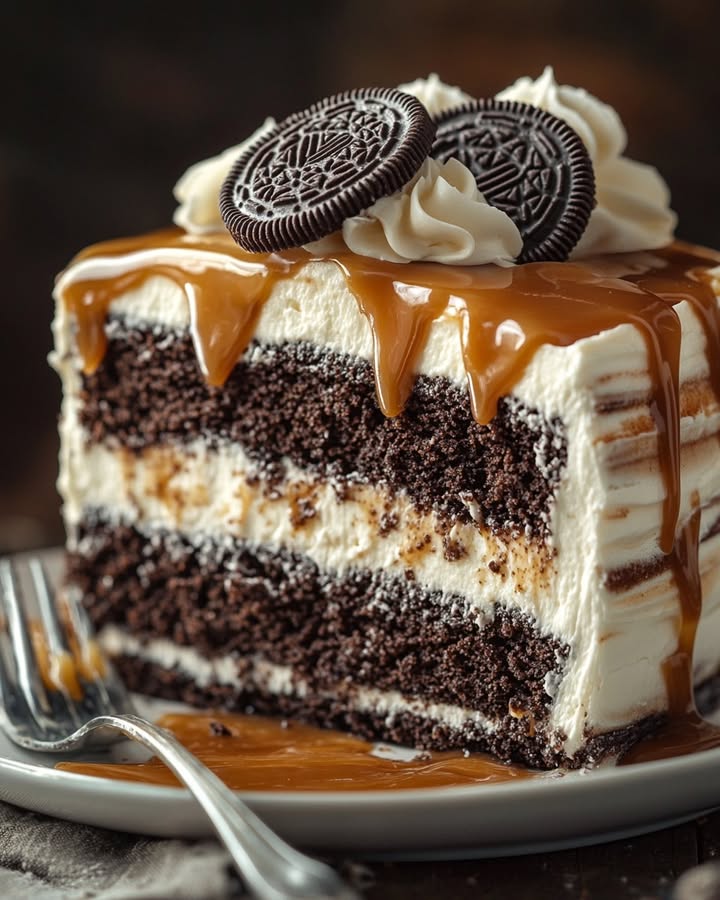
Start by crushing those Oreos. I use a food processor for fine, even crumbs, but a sealed bag and a rolling pin work just as well—and it’s a great stress reliever! Mix the dark, fragrant crumbs with the melted butter until it looks like wet sand. The smell is already incredible. Press this mixture firmly into the bottom of your springform pan. This crust is the base for all the deliciousness to come, so pack it well. Chill it for 15 minutes to let it set properly.
Step 2: The Creamy, Dreamy Layer
While the crust chills, let’s make the cream cheese filling. In a large bowl, beat the softened cream cheese until it’s completely smooth and lump-free. This is key for a silky texture. Add the powdered sugar and vanilla, and beat again until it’s light and fluffy. Now, gently fold in one cup of your whipped cream. You want to keep that airy volume. Spread this cloud-like mixture over your chilled crust. Then, take that caramel sauce and drizzle half of it back and forth in pretty ribbons over the top. Pop it back in the fridge for 30 minutes to firm up.
Step 3: The Rich Chocolate Heart
Now for the chocolate! Gently pour or spoon your chocolate pudding over the cream cheese layer. Use a spatula to spread it into an even, smooth, dark brown layer. This rich chocolate wave is the perfect contrast to the sweeter caramel and cream. At this point, I like to freeze the cake for just 20 minutes. This helps the pudding set so the next layer doesn’t sink in.
Step 4: The Gooey Caramel Cascade
This is the “explosion” part! Melt your caramel chips according to the package directions. Carefully pour the warm, liquid caramel over the chilled pudding layer. Tilt the pan gently to help it spread, or use a spatula for guidance. Then, take the remaining caramel sauce and drizzle it artistically on top. You can make swirls or zig-zags—have fun with it! Another quick 10-minute chill helps this layer settle.
Step 5: The Finishing Touches
Finally, spread the remaining whipped cream over the entire cake. It’s like putting a fluffy white blanket on top. For the grand finale, artfully place the halved Oreo cookies on top. Press them in slightly so they stick. Now, the hardest part: patience. Let the cake chill for at least 4 hours, or overnight. This allows all the beautiful layers to meld and slice perfectly.
Timing is Everything
This cake is all about planning. The active prep time is quick, about 25 minutes. But the chilling time is crucial for the right texture. Plan for at least 4 hours of chill time, but overnight is truly best. So, your total time from start to serving is about 4 hours and 25 minutes. It’s the perfect “make it today, enjoy it tomorrow” dessert.
My Chef’s Secret for the Perfect Slice
Here’s my special trick: run a sharp knife under very hot water, wipe it dry, and then slice. Do this between every single cut. The heat will glide through the frozen caramel and firm cream cheese layers like magic, giving you those stunning, clean layers in every piece.
A Fun Fact About Our Star Ingredient
Did you know Oreos were originally a knock-off? They were introduced in 1912 by Nabisco as a competitor to the Hydrox cookie. Today, Oreos are the world’s best-selling cookie, with over 500 billion sold. I think they won that battle!
What You’ll Need in Your Kitchen
- 9-inch springform pan (this is essential for easy removal!)
- Mixing bowls
- Electric hand mixer or stand mixer
- Spatula
- Food processor or zip-top bag and rolling pin
- Measuring cups and spoons
Storing Your Decadent Creation
This cake must stay refrigerated. Keep it covered tightly with plastic wrap or in a cake carrier. The layers hold up beautifully in the fridge for 3-4 days.
You can also freeze the entire cake for longer storage. Wrap it tightly in a layer of plastic wrap and then a layer of aluminum foil. It will keep for up to 2 months.
To serve a frozen cake, simply transfer it to the refrigerator to thaw overnight. This helps maintain the perfect texture.
Handy Tips and Advice
- Let your cream cheese soften fully on the counter. This prevents lumps in your filling.
- When folding whipped cream, use a gentle hand and a spatula. Over-mixing will deflate it.
- For a cleaner look, wipe the edges of your springform pan after adding each layer.
- If your caramel sauce is too thick to drizzle, warm it slightly in the microwave for 5-10 seconds.
Presentation Tips to Impress Your Guests
- Grate a little chocolate over the whipped cream top for extra elegance.
- Serve each slice with a small extra drizzle of caramel sauce on the plate.
- Add a few gold flakes or edible glitter for a truly festive look.
- Place the cake on a cake stand and surround the base with whole Oreos.
Inspired Variations to Try
Once you master the base, the flavor world is your oyster! Here are six fun twists:
- Peanut Butter Bliss: Swirl 1/2 cup of peanut butter into the cream cheese layer and use peanut butter cups as garnish.
- Mint Chocolate Refresh: Use mint Oreos for the crust, and add a drop of peppermint extract to the cream cheese layer.
- Salted Caramel Sophisticate: Sprinkle a little flaky sea salt over the caramel layers before chilling.
- Mocha Madness: Add 1 tablespoon of instant espresso powder to the chocolate pudding for a coffee kick.
- Fruity Berry Twist: Replace the caramel layers with a seedless raspberry jam or compote.
- Rocky Road Fun: Garnish the top with mini marshmallows, chopped nuts, and extra chocolate chips.
Common Mistakes to Avoid
Mistake 1: Not Letting the Cream Cheese Soften
Using cold cream cheese straight from the fridge is a top error. It creates a lumpy, uneven filling that’s impossible to spread smoothly. It also won’t blend well with the other ingredients. Always plan ahead and let your cream cheese sit on the counter for a good hour. It should feel soft to the touch. Pro tip: If you forget, you can microwave it on low power for 15-second intervals, but room temperature is best.
Mistake 2: Skipping the Chill Steps
It’s tempting to rush the process and add the next layer right away. But each chilling step has a purpose. It sets the layer so the next one doesn’t sink in and create a muddy mess. If you skip them, your beautiful distinct layers will blend together, and your cake might not hold its shape when sliced. Patience is the secret ingredient here!
Mistake 3: Over-mixing the Whipped Cream
When you fold the whipped cream into the cream cheese, be gentle. Vigorous stirring or using the mixer will deflate all the air you whipped into it. You’ll end up with a dense, heavy layer instead of a light and fluffy one. Use a spatula and a folding motion, just until no white streaks remain. It’s okay if it’s not perfectly uniform.
Mistake 4: Using a Regular Cake Pan
A springform pan is non-negotiable for this recipe. The sides clamp on and then release, allowing you to lift off the ring and reveal your perfect layered cake. If you use a regular pan, you’ll have a terrible time trying to get the first slice out intact. Trust me, the springform makes all the difference for presentation.
Frequently Asked Questions
Can I make this cake more than a day ahead?
Absolutely! This cake actually gets better with time. The flavors meld and the texture becomes more set. You can confidently make it up to two days before you need to serve it. Just keep it tightly covered in the refrigerator. It’s the ultimate make-ahead dessert for stress-free entertaining.
What can I use instead of a springform pan?
While a springform pan is highly recommended, you can use a deep-dish pie plate or a 9×9 square baking dish in a pinch. The presentation will be different—you’ll serve it directly from the dish—but it will still taste delicious. Just be extra careful when slicing to get clean layers.
My caramel sauce is too thick. How can I fix it?
This is a common issue, especially with store-bought sauces that thicken in the fridge. The fix is simple. Scoop the amount you need into a microwave-safe bowl. Heat it on low power for 10-15 seconds, stir, and check the consistency. Repeat in 5-second bursts until it’s pourable but not hot. You can also warm it gently in a small saucepan on the stove over low heat.
Can I use Cool Whip instead of fresh whipped cream?
Yes, you can substitute an 8-ounce tub of thawed Cool Whip or other non-dairy whipped topping for the whipped cream in this recipe. Fold half of it into the cream cheese mixture and use the rest for the top layer. The texture will be slightly different but still very tasty and convenient.
Is it okay to use sugar-free pudding and caramel?
It is perfectly fine to use sugar-free or reduced-sugar versions of the pudding and caramel sauce. This is a great way to adjust the recipe for dietary needs. Just ensure the caramel sauce is of a good consistency for drizzling, as some sugar-free versions can be runny or overly thick.
How do I get perfectly clean slices?
The key to a beautiful slice is a hot, clean knife. Fill a tall glass with very hot water. Dip your sharp knife in, wipe it clean and dry with a towel, and make your slice. Wipe the knife clean, re-dip and dry, and repeat for the next slice. This method cuts through the caramel and cream layers effortlessly.
Can I add other toppings?
Go wild with toppings! Chocolate shavings, toffee bits, chopped nuts, or even a sprinkle of sea salt are all fantastic additions. I sometimes add a few whole caramel candies or chocolate-dipped Oreos on top for extra drama. Let your creativity guide you.
How many people does this cake serve?
This is a very rich dessert, so a little goes a long way. You can comfortably get 12 generous slices from a 9-inch cake. For larger gatherings, you can slice it a bit smaller and serve 14-16 portions, especially if you have other desserts available.
What’s the best way to crush the Oreos?
My favorite tool is a food processor—it’s quick and gives you fine, even crumbs. If you don’t have one, place the Oreos in a sturdy zip-top bag, seal it well, and use a rolling pin to crush them. You can also use a heavy-bottomed pot or pan. Crush them until you have a mix of fine powder and a few small chunks for texture.
My cake seems too soft to slice. What happened?
This usually means it didn’t chill long enough. The layers, especially the cream cheese and pudding, need ample time to firm up in the cold. Put it back in the fridge for another hour or two. If you’re in a real rush, you can put it in the freezer for 30-45 minutes to speed up the process, but don’t let it freeze solid.
Ready to Become a Dessert Hero?
So there you have it—everything you need to create this unforgettable Caramel Oreo Explosion Cake. It looks impressive, but the steps are simple. It’s the kind of dessert that will have everyone asking for the recipe. Grab your Oreos, pour that caramel, and get ready for the compliments. Happy baking—or should I say, happy chilling!
Cozy Chicken Noodle
Ingredients
Equipment
Method
- Crush Oreo cookies and mix with melted butter until it resembles wet sand; press into a springform pan and chill for 15 minutes.
- Beat softened cream cheese in a bowl until smooth, add powdered sugar and vanilla, then gently fold in 1 cup of whipped cream; spread over the chilled crust and drizzle half of the caramel sauce on top. Chill for 30 minutes.
- Pour chocolate pudding over the cream cheese layer and smooth it out; freeze for 20 minutes to set.
- Melt caramel chips and pour over the pudding layer, then drizzle remaining caramel sauce on top; chill for an additional 10 minutes.
- Spread remaining whipped cream over the cake and garnish with halved Oreo cookies; chill for at least 4 hours or overnight before serving.