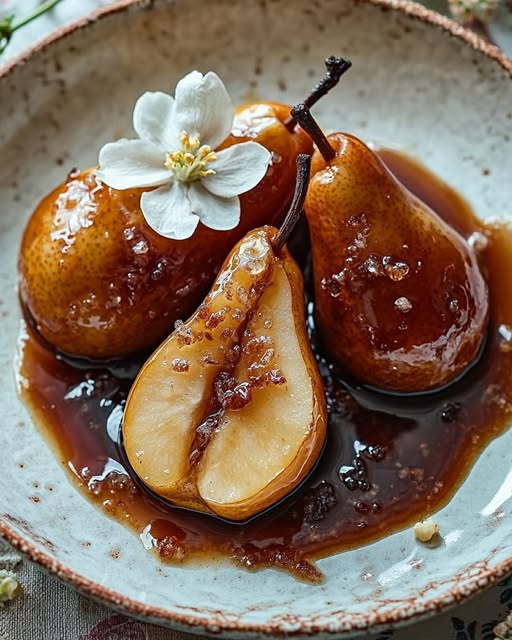
The Warmest Hug on a Plate: My Love for Caramelized Roasted Pears
You know those evenings when you crave something sweet, but you want it to feel like a real event? I had one of those nights last fall. The air was crisp, and I had a bowl of beautiful, slightly firm pears on the counter just begging to become dessert. That’s how my journey with these Poires Rôties au Caramel Salé began. It’s less of a recipe and more of a warm, buttery, caramel-scented hug. It’s fancy enough for guests but simple enough for a Tuesday night treat. Let me show you how to make this magic happen.
A Sweet Slice of History
The French have a beautiful way with desserts, don’t they? “Poires Rôties au Caramel Salé” simply means “Pears Roasted with Salted Caramel.” While it feels like a modern bistro classic, the idea of cooking fruit in butter and sugar is timeless. I like to think of this as the elegant cousin of a simple baked apple. The genius twist is the hit of sea salt that cuts through the rich sweetness, making every bite perfectly balanced. It’s a tradition made even better.
Why You’ll Fall in Love with This Caramelized Pear Recipe
This recipe is a total winner for so many reasons! First, the flavors are incredible. Sweet pears, deep caramel, and a whisper of salt create pure harmony. Second, it’s surprisingly simple. You basically use one pan for most of the work. Third, it makes your whole house smell like a dreamy French bakery. It’s the kind of dessert that makes everyone feel special, including the cook!
When to Serve Your Salted Caramel Pears
This dish is your secret weapon for so many occasions! It’s perfect for a cozy date night at home. It shines at a holiday dinner when you want something impressive but not too heavy. I also love serving it after a simple weeknight meal to turn an ordinary dinner into a celebration. It’s even a great dish to bring to a friend’s potluck—just reheat the sauce on their stove!
Gathering Your Ingredients for Roasted Pears
Here’s what you’ll need for this delicious caramel pear dessert. Using good-quality ingredients really makes a difference here!
- 4 tablespoons unsalted butter
- 4 firm Bosc pears, halved and cored (stems and skin on)
- 1/2 cup packed dark brown sugar
- 2 tablespoons whiskey, bourbon, or dark rum (optional but amazing!)
- 2 teaspoons pure vanilla extract
- 1 teaspoon sea salt (I use flaky salt for finishing)
- 1/4 cup water
- 1/4 cup sliced almonds
No Worries! Handy Substitution Ideas
Don’t have every item? No problem! Cooking should be fun, not stressful.
- Pears: Anjou pears work well if Bosc aren’t available. Just make sure they are firm, not overripe.
- Alcohol: You can skip it entirely or use 2 tablespoons of apple cider or even orange juice for a different flavor.
- Nuts: Swap almonds for chopped pecans or walnuts. You could even use pumpkin seeds for a nut-free version.
- Sugar: Light brown sugar can be used, but dark brown sugar gives a richer, more molasses-like caramel.
Let’s Make Some Magic: Step-by-Step to Perfect Caramelized Roasted Pears
Step 1: Get Your Kitchen Ready
First things first, let’s heat things up! Preheat your oven to 400°F (200°C). Grab a small tart pan or a baking sheet for the almonds. Now, find an oven-safe skillet that’s big enough to hold all eight pear halves in a single layer. I love using my trusty cast-iron skillet for this. Having everything ready before you start cooking makes the whole process smooth and enjoyable.
Step 2: Give Those Pears a Golden Tan
Place your skillet over medium heat and add the butter. Listen for that lovely sizzle as it melts. Once it’s foamy, carefully place the pear halves in the pan, cut-side down. Now, just let them be! Cook them for 3 to 4 minutes without moving them. You’re waiting for a beautiful, deep golden-brown color to develop on the cut surface. This step builds incredible flavor. When they’re gorgeous, transfer them to a plate. Pro tip: Don’t crowd the pears. If your pan is small, cook them in two batches.
Step 3: Create the Dreamy Salted Caramel Sauce
In that same buttery, pear-infused pan, add the dark brown sugar, your chosen spirit (if using), vanilla, salt, and water. Give it a gentle swirl to combine. Let it cook for 2 to 3 minutes. You’ll see it start to bubble all over and the sugar will completely melt into a glossy, fragrant sauce. The smell at this point is absolutely divine.
Step 4: The Main Event: Roasting to Perfection
Here comes the easy part! Nestle the pear halves back into the skillet, cut-side down, right into that bubbling caramel. Carefully transfer the whole skillet to your preheated oven. Let them roast, uncovered, for 15 to 18 minutes. The pears will become tender but still hold their shape, and the caramel will thicken and cling to them beautifully.
Step 5: A Toasty, Crunchy Finish
While the pears are roasting, let’s toast the almonds. Spread them out in your small tart pan or on a baking sheet. Pop them into the oven alongside the pears. They only need 5 to 6 minutes. Watch them closely! They’re done when they turn a light golden brown and smell wonderfully nutty. Pro tip: Set a timer for the almonds. They can go from perfect to burnt very quickly!
Step 6: Bringing It All Together
Once the pears are tender, take the skillet out of the oven. Be very careful—the handle is extremely hot! I always put an oven mitt over it as a reminder. Place two pear halves, cut-side up, on each serving plate. Let the caramel sauce in the pan cool for about 5 minutes. It will thicken as it sits. If it gets too thick, just stir in a tablespoon of warm water at a time until it’s a nice drizzling consistency. Give it a final taste and add a tiny pinch more salt if you like.
Step 7: The Grand Finale
This is the fun part! Generously drizzle the warm salted caramel sauce over each plate of pears. Sprinkle each serving with the toasted almonds for that essential crunch. For the ultimate experience, serve immediately with a scoop of vanilla ice cream or a dollop of softly whipped cream. The contrast of warm pears and cold cream is heavenly. Chef’s tip: For a restaurant-style look, use the back of a spoon to spread a smear of the caramel sauce on the plate before placing the pears.
Your Caramelized Pear Timeline
Good news for busy folks! This impressive dessert comes together quickly.
- Prep Time: 15 minutes (mostly coring pears and measuring)
- Cook Time: 30 minutes (stovetop and oven combined)
- Total Time: 45 minutes
- Servings: 4 happy people
You can have a stunning dessert on the table in less than an hour. That’s my kind of recipe!
A Little Chef’s Secret Just for You
My secret weapon for the most flavorful caramel pear dessert? Letting the pears sit in the caramel sauce for a few minutes after roasting. Once you take the skillet out of the oven, don’t immediately remove the pears. Turn them cut-side up right in the pan and let them bathe in the sauce for 5-10 minutes as it cools. They soak up even more of that delicious flavor.
A Fun Fact About Your Ingredients
Did you know that Bosc pears are sometimes called the “aristocrat” of pears? They have that lovely, elongated neck and a firm texture that makes them ideal for baking and roasting. They hold their shape beautifully and don’t turn to mush, which is exactly what we want for this roasted pears recipe!
Tools You’ll Need in Your Kitchen
You don’t need any fancy equipment for this one!
- A good, oven-safe skillet (cast iron or stainless steel are perfect).
- A sharp paring knife and a small spoon for coring the pears.
- A small baking sheet or tart pan for toasting the almonds.
- A set of sturdy tongs or a flexible spatula for turning the pears.
- Measuring cups and spoons.
Storing Your Delicious Leftovers
If you somehow have leftovers, you can store them! Let the pears and sauce cool completely in the skillet. Then, transfer them to an airtight container. They will keep in the refrigerator for up to 3 days.
To reheat, I recommend gently warming them in a saucepan over low heat. You can add a splash of water or apple juice to loosen the caramel sauce if it has thickened too much in the fridge. The microwave can work in a pinch, but it might make the pears a bit too soft.
I do not recommend freezing this dish. The texture of the pears becomes very mushy when thawed, and the sauce can separate.
My Best Tips for Your Baking Success
- Pear Picking: Choose pears that are firm, not soft or bruised. They should give just a little at the stem when pressed.
- Pan Choice Matters: Using a light-colored skillet (like stainless steel) lets you see the color of the caramel change easily. A dark non-stick pan makes it harder.
- Don’t Rush the Caramel: When making the sauce, let the sugar fully dissolve before moving to the next step. Patience gives you a smooth, not grainy, caramel.
- Safety First: Always place an oven mitt or a towel over the hot skillet handle after it comes out of the oven. It’s too easy to forget and grab it by accident!
Make It Beautiful: Presentation Ideas
- Serve on a simple white plate to let the golden-brown colors pop.
- Add a fresh mint leaf or edible flower for a touch of color.
- For a dinner party, serve each portion in a shallow, individual bowl.
- Drizzle the caramel sauce in a zig-zag pattern over the pears and ice cream.
- Offer the extra toasted almonds in a small bowl on the side for people to add more.
Want to Mix It Up? Try These Healthier Twists
Love the recipe but want to try a different version? Here are six fun ideas!
- Vegan Caramelized Pears: Swap the butter for a high-quality vegan butter or coconut oil. Use maple syrup instead of brown sugar and skip the dairy-based topping for coconut whipped cream.
- Spiced Pear Version: Add warm spices to the caramel sauce. A pinch of cinnamon, cardamom, or a star anise pod infuses the dish with cozy, wintery flavors.
- Ginger-Infused Pears: Add a tablespoon of finely chopped crystallized ginger to the caramel sauce. It adds a lovely spicy-sweet kick and another layer of texture.
- Apple & Pear Combo: Use two pears and two apples! Firm apples like Granny Smith hold up great. The mix of flavors is fantastic.
- Honey-Sweetened Pears: For a more natural sweetener, try using 1/3 cup of honey instead of brown sugar. The flavor will be lighter and more floral.
- Oat & Nut Crumble Top: Turn this into a crumble! Before roasting, sprinkle a mix of rolled oats, chopped nuts, a little flour, and a bit of cold butter over the pears in the skillet.
Common Mistakes to Avoid for Perfect Caramelized Roasted Pears
Mistake 1: Using Overripe, Soft Pears
This is the biggest mistake I see. Soft, juicy pears will fall apart during cooking. You’ll end up with pear sauce, not beautiful roasted halves. The heat breaks down their structure too quickly. Always choose pears that are firm to the touch. They should have just a slight give near the stem. Firm Bosc or Anjou pears are your best friends for this recipe.
Mistake 2: Not Letting the Pears Brown Enough on the Stove
It’s tempting to move the pears around in the butter, but don’t do it! That initial sear in the butter is what creates deep, rich flavor and a beautiful color. If you move them too soon, they’ll steam instead of caramelize. Place them cut-side down and leave them alone for a full 3-4 minutes. Wait until you see a solid, golden-brown crust forming before you flip or remove them.
Mistake 3: Burning the Caramel Sauce
Caramel can go from perfect to burnt in seconds. The key is medium heat and attention. Once you add the sugar and water, swirl the pan to mix, but don’t stir aggressively with a spoon. Swirling gives you more control. Watch for bubbles that cover the entire surface and a color change to a deep amber. If you smell burning, immediately take the pan off the heat. It’s better to have a slightly lighter caramel than a bitter, burnt one.
Mistake 4: Skipping the Salt
I know it sounds odd to add salt to dessert, but please don’t skip it! Salt is what makes the sweet flavors taste sweeter and more complex. It balances the dish and prevents it from being one-note and cloying. Use a good quality sea salt. You can even add an extra tiny pinch of flaky salt on top when serving for a delightful salty crunch.
Your Caramelized Pear Questions, Answered!
Can I make this recipe without alcohol?
Absolutely! The alcohol is completely optional. It adds a nice depth of flavor, but the dessert is still wonderful without it. You can simply leave it out. The vanilla and brown sugar provide plenty of flavor on their own. If you want to replace the liquid, you can add an extra 2 tablespoons of water or a splash of apple juice or even strong brewed tea for a subtle twist.
What’s the best type of pear to use for roasting?
For roasted pears, you need a variety that holds its shape under heat. Bosc pears are the top choice because of their firm, dense flesh and lovely shape. Anjou pears are a great second option. Avoid very juicy pears like Bartlett or Comice for this specific recipe, as they tend to become too soft and mushy during the roasting process. The firm texture is key to a beautiful presentation.
My caramel sauce got too hard after cooling. What can I do?
Don’t worry, this is an easy fix! Simply place the skillet back on the stove over low heat. Add a tablespoon of warm water or apple juice and stir gently. Keep adding liquid, one tablespoon at a time, until the sauce loosens up to a nice, drizzle-able consistency. It will thin out as it warms. Let it bubble for a minute to re-combine, then it will be perfect for serving.
Can I prepare any part of this dessert ahead of time?
Yes, you can do some prep to make things easier! You can core and halve the pears a few hours ahead. Just toss them with a little lemon juice to prevent browning and store them in an airtight container in the fridge. You can also measure out all your dry ingredients ahead of time. I don’t recommend cooking the pears fully ahead, as they are best served warm and fresh from the oven for the ideal texture and temperature.
What can I serve with these pears besides ice cream?
While vanilla ice cream is a classic pairing, there are so many delicious options! Try a dollop of lightly sweetened whipped cream or crème fraîche for a tangy contrast. Greek yogurt is a fantastic healthier alternative. For a decadent treat, serve it with a drizzle of warm chocolate sauce or alongside a slice of pound cake. The pears are so versatile they pair well with many different flavors and textures.
Is this recipe gluten-free and nut-free?
This caramelized pear dessert is naturally gluten-free, as none of the core ingredients contain gluten. Just double-check your vanilla extract to ensure it’s gluten-free, as some brands are not. For a nut-free version, simply omit the almonds. You could top it with toasted pumpkin seeds (pepitas) for a similar crunch without the nuts, or just enjoy the pears and caramel on their own.
How do I know when the pears are perfectly cooked?
The best test is the knife test. After about 15 minutes in the oven, carefully pierce the thickest part of a pear half with the tip of a sharp paring knife. It should slide in with just a little resistance, similar to a ripe avocado. The pears should be tender but not falling apart. They will continue to soften a bit from residual heat after you take them out of the oven, so it’s okay if they are slightly firm when tested.
Can I use a different type of sugar?
Dark brown sugar is ideal for its rich molasses flavor, which makes a deeper, more complex caramel. You can use light brown sugar in a pinch; your caramel will just be a bit lighter in color and taste. I do not recommend using white granulated sugar alone, as the flavor will be one-dimensional. If you only have white sugar, try adding half a teaspoon of molasses to mimic the dark brown sugar flavor.
My skillet isn’t oven-safe. What can I do?
No oven-safe skillet? No problem! After browning the pears on the stove and making the caramel sauce, transfer everything to a baking dish. Carefully place the pears cut-side down in the dish and pour the caramel sauce over them. Then roast as directed. The result will be just as delicious. Just make sure the dish is large enough so the pears aren’t crowded.
How can I make this dessert look extra fancy for guests?
A few simple touches make it look restaurant-worthy! Use an ice cream scoop to place a perfect round ball of vanilla ice cream on the plate first. Lean two pear halves against it. Drizzle the caramel in an artistic swoosh across the plate before adding the pears. Finish with a fine sprinkle of the toasted almonds and one last tiny pinch of flaky sea salt on top. A fresh mint leaf adds a perfect pop of green color.
The Simple Joy of a Perfect Dessert
Well, there you have it! My absolute favorite way to turn simple pears into something unforgettable. This recipe for Caramelized Roasted Pears is about more than just following steps. It’s about creating a moment of warmth and sweetness to share. It has saved my dinner parties and cheered up my quiet nights. I hope it brings as much joy to your table as it has to mine. Now, go preheat that oven. Your own sweet, caramel-scented adventure awaits!