Irresistible Gooey Butter Cake: Your New Favorite Dessert
Have you ever had a dessert so good it made you close your eyes and just sigh? That’s Gooey Butter Cake for you. I first tried it at a church potluck years ago, and I’ve been chasing that perfect, messy, sweet bite ever since. After many, many (delicious) tests, I’ve nailed a recipe that’s foolproof and absolutely magical. It’s the kind of treat that disappears before you can even say “seconds, please!”
A Slice of Sweet History
This cake is a happy accident from St. Louis, Missouri. The story goes that a baker in the 1930s mixed up the proportions for a regular cake. Instead of a fluffy cake, he got a gooey, buttery, dense delight. People loved it! The classic version uses a yeast dough, but this modern “cheater” version with cake mix is a beloved shortcut. It captures all that wonderful flavor and texture with way less fuss. It’s a beautiful blend of tradition and convenience.
Why You’ll Fall in Love With This Gooey Butter Cake
You will love this recipe because it’s the ultimate crowd-pleaser. It’s incredibly simple—no fancy skills needed. The contrast between the soft, cakey crust and the rich, creamy, almost custard-like topping is pure heaven. It’s sweet, but not too sweet, and that signature “gooey” center is what dreams are made of. Plus, it uses mostly pantry staples. It’s the dessert you can whip up when surprise guests arrive or when you just need a big hug in cake form.
Perfect Occasions for This Sweet Treat
This cake is your secret weapon for so many events! Bring it to potlucks, bake sales, or family reunions—it always gets rave reviews. It’s a must for holiday dessert tables alongside pies. I love making it for casual weekend get-togethers with friends over coffee. Honestly, a quiet Tuesday night is also a perfect occasion. Any day is better with Gooey Butter Cake.
What You’ll Need: The Ingredients
Gather these simple ingredients. The magic is in how they come together!
- 1 (15.25-ounce) box yellow cake mix
- 3 large eggs (divided use)
- ½ cup (1 stick) butter, melted
- 1 (8-ounce) package cream cheese, softened
- 1 teaspoon pure vanilla extract
- 3 cups powdered sugar (plus more for dusting)
Easy Ingredient Swaps
No worries if you’re missing something! Here are some easy swaps:
- Cake Mix: A white or butter golden cake mix works just as well as yellow.
- Butter: Use salted or unsalted butter. If using unsalted, you can add a tiny pinch of salt to the crust.
- Cream Cheese: Full-fat is best for texture, but reduced-fat will work in a pinch.
- Vanilla: Try using almond extract for a different, lovely flavor twist.
How to Make Your Own Gooey Butter Cake
Let’s bake! Follow these simple steps for perfect results every time.
Step 1: Get Your Pan Ready
First, grab your 9×13 inch baking pan. Give it a good coating of butter, oil, or non-stick spray. This prevents sticking and makes cleanup easy. Now, preheat your oven to 350°F (175°C). Let it heat up while you make the cake. A properly heated oven is key for even baking. This simple prep sets you up for success.
Step 2: Make the Buttery Crust
In a medium bowl, combine the dry yellow cake mix, 1 egg, and the melted butter. The butter will smell amazing. Stir until it forms a thick, smooth, and slightly sticky dough. It will be a beautiful golden color. Press this mixture firmly and evenly into the bottom of your prepared pan. I use my fingers or the bottom of a glass. A solid, even crust is the foundation of your cake.
Pro tip: Press the crust about halfway up the sides of the pan. This creates a little wall to hold in all the glorious gooey topping.
Step 3: Whip Up the Dreamy Topping
Now for the star! In a large bowl, beat the softened cream cheese until it’s smooth and creamy. Add the 2 remaining beaten eggs and the vanilla extract. Beat again until everything is fully combined. Gradually add the 3 cups of powdered sugar. Keep mixing on low speed at first so the sugar doesn’t fly everywhere! Beat until the filling is completely smooth, creamy, and lump-free. It will be a pale, inviting color.
Step 4: Bake to Gooey Perfection
Carefully pour the creamy filling over your crust. Use a spatula to spread it evenly to all the edges. Place the pan in your preheated oven. Bake for 40 to 45 minutes. You’re looking for the edges to be a lovely golden brown. The center will still look a bit soft, puffed, and jiggly—that’s perfect! It will sink as it cools, creating that famous gooey layer. The smell in your kitchen will be incredible.
Chef’s tip: Do not overbake! The cake is done when the edges are set and golden. The center should not be fully firm. It continues to set as it cools.
Step 5: Finish and Serve Your Masterpiece
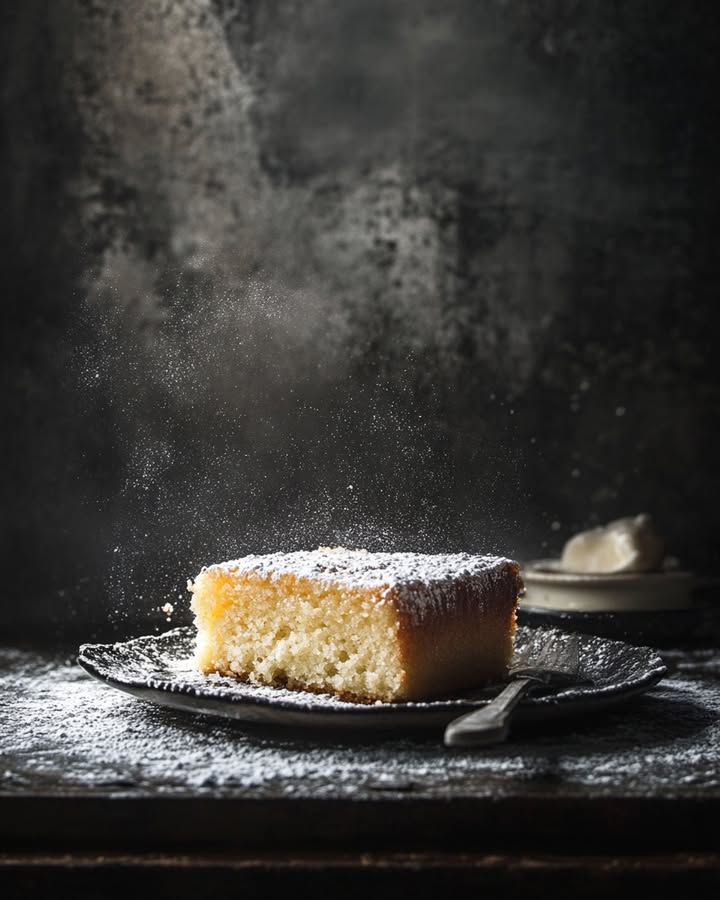
Take the cake out of the oven and let it cool completely in the pan on a wire rack. This is the hardest part—waiting! Once cool, generously dust the top with more powdered sugar. I use a small sieve for a pretty, even snow-like coating. Cut into squares and serve. Get ready for the oohs and aahs!
Your Gooey Butter Cake Timeline
This cake comes together so quickly!
- Prep Time: 7 minutes
- Cook Time: 40 minutes
- Cooling Time: 1 hour (very important!)
- Total Time: About 1 hour 50 minutes
- Servings: 12 generous squares
A Little Chef’s Secret
For an extra layer of flavor, add a tablespoon of fresh lemon juice or zest to the cream cheese filling. It cuts the sweetness just a tiny bit and adds a bright, wonderful note that people can’t quite place but absolutely love.
Fun Fact: Why Is It So Gooey?
The “gooey” magic comes from the high ratio of wet ingredients (butter, eggs, cream cheese) to dry ingredients (cake mix, powdered sugar) in the topping. As it bakes, the proteins and sugars create a soft, custard-like texture instead of a firm cake one. It’s delicious science!
Kitchen Tools You’ll Need
You don’t need anything fancy:
- 9×13 inch baking pan
- Mixing bowls (2)
- Hand mixer or stand mixer (a whisk and strong arm can work too!)
- Spatula
- Measuring cups and spoons
- Wire cooling rack
Storing Your Gooey Butter Cake
If it lasts, you can store leftovers! Cover the pan tightly with plastic wrap or foil. It keeps well at room temperature for 2-3 days. The texture stays perfect.
For longer storage, pop it in the fridge. It will stay fresh for up to a week. The chilled cake is firmer but still delicious. Let a slice sit out for 10 minutes before eating to soften up.
You can also freeze it! Wrap individual squares or the whole pan tightly in plastic wrap, then in foil. Freeze for 4-5 months. Thaw overnight in the fridge or at room temperature for a few hours.
My Best Tips for You
- Soft Cream Cheese is Key: Let your cream cheese sit out for an hour to soften. This prevents lumps in your filling.
- Cool Completely: I know it’s tempting, but let the cake cool fully before cutting. This allows the gooey layer to set properly so you get clean squares.
- Dust Sugar Later: Dust the powdered sugar on top right before serving. If you do it while the cake is warm, the sugar will melt and disappear into the topping.
Pretty Presentation Ideas
Make it look as good as it tastes!
- Serve on a vintage cake stand for a classic look.
- Add fresh berries like raspberries or strawberries on the side for a pop of color.
- Drizzle a little caramel or chocolate sauce over each plate before placing the cake square on top.
- Garnish with a tiny sprig of mint for a festive touch.
Try These Tasty Variations
Love the base recipe? Mix it up with these fun ideas:
- Chocolate Gooey Butter Cake: Use a chocolate cake mix and add ¼ cup of cocoa powder to the cream cheese filling.
- Pumpkin Spice Version: Add ½ cup of pumpkin puree and a teaspoon of pumpkin pie spice to the filling for a fall twist.
- Lemon Blueberry: Add the zest of one lemon to the filling and sprinkle a cup of fresh blueberries over the crust before adding the topping.
- Peanut Butter Cup: Swirl ½ cup of peanut butter into the cream cheese filling and top baked squares with chopped peanut butter cups.
- Cookie Dough Delight: Press chunks of edible cookie dough into the crust before adding the gooey topping.
- Salted Caramel: Drizzle store-bought or homemade salted caramel over the baked and cooled cake before the powdered sugar dusting.
Common Mistakes to Avoid
Steer clear of these pitfalls for the best cake ever.
Mistake 1: Using Cold Cream Cheese
This is the biggest culprit for a lumpy filling. Cold cream cheese doesn’t blend smoothly with the sugar and eggs. You’ll end up with little white bits throughout your topping. Always plan ahead. Take the cream cheese out of the fridge at least an hour before you start baking. It should be soft to the touch.
Mistake 2: Overbaking the Cake
We want gooey, not cakey! If you bake it until the center is completely firm like a regular cake, you’ve gone too far. You’ll lose that wonderful soft texture. The cake is done when the edges are puffed and golden brown. The center should still have a slight jiggle. Remember, it sets up a lot as it cools.
Mistake 3: Not Pressing the Crust Firmly
If you just loosely sprinkle the crust mixture in the pan, it won’t hold together. You might get a crumbly base that mixes with the filling. Use your fingers or a flat object to press the dough firmly and evenly into the pan. Get it into the corners and slightly up the sides. This creates a solid foundation.
Mistake 4: Cutting the Cake While It’s Warm
I know the wait is torture! But if you cut into a warm gooey butter cake, it will be a messy, saucy puddle. The filling needs time to cool and set. Let it cool completely in the pan on a wire rack. This usually takes about an hour. You’ll get perfect, clean squares that hold their shape.
Your Gooey Butter Cake Questions, Answered
Can I make this recipe without a boxed cake mix?
Yes, you can! For a from-scratch crust, combine 2 cups all-purpose flour, 1 ½ cups granulated sugar, 2 teaspoons baking powder, and a pinch of salt. Cut in ½ cup of softened butter until crumbly, then mix in 1 egg. Press this into the pan and proceed with the same cream cheese topping. It’s a bit more work but just as delicious.
Why did my cake turn out too cakey and not gooey?
This usually means it was overbaked. Oven temperatures can vary. Start checking your cake at the 35-minute mark. Also, make sure you’re using the correct size pan. A smaller pan will make the cake thicker and require longer baking, which can dry it out. Always use a 9×13 inch metal baking pan for best results.
Can I double this recipe?
I don’t recommend doubling it in one larger pan, as it won’t bake evenly. Instead, make two separate batches in two 9×13 pans. You can mix a double batch of the crust and topping separately, then divide them between the two greased pans. This ensures each cake bakes perfectly with the right texture.
Is it normal for the top to crack?
Yes, a few small cracks on the surface are completely normal and even expected! It’s a sign of that rich, dense filling. Don’t worry about it. The generous dusting of powdered sugar at the end will cover any minor cracks beautifully. It adds to the homemade charm.
Can I use a different size pan?
You can, but the baking time and texture will change. A 9×9 pan will make a thicker cake that needs longer baking, risking a less gooey center. A 10×15 jelly roll pan will make a thinner cake that bakes faster and will be less gooey. For the classic texture, the 9×13 pan is ideal.
My filling is lumpy. Can I fix it?
If you have small lumps from the cream cheese, try pressing the filling through a fine-mesh sieve with a spatula before pouring it over the crust. For future bakes, ensure your cream cheese is very soft. You can also beat the cream cheese alone first until completely smooth before adding any other ingredients.
How do I know for sure when the cake is done?
Look for the golden brown edges that are pulling slightly away from the pan. The center should no longer look liquid or shiny wet, but it should still wobble a bit like Jell-O when you gently shake the pan. A toothpick inserted about an inch from the edge should come out clean, but in the center, it will come out with moist crumbs attached.
Can I make this gluten-free?
Absolutely! Simply use a gluten-free yellow cake mix. Check that all your other ingredients (like powdered sugar) are certified gluten-free. The method and baking time remain exactly the same. You’ll get the same wonderfully gooey result that everyone can enjoy.
What’s the best way to cut clean squares?
Use a sharp knife. Wipe the blade clean with a damp paper towel between each cut. This prevents the gooey filling and powdered sugar from smearing and gives you those perfect, photogenic slices. For super clean lines, you can even chill the whole cake for 30 minutes before cutting.
Can I add fruit to this cake?
You can, but be careful. Adding wet fruit like pineapple or berries directly to the filling can make it too soggy. A better method is to sprinkle a layer of well-drained, chopped fruit (like peaches or cherries) over the pressed crust before you add the cream cheese topping. The topping will bake over it beautifully.
Go Bake Some Happiness
There you have it—everything you need to make the most incredible Gooey Butter Cake. It’s more than just a recipe; it’s a guaranteed smile-maker. Whether it’s for a special event or a regular Wednesday, this cake brings joy. So preheat that oven, grab your bowl, and get ready for the easiest, most impressive dessert you’ll ever make. Happy baking!
Hearty Slow Cooker Stew
Ingredients
Equipment
Method
- Preheat your oven to 350°F (175°C) and prepare a 9x13 inch baking pan with butter, oil, or non-stick spray.
- In a medium bowl, mix the yellow cake mix, 1 egg, and melted butter until a thick dough forms, and press into the bottom of the prepared pan.
- In a large bowl, beat the softened cream cheese until smooth, then add the 2 remaining eggs and vanilla extract; mix until combined.
- Gradually add the powdered sugar to the cream cheese mixture, mixing on low speed until smooth and lump-free.
- Pour the creamy filling over the crust, spreading it evenly, and bake for 40 to 45 minutes until the edges are golden and the center is slightly jiggly.
- Let the cake cool completely in the pan on a wire rack, dust with powdered sugar, cut into squares, and serve.