Let’s be honest, some days you just need a little slice of joy. Something that feels like a full-on, decadent dessert but without the fuss of a big baking project. That’s where my little heroes, these Mini Banana Cheesecake Bites, come in. I first made them for my daughter’s book club, and the entire group of ten-year-olds declared them “the best thing ever.” Seeing them vanish in minutes was all the proof I needed that this recipe is a total crowd-pleaser.
The Happy Origin of Mini Banana Cheesecake Bites
I often think cheesecake deserves a friendlier, more casual version. The classic is grand, sure, but sometimes you want to eat dessert with your hands and not share a plate! These mini cheesecakes are my personal twist on that classic American no-bake cheesecake, inspired by the ripe bananas always sitting on my counter. Instead of letting them turn to mush, I saw a sweet, natural flavor booster waiting to happen. It’s like taking the creamy comfort of banana pudding and giving it a cheesecake hug. Over time, I’ve swapped in different cookies, played with toppings, and these cute little cups have become my absolute go-to for any potluck or family dinner.
Why You’ll Adore These Banana Cheesecake Minis
First, they’re no-bake. That means no heating up the kitchen and no stress about water baths or cracks. You just mix, chill, and delight. They are perfectly portable, looking adorable in their little liners, and everyone gets their own personal dessert. The creamy filling is incredibly smooth, with the subtle sweetness of ripe banana shining through. Plus, that buttery vanilla wafer crust adds just the right amount of crunch. It’s a simple recipe with a seriously impressive result.
Perfect Occasions for These Cheesecake Bites
These little guys are incredibly versatile. I love bringing them to picnics and baby showers because they travel so well. They’re a hit at kids’ birthday parties—much easier than cake to serve! A perfect end to a summer BBQ, or a sweet little treat set out during a holiday gathering. Honestly, any Tuesday where you think, “I deserve something special,” is also a perfect occasion.
Gather Your Ingredients for Banana Cheesecake Bites
You only need a handful of simple items to create these bites of bliss. Make sure your cream cheese is truly softened to room temperature for a lump-free filling.
- Crust:
- 1 cup crushed vanilla wafers (about 25-30 cookies)
- 3 tablespoons unsalted butter, melted
- Cheesecake Filling:
- 8 oz (one brick) cream cheese, softened
- 1/2 cup sweetened condensed milk
- 1/2 cup mashed ripe banana (about 1 large banana)
- 1 teaspoon vanilla extract
- 1 cup whipped topping (like Cool Whip), thawed
- Layering & Garnish:
- 1 banana, thinly sliced
- Extra whipped topping for garnish
- Mini vanilla wafers or extra crushed cookies for garnish
Easy Swaps and Substitutions
Out of something? No worries! This recipe is very forgiving.
- Vanilla Wafers: Try graham cracker crumbs, shortbread cookies, or even Biscoff cookies for the crust.
- Whipped Topping: You can use an equal amount of freshly whipped heavy cream, sweetened with a tablespoon of powdered sugar.
- Sweetened Condensed Milk: In a pinch, you can use a thick, sweet vanilla pudding, though the texture will be slightly different.
- For a Richer Taste: Add a tablespoon of lemon juice to the filling to brighten the banana flavor.
How to Make Mini Banana Cheesecake Bites
Follow these simple steps for a foolproof, delicious result every single time.
Step 1: Create the Buttery Crust
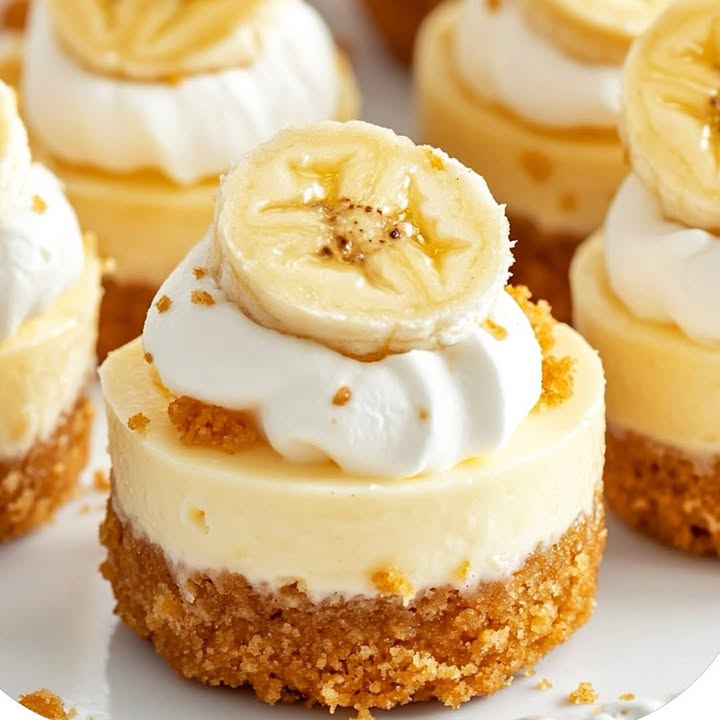
Start by placing your vanilla wafers in a zip-top bag and crushing them with a rolling pin until you have fine crumbs. You’ll hear a satisfying crunch as you crush. In a medium bowl, pour the golden crumbs over the melted butter. Mix it all together with a fork until every crumb is glistening and coated. The mixture should hold together when you pinch it. Spoon this aromatic, sandy mixture evenly into 12 muffin cups lined with paper liners. Press it down firmly with your fingers or the bottom of a small glass. This creates a solid foundation that won’t fall apart when you bite into your cheesecake.
Pro tip: A small, flat-bottomed measuring cup or a shot glass works perfectly to press the crust evenly and firmly.
Step 2: Whip Up the Dreamy Filling
Now, for the star of the show. In a large mixing bowl, beat your softened cream cheese with a hand mixer on medium speed. Beat it until it is completely smooth, creamy, and free of any lumps. This is crucial for that perfect, velvety texture. Add the sweetened condensed milk, the mashed banana (which should smell wonderfully sweet and fruity), and the vanilla extract. Mix again until the filling is beautifully uniform and creamy. Finally, gently fold in the whipped topping with a spatula. Use big, sweeping motions to incorporate it fully, keeping as much air in the mixture as possible. You’ll see the color lighten and the texture become wonderfully fluffy.
Pro tip: To easily mash the banana, just use a fork right in a small bowl. The riper the banana, the sweeter and more flavorful your cheesecake bites will be.
Step 3: Layer, Chill, and Set
This is the secret layer that makes these extra special. Place one thin slice of fresh banana right on top of each crust in the muffin tin. It adds a fresh banana burst in every bite. Carefully spoon or pipe the luscious banana cheesecake filling over the slices, filling each cup nearly to the top. Smooth out the tops with the back of your spoon. Now, the hardest part: patience. Gently transfer the muffin tin to the refrigerator. Let your mini cheesecakes chill and set for at least 4 hours, but overnight is truly best. This allows the flavors to meld and the texture to become perfectly sliceable.
Chef’s tip: For a beautiful, neat top, pipe the filling using a large piping bag fitted with a star or round tip. It looks professional and is actually less messy than spooning!
Step 4: The Finishing Touches
Just before you’re ready to serve, it’s garnish time. Pull your beautiful set cheesecakes from the fridge. Top each one with a pretty dollop of extra whipped topping. For the final touch, place a mini vanilla wafer right on top, or sprinkle a few extra crushed cookie crumbs over the whipped cream. That little bit of extra crunch and visual appeal makes all the difference. They are now ready to be devoured!
Timing Breakdown
- Prep Time: 20 minutes
- Chill Time: 4 hours minimum (overnight recommended)
- Total Time: 4 hours 20 minutes (plus chilling)
- Yields: 12 perfect mini cheesecakes
My Best Chef’s Secret
The key to a clean, professional look is all in the release. Before you try to remove the paper liners, run a thin knife around the very edge of each mini cheesecake. This breaks any seal between the filling and the liner, so it peels off perfectly without sticking or tearing your beautiful dessert.
A Little Extra Fun Fact
Bananas and cheesecake are a more iconic duo than you might think! The combination became hugely popular in the mid-20th century with the rise of banana cream pie and instant pudding. Adding that flavor to the luxurious texture of cheesecake was a natural, and brilliant, next step. It’s a classic American dessert mashup that just feels right.
Necessary Equipment
You likely have everything you need already in your kitchen.
- 12-cup standard muffin tin
- Paper or foil muffin liners
- Medium and large mixing bowls
- Hand mixer or stand mixer
- Spatula
- Fork or small glass for pressing crust
- Piping bag (optional, but helpful for a neat finish)
How to Store Your Mini Cheesecake Bites
Because they need to stay chilled, storage is simple. Keep the cheesecakes in their muffin tin, or transfer them to an airtight container. Store them in the refrigerator for up to 4 days. The banana slices on the bottom may darken slightly after a day or two, but they will still taste delicious.
You can also freeze these cheesecake bites for longer storage. Once they are fully set, place the whole muffin tin in the freezer for about an hour to firm them up solid. Then, pop the individual cheesecakes out and transfer them to a freezer-safe bag or container. They will keep for up to 2 months.
To serve frozen cheesecakes, simply move them from the freezer to the refrigerator about 30 minutes before you plan to eat them. This lets them thaw just enough to be creamy and perfect. I don’t recommend freezing them with the whipped topping garnish on top, as it can get icy. Add fresh topping right before serving.
Tips and Advice for Guaranteed Success
- Soft Cream Cheese is Non-Negotiable: Take your cream cheese out of the fridge at least an hour before you start. Soft cheese blends smoothly and prevents a grainy filling.
- Press That Crust! A firmly packed crust won’t crumble when you take a bite. Really put some pressure on it.
- Don’t Over-mix the Filling: Once you add the whipped topping, fold gently. Over-mixing can deflate the air and make the filling dense.
- Use Ultra-Ripe Bananas: The more brown spots, the better. They mash easier and have a much stronger, sweeter banana flavor.
Presentation Ideas to Wow Your Guests
- Drizzle with a little caramel or chocolate sauce just before serving.
- Place them on a beautiful tiered cake stand for a party.
- Sprinkle with toasted coconut flakes or chopped nuts for added texture.
- Top with a single perfect blueberry or raspberry for a pop of color.
Healthier and Fun Recipe Variations
Feel like mixing it up? Try one of these tasty twists on the classic Mini Banana Cheesecake Bites.
- Chocolate Banana Cheesecake Bites: Use chocolate wafer cookies for the crust and add 2 tablespoons of cocoa powder to the filling.
- Peanut Butter Banana Bliss: Swirl 1/4 cup of creamy peanut butter into the cheesecake filling and use Nilla Wafers or graham crackers for the crust.
- Tropical Mango Banana: Replace half of the mashed banana with mashed ripe mango for a sunny, tropical flavor.
- Lighter Greek Yogurt Version: Substitute half the cream cheese with plain Greek yogurt and use light whipped topping for a protein-rich, tangier bite.
- Salted Caramel Swirl: Before chilling, drizzle a teaspoon of salted caramel sauce over each filled cup and use a toothpick to swirl it gently into the filling.
- Nutty Crunch Delight: Add 1/4 cup of very finely chopped toasted pecans or walnuts to your vanilla wafer crust mixture.
Common Mistakes to Avoid with Mini Banana Cheesecake Bites
Mistake 1: Using Cold, Hard Cream Cheese
This is the number one reason for a lumpy, unpleasant cheesecake filling. When cream cheese is straight from the fridge, it won’t blend smoothly with the other ingredients. No amount of mixing will get rid of all the little bits. Always plan ahead and let your cream cheese sit on the counter until it’s soft to the touch. You should be able to press your finger into it easily.
Mistake 2: Skipping the Banana Slice Layer
It might seem like an extra, unnecessary step, but that thin slice of banana between the crust and filling is a game-changer. It keeps the crust from getting soggy from the moist filling above it. More importantly, it gives you a fresh, bright hit of banana flavor in every single bite, instead of just the mashed banana flavor blended throughout. Don’t skip this simple secret to a better texture and flavor!
Mistake 3: Not Chilling Long Enough
Impatience can ruin these mini cheesecakes. If you try to eat them after just an hour or two in the fridge, they will be a soft, messy puddle. The chilling time is when the magic happens—the filling firms up, the flavors deepen, and everything sets into that perfect, sliceable cheesecake texture. Respect the chill! A minimum of 4 hours is required, but overnight is truly ideal for the best results.
Mistake 4: Over-Mixing After Adding Whipped Topping
Once you fold in the whipped topping, you need to be gentle. Vigorous mixing with your electric mixer will beat all the air out of the whipped topping. This leads to a dense, heavy filling instead of the light, fluffy, mousse-like texture you want. Use a spatula and fold slowly and deliberately, just until no white streaks remain. A few lumps are better than over-mixing.
Frequently Asked Questions
Can I make these mini cheesecakes ahead of time?
Absolutely! In fact, I highly recommend it. These are the perfect make-ahead dessert. You can prepare them fully, including the crust, filling, and layering, up to two days in advance. Keep them covered in the refrigerator until you’re ready to garnish and serve. The flavors actually improve as they sit, melding together beautifully. Just add the final whipped topping and cookie garnish right before you present them to keep everything looking fresh and perfect.
What can I use instead of Cool Whip?
You have a couple of great options if you prefer not to use Cool Whip. The best substitute is freshly whipped heavy cream. Simply take 1 cup of cold heavy whipping cream and beat it with 1-2 tablespoons of powdered sugar and a splash of vanilla extract until it forms stiff peaks. Then, gently fold this into your cream cheese mixture just as you would the Cool Whip. The taste will be wonderfully fresh and rich. Just note, the filling may be slightly less stable and a bit softer.
My crust is crumbling and won’t hold together. What did I do wrong?
A crumbly crust usually means you need a bit more binder, or you didn’t press it firmly enough. First, ensure you used real melted butter, not just softened. If after mixing, the crumbs don’t hold together when you squeeze a handful, add another half tablespoon of melted butter and mix again. Second, and most importantly, you must press the crumbs into the liner very firmly. Use the bottom of a small glass or measuring cup and really compact it. A loose press leads to a crust that falls apart.
Can I freeze banana cheesecake bites?
Yes, they freeze wonderfully! It’s a great way to have a ready-to-go dessert. For best results, freeze them without the final whipped topping garnish. Place the chilled, set cheesecakes (sans topping) in a single layer on a baking sheet and freeze for 1-2 hours until solid. Then, transfer them to a freezer-safe bag or container. They’ll keep for 1-2 months. Thaw in the refrigerator for about 30 minutes before serving, then add fresh whipped topping and garnish.
Why did my banana slices turn brown on the bottom?
This is completely normal and does not affect the taste at all! Bananas oxidize and turn brown when exposed to air. Since the slices are buried under the filling, the process is slower, but it still happens over a day or two. To minimize it, you can toss the banana slices very lightly with a teaspoon of lemon or pineapple juice before placing them on the crust. This acid slows down the browning. For the best appearance, serve the cheesecakes within 24 hours of making them.
Is there a way to make this recipe gluten-free?
Easily! Just swap the vanilla wafers for your favorite gluten-free vanilla cookies or graham-style crackers. Make sure to crush them finely. All the other ingredients in the filling are naturally gluten-free. Always double-check labels on things like whipped topping if you have a severe allergy, but most standard brands are gluten-free.
Can I use a different fruit instead of banana?
You sure can, though the texture might change slightly. For a similar consistency, try using an equal amount of very ripe, mashed peaches or mango. For berries, I recommend making the filling as written (without fruit), then swirling in a few tablespoons of berry puree or jam at the end rather than mashing them in, as they contain more water. The possibilities are endless!
My filling seems too runny. How can I fix it?
A runny filling usually points to under-whipped cream cheese or not enough chilling time. First, make sure you beat the cream cheese until it’s very smooth and almost fluffy on its own. If you’ve already mixed everything and it’s soupy, you can try stirring in an extra 1/4 cup of crushed cookie crumbs to help absorb moisture and thicken it. Then, be patient with the chilling. The filling will firm up significantly in the cold refrigerator. Give it the full 4 hours, or even overnight, before you decide it’s a fail.
Do I have to use a muffin tin? Can I make one big cheesecake?
You don’t have to use a muffin tin, but it creates the perfect individual portions. If you want one large cheesecake, simply press the crust mixture into the bottom of a 9-inch pie plate or springform pan. Double the filling recipe for a standard-sized cheesecake. The method and chill time remain the same. You’ll just slice it like a pie when serving.
How do I prevent the paper liners from sticking to the cheesecake?
This is a common annoyance! The best trick is to run a thin, sharp knife around the very edge of the cheesecake before you try to peel the liner off. This cuts any connection between the filling and the paper. Also, using foil liners can sometimes release a little easier than plain paper ones. My chef’s secret of running the knife around the edge virtually guarantees a clean release every single time.
Your New Go-To Dessert
So there you have it—my beloved recipe for Mini Banana Cheesecake Bites. They are simple, joyful, and always met with smiles. Whether you’re cooking for a crowd or just want a sweet treat waiting for you after a long day, these little cups of happiness deliver. I hope they become a regular in your kitchen, bringing as much fun and flavor to your table as they have to mine. Now, go grab those ripe bananas and get mixing!
Mini Banana Cheesecake Bites
Ingredients
Equipment
Method
- Crush vanilla wafers in a zip-top bag using a rolling pin until you have fine crumbs.
- In a medium bowl, mix crushed wafers with melted butter until well combined and holds together.
- Spoon the mixture evenly into 12 muffin cups lined with paper liners and press down firmly to form the crust.
- In a large mixing bowl, beat softened cream cheese until smooth with a hand mixer.
- Add sweetened condensed milk, mashed banana, and vanilla extract to the cream cheese and mix until uniform.
- Gently fold in the whipped topping with a spatula until fully incorporated.
- Place a thin slice of banana on top of each crust in the muffin tin.
- Spoon or pipe the cheesecake filling over the banana slices, filling each cup nearly to the top.
- Chill in the refrigerator for at least 4 hours or overnight to set.
- Before serving, garnish with extra whipped topping and a mini vanilla wafer or crushed cookies.