The Easiest, Cheesiest Hash Brown Casserole You’ll Ever Make
Okay, can we all just agree that a good casserole is a hug in a dish? I’m talking about that cozy, no-fuss kind of meal that feels like a warm blanket. You know the one I mean! My family goes absolutely wild for this Easy & Quick Hash Brown Casserole. It’s my secret weapon for busy mornings, last-minute potlucks, and those nights when only carbs and cheese will solve the problem. Inspired by a classic diner favorite, this recipe guarantees smiles all around. Let me show you how simple it really is!
Where Did This Cheesy Masterpiece Come From?
This recipe is a true American classic, often linked to the homey feel of places like Cracker Barrel. It’s a dish born from practicality, using simple pantry staples and frozen hash browns to create something magical. In my own kitchen, it started as a desperate attempt to feed a hungry crowd of kids after a soccer game. I tossed together what I had—hash browns, sour cream, a can of soup, and lots of cheese. The result was an instant legend! Now, it’s the most requested ‘breakfast for dinner’ at my house. It’s humble, it’s comforting, and it always brings everyone to the table.
Why You’ll Fall Head Over Heels for This Casserole
You will love this recipe because it’s the definition of easy comfort food. First, it’s incredibly forgiving. No fancy skills are needed. Second, that crispy, golden cheese top gives way to a creamy, savory, and hearty center that is pure bliss. It’s also wildly versatile. Serve it for brunch with eggs, or as a main dish with a salad for dinner. Plus, it makes fantastic leftovers (if you’re lucky enough to have any!). It’s the kind of reliable recipe you’ll turn to again and again.
Perfect Occasions for This Crowd-Pleasing Casserole
This dish is your culinary MVP for so many events! Here’s where it shines brightest:
- Big Family Brunches: It’s a holiday morning lifesaver. Pair it with scrambled eggs and bacon.
- Potluck Dinners: It travels like a dream and everyone asks for the recipe.
- Weeknight Comfort Dinner: When you need a surefire hit that requires minimal effort.
- Tailgating or Game Day: Hearty, cheesy, and feeds a hungry team of fans.
What You’ll Need: The Ingredients List
Gather these simple ingredients. I bet you have most of them already!
- 32 oz. package of frozen shredded hash browns, thawed
- 1/2 cup (1 stick) of butter, melted
- 1 (10.5 oz) can of cream of chicken soup (Cream of Cheddar or Mushroom work great too!)
- 1 (16 oz) container of sour cream
- 1 small yellow onion, finely diced
- 2 cups of shredded sharp cheddar cheese, divided
- 1/4 teaspoon of freshly ground black pepper
No Stress Substitutions
Out of something? No problem! This recipe is flexible.
- Soup Swap: Use cream of mushroom, celery, or cheddar soup. For a vegetarian version, cream of mushroom works perfectly.
- Sour Cream Alternative: Plain Greek yogurt can stand in for a tangy, protein-packed twist.
- Cheese Choices: Colby Jack, Monterey Jack, or a Mexican blend would all be delicious.
- Add-Ins: Feel free to stir in cooked, crumbled bacon, diced ham, or a handful of chopped green onions for extra flavor.
Let’s Get Cooking: Your Step-by-Step Guide
Follow these simple steps for casserole perfection.
Step 1: Prep Your Oven and Ingredients
First, preheat your oven to 350°F (175°C). This ensures it’s perfectly hot and ready when your casserole goes in. While it warms up, take your thawed hash browns and give them a good pat-down with paper towels. Removing that excess moisture is key! You want them just damp, not wet, so your casserole doesn’t get soggy. Trust me, this small step makes a huge difference in the final texture.
Step 2: The Big, Beautiful Mix
This is the fun part! In a large mixing bowl, combine the thawed and dried hash browns, the melted butter, the can of soup, the full container of sour cream, and the diced onion. Now, grab 1 1/2 cups of that shredded cheddar cheese (save the last 1/2 cup for the top!) and sprinkle it into the bowl. Add your black pepper. Now, roll up your sleeves and get mixing! Use a big spatula or your hands to fold everything together until every shred of potato is coated in that creamy, cheesy, glorious mixture. The smell of onion and cheese already starts to work its magic.
Step 3: Assemble and Bake to Golden Glory
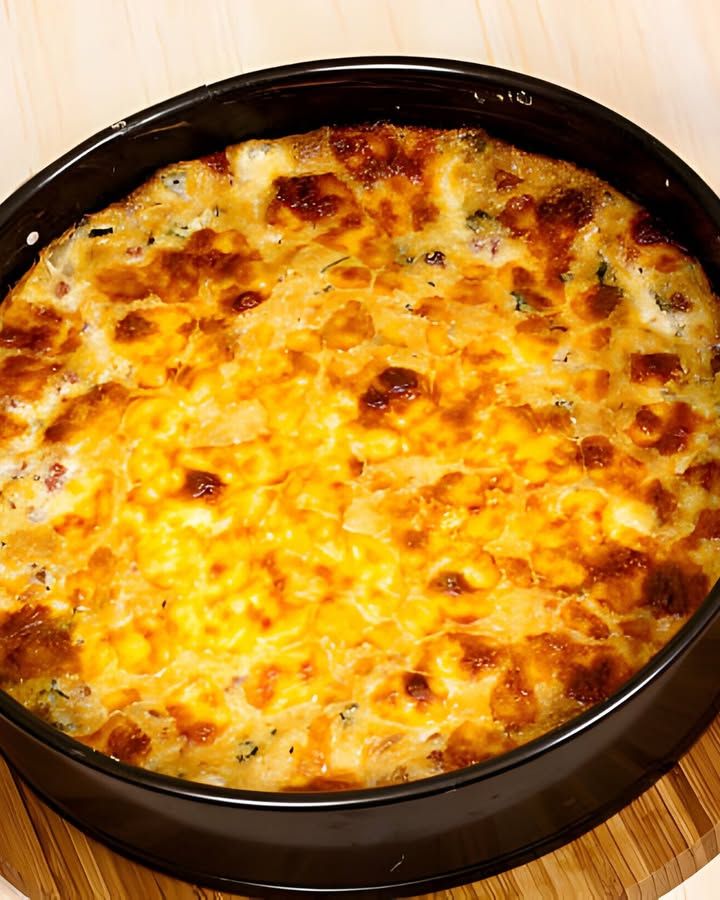
Take a 9×13 inch baking dish and grease it lightly with butter or cooking spray. Pour your hash brown mixture into the dish and use your spatula to spread it out evenly. Now, take that reserved 1/2 cup of cheese and sprinkle it generously over the entire top. This is what will create that irresistible, crispy, golden-brown crust we all dream about. Place the dish in the center of your preheated oven and bake for 35 minutes. Pro tip: Place a baking sheet on the rack below to catch any potential bubbly drips for easy cleanup.
Step 4: Crisp It Up and Rest
After 35 minutes, don’t take it out yet! Increase your oven temperature to 375°F (190°C). Let the casserole bake for another 8-12 minutes. Watch it closely now—you’re waiting for the top to transform into a deep, golden brown and the edges to get bubbly and crisp. Once it’s perfectly golden, remove it from the oven. This next step is crucial: let it rest and cool for about 10 minutes. This allows the casserole to set up, making it much easier to slice and serve without it being a gooey mess. The wait is tough, but so worth it!
Timing is Everything
Here’s a quick breakdown of how long this will take from start to finish:
- Prep Time: 15 minutes (plus time for hash browns to thaw)
- Cook Time: 45-47 minutes
- Resting Time: 10 minutes
- Total Time: About 1 hour 10 minutes
My Chef’s Secret for the Best Texture
My absolute secret trick? After you mix everything, let the combined mixture sit for 10 minutes before you put it in the baking dish. This gives the hash browns a little time to soak up the creamy sauce. It results in a more cohesive, less soupy casserole that holds its shape beautifully when you cut into it.
Fun Food Fact: The Humble Hash Brown
Did you know? The term “hash brown potatoes” first showed up in a cookbook by Maria Parloa in 1888! The name comes from the French word “hacher,” meaning to chop. So you’re making a little bit of chopped-and-fried history with this dish. It’s a classic that’s stood the test of time for a very good reason—it’s delicious.
Necessary Equipment
You don’t need any fancy tools for this recipe.
- Large mixing bowl
- 9×13 inch baking dish (glass or ceramic is best)
- Box grater (if you’re shredding your own cheese)
- Mixing spatula
- Measuring cups
- Paper towels (for drying the potatoes)
How to Store Your Leftover Casserole
Let the casserole cool completely to room temperature. Do not leave it out for more than two hours. Cover the baking dish tightly with aluminum foil or plastic wrap. You can also transfer individual portions to airtight containers. Stored this way, it will keep well in the refrigerator for 3 to 4 days.
To reheat, you have great options. For a single serving, the microwave works fine for about 60-90 seconds. To revive that crispy top, reheat portions in a toaster oven or a regular oven at 350°F until warmed through. For the whole casserole, cover it with foil and bake at 325°F for 20-25 minutes, then remove the foil for the last 5 minutes.
Yes, you can freeze this casserole! Wrap the cooled, baked casserole (or unbaked assembled casserole) extremely well in plastic wrap and then foil. Label it with the date. It will keep for up to 2 months. Thaw overnight in the fridge before baking or reheating. Note: the texture of the potatoes may become a bit softer after freezing, but it will still taste wonderful.
My Best Tips and Advice for You
- Thaw Properly: Plan ahead! Let the hash browns thaw in the fridge overnight. If you’re in a pinch, spread them on a plate and microwave in 30-second bursts until no longer frozen in chunks, then pat dry.
- Dry Those Potatoes: I can’t say it enough. Squeeze out the water! This is the #1 tip to avoid a watery casserole.
- Fresh vs. Pre-Shredded Cheese: I highly recommend shredding your own cheese from a block. Pre-shredded cheese contains anti-caking agents that can sometimes make the sauce a bit grainy and less smooth. Block cheese melts like a dream.
- Test for Doneness: The casserole is done when the edges are bubbling vigorously and the center is hot. A knife inserted should go in easily.
Presentation Ideas to Wow Your Guests
Make it look as good as it tastes!
- Top with a fresh, colorful sprinkle of chopped chives or green onions right before serving.
- Serve scoops in individual ramekins for a cute, personalized touch at brunch.
- On a brunch buffet, garnish the whole dish with a few cherry tomatoes on the vine or fresh parsley sprigs.
- For a hearty dinner plate, place a square of casserole next to a bright, simple green salad with vinaigrette.
Healthier & Creative Recipe Variations
Love the idea but want to mix it up? Try these six twists!
- Loaded Potato Casserole: Stir in 1 cup of cooked, crumbled bacon and 1/2 cup of chopped green onions before baking. Top with an extra sprinkle of both after baking.
- Veggie-Packed Lighter Version: Use fat-free sour cream, reduced-fat cream of mushroom soup, and add a cup of finely chopped steamed broccoli or spinach to the mix.
- Southwestern Hash Brown Casserole: Add a can of drained green chiles, use Pepper Jack cheese, and stir in 1 teaspoon of cumin. Top with crushed tortilla chips the last 5 minutes of baking.
- French Onion Inspired: Sauté the onions until deeply caramelized before adding. Use a Swiss and Gruyere cheese blend instead of cheddar for that classic French onion soup flavor.
- Breakfast Sausage Casserole: Brown and crumble 1 pound of breakfast sausage. Drain the fat and mix it into the casserole base before baking. Perfect for a protein-packed start.
- Dairy-Free/Delicious Version: Use a vegan sour cream alternative, a dairy-free cream soup, vegan butter, and your favorite plant-based shredded cheese. It’s surprisingly creamy and satisfying!
Common Mistakes to Avoid
Steer clear of these pitfalls for casserole success every single time.
Mistake 1: Skipping the Thaw and Dry Step
Using frozen hash browns straight from the freezer is a major error. They release a ton of water as they bake, leaving you with a soggy, watery mess in the middle of your dish. Always, always thaw them first. Then, take a few minutes to press them between layers of paper towels or squeeze them in a clean kitchen towel. Removing that moisture is non-negotiable for a creamy, not soupy, texture.
Mistake 2: Overlooking the Resting Time
Pulling the casserole from the oven and immediately digging in is so tempting. I get it! But if you cut into it right away, it will ooze and fall apart on your serving spoon. Letting it rest for a full 10 minutes allows the hot, bubbly ingredients to settle and bond together. This waiting period gives you neat, beautiful squares that hold their shape perfectly on the plate.
Mistake 3: Using Only Low-Fat Dairy Products
Substituting all the dairy with low-fat or fat-free versions can seem like a healthy swap. Unfortunately, it often leads to a less flavorful and sometimes oddly textured casserole. The fat in the full-fat sour cream, soup, and cheese contributes to the rich, creamy sauce and helps the top brown beautifully. If you want to lighten it up, maybe just choose one element to swap, like using a reduced-fat soup, but keep the rest full-fat for the best results.
Mistake 4: Not Getting the Top Crispy Enough
A pale, soft top on a hash brown casserole is a missed opportunity for amazing texture. The solution is simple: use the two-temperature bake method outlined in the recipe. The initial lower temperature cooks the casserole through gently. The final blast of higher heat (375°F) is specifically to crisp and bronze that cheesy topping. Keep an eye on it during these last few minutes to achieve that perfect golden crunch.
Your Hash Brown Casserole Questions, Answered
Can I make this hash brown casserole ahead of time?
Absolutely! This is a fantastic make-ahead dish. You have two great options. First, you can assemble the entire casserole, cover it tightly, and refrigerate it for up to 24 hours before baking. You might need to add 5-10 extra minutes to the baking time since it will be going into the oven cold. Second, you can fully bake it, let it cool, cover, and refrigerate. Then, reheat it covered in foil at 325°F until hot all the way through. The make-ahead flexibility makes it perfect for stress-free entertaining.
What’s the best way to thaw the frozen hash browns quickly?
If you forgot to thaw them overnight, don’t worry! The fastest method is to use your microwave. Spread the frozen hash browns in a single layer on a microwave-safe plate. Microwave on the defrost setting or at 50% power in 2-minute intervals, fluffing them with a fork between intervals. Stop when they are no longer frozen in solid clumps but are still very cold. Then, immediately spread them on paper towels and press firmly to absorb all the released moisture. This method can have you ready to mix in about 10 minutes.
Can I use fresh potatoes instead of frozen hash browns?
You can, but it requires more work. You would need to peel and shred about 3-4 large russet potatoes. The critical step is to rinse the shredded potatoes in cold water until the water runs clear to remove excess starch. Then, you must squeeze them incredibly dry—even more so than frozen. Parboiling or frying them slightly is not usually needed for this wet casserole style. Using frozen is much easier as they are pre-shredded, par-cooked, and consistent, guaranteeing reliable results every time.
My casserole came out watery. What did I do wrong?
A watery casserole almost always points to excess moisture. The main culprits are: 1) Not thawing and thoroughly drying the frozen hash browns. 2) Using ingredients like fresh vegetables (onions, peppers) that weren’t sautéed first to cook off their water. 3) Possibly using a soup with a higher water content or a larger can by mistake. To fix it for next time, be religious about drying the potatoes. You can also try sautéing your diced onion in a little butter until soft before adding it to the mix, which evaporates its water.
What can I serve with hash brown casserole for dinner?
It’s a wonderfully hearty side dish that pairs with so many proteins! For a classic comfort food plate, serve it alongside baked or fried chicken, meatloaf, or roasted pork chops. It’s also fantastic with grilled sausages or brats. To balance the richness, always include something green and fresh. A simple arugula salad with lemon vinaigrette, steamed green beans, or roasted asparagus are perfect choices. It turns a simple protein into a full, satisfying meal.
Can I freeze the baked or unbaked casserole?
Yes, both ways work! To freeze an unbaked casserole, assemble it in a freezer-safe dish (or a disposable aluminum pan). Wrap it tightly in several layers of plastic wrap, then foil. Label and freeze for up to 2 months. Thaw overnight in the fridge before baking as directed, adding a few extra minutes. To freeze a baked casserole, let it cool completely, then wrap and freeze the same way. Reheat from frozen, covered, in a 325°F oven until hot, or thaw first and reheat. The potato texture may soften slightly but flavor remains great.
Is there a vegetarian version of this casserole?
Easily! The main non-vegetarian ingredient is typically the cream of chicken soup. Simply swap it for a vegetarian-friendly cream soup. Cream of mushroom, celery, or cheddar soup are all excellent choices. Just double-check the label to ensure no chicken stock is used. All the other base ingredients—hash browns, butter, sour cream, cheese, onion—are naturally vegetarian. You can also add in other veggies like diced bell peppers or mushrooms for more flavor.
How can I make the top extra crispy and golden?
For an exceptional crispy top, employ a few pro strategies. First, ensure you’ve used that final high-heat bake (375°F). Second, try mixing 1/4 cup of grated Parmesan cheese into your reserved cheddar for the topping—it browns beautifully. Third, for the ultimate crunch, sprinkle a handful of buttery breadcrumbs or crushed cornflakes mixed with a little melted butter over the cheese before the final bake. The combination of higher heat, good cheese, and a crunchy element creates a top that’s irresistible.
What’s the difference between using shredded vs. diced hash browns?
This comes down to personal texture preference. Shredded hash browns (the kind that look like little strings) create a casserole with a more delicate, intertwined texture. It tends to be a bit more cohesive. Southern-style or diced hash browns (little cubes) give a chunkier, more distinct potato bite, similar to home fries. Both work wonderfully in this recipe. I prefer shredded for that classic, creamy casserole feel, but if you love potato chunks, go for the diced! Just make sure to thaw and dry them well.
Why did my cheese turn greasy or separate on top?
Cheese can become greasy if it’s overheated or if you used a cheese with a lower fat content that doesn’t melt smoothly. Pre-shredded cheeses often have this issue due to their coatings. To avoid it, shred your own cheese from a block of good quality sharp cheddar. Also, don’t over-bake the casserole. Once the top is golden and bubbly, it’s done. If you see grease pooling, you can gently blot the top with a paper towel right when it comes out of the oven before letting it rest.
Ready to Make Some Family Memories?
There you have it, friends! My ultimate guide to the easiest, cheesiest, most comforting hash brown casserole. This recipe is more than just food; it’s about creating those happy, full-bellied moments around the table. It’s about simplicity that tastes like a million bucks. I’ve made this for my family more times than I can count, and it never fails to bring joy. So grab that bowl, get mixing, and get ready for the compliments to roll in. Don’t forget to share this recipe with someone you love. Happy cooking!
Philly Cheesesteak Garlic Fusion
Ingredients
Equipment
Method
- Preheat your oven to 350°F (175°C).
- Pat down the thawed hash browns with paper towels to remove excess moisture.
- In a large mixing bowl, combine thawed hash browns, melted butter, cream of chicken soup, sour cream, diced onion, 1 1/2 cups of shredded cheddar cheese, and black pepper.
- Mix everything together using a spatula or your hands until well combined.
- Grease a 9x13 inch baking dish and pour the hash brown mixture in, spreading it evenly.
- Sprinkle the remaining 1/2 cup of cheddar cheese over the top.
- Bake in the preheated oven for 35 minutes.
- Increase the oven temperature to 375°F (190°C) and bake for an additional 8-12 minutes or until golden brown and bubbly.
- Remove from the oven and let it rest for about 10 minutes before serving.