No-Bake Strawberry Cheesecake Lasagna: Your New Favorite Dessert
Picture this: It’s a hot summer day, and you promised to bring dessert to the family BBQ. The oven is the last place you want to be. You start to sweat just thinking about it. That was me last Fourth of July. In a panic, I threw together layers of cream, berries, and crust. What came out of my fridge hours later was a miracle. This No-Bake Strawberry Cheesecake Lasagna saved the day and has been my go-to dessert ever since. It’s cool, creamy, and looks like you spent all day in the kitchen. Spoiler: you absolutely did not.
From Italy to My Kitchen: A Delicious History
The name “lasagna” for a dessert might make an Italian grandma raise an eyebrow. But the idea of delightful layers is universal! Traditional lasagna is about savory layers of pasta, cheese, and sauce. Our dessert version takes that wonderful concept and turns it into something sweet and magical. Instead of noodles, we have a buttery graham cracker crust. We swap ricotta for a cloud-like cream cheese filling. The “meat sauce” becomes juicy, fresh strawberries. It’s a fun, modern twist that’s all about ease and big flavor. No baking required means more time enjoying the party.
Why You’ll Fall in Love With This Recipe
If I had to pick one dessert to make for the rest of my life, this might be it. First, it’s a no-bake dream. You can make it without turning on the oven. That’s a win in the summer or when you’re just too busy. Second, the textures are incredible. You get the crunchy crust, the smooth and fluffy filling, and the juicy burst of fresh berries. Finally, it’s a total crowd-pleaser. Kids adore it, and adults always ask for the recipe. It’s the perfect mix of fancy and foolproof.
When to Whip Up This Berry Bliss
This dessert is your secret weapon for so many occasions. It’s a star at potlucks and picnics because it travels so well. Need a show-stopper for a birthday or baby shower? Arrange the top strawberries in a heart shape. It’s my favorite for holiday parties like Memorial Day or Fourth of July because it’s so red, white, and beautiful. Honestly, a simple Tuesday night is also a great reason. Because who says you need a special day for something this good?
Gathering Your No-Bake Strawberry Cheesecake Lasagna Ingredients
Here’s everything you need. Most of it is probably in your fridge or pantry already!
- 2 cups graham cracker crumbs (about 14-16 full sheets)
- 1/2 cup unsalted butter, melted
- 3 (8-ounce) packages cream cheese, softened
- 1 cup powdered sugar
- 1 teaspoon vanilla extract
- 2 cups heavy whipping cream
- 1 (3.4-ounce) package instant vanilla pudding mix
- 1 1/2 cups milk (whole or 2% works best)
- 4 cups fresh strawberries, sliced
- 1/4 cup granulated sugar
- 1/2 cup strawberry preserves
Easy Swaps and Substitutions
Don’t stress if you’re missing something. You can easily adapt this recipe.
- Graham Cracker Crumbs: Try crushed vanilla wafers, biscoff cookies, or even Oreos (without the filling) for a chocolate crust.
- Fresh Strawberries: In a pinch, you can use thawed frozen strawberries. Just pat them very dry to avoid a soggy dessert.
- Heavy Cream: For a slightly lighter version, you can use an 8-ounce tub of frozen whipped topping, thawed. Fold it in at the end instead of the whipped cream.
- Vanilla Pudding: Cheesecake flavor pudding mix is a fantastic substitute for extra tang.
Crafting Your Creamy, Dreamy Dessert Lasagna
Let’s get layering! The process is simple, fun, and smells amazing.
Step 1: The Buttery, Crunchy Foundation
Start by making your crust. Combine the golden graham cracker crumbs with the melted, fragrant butter in a medium bowl. Mix until it looks like wet sand and every crumb is coated. This butter is the glue that holds your crust together. Pour the mixture into a 9×13-inch pan. Use the bottom of a cup or your fingers to press it down firmly and evenly. A solid, tight crust means clean slices later. Pro tip: Pressing with a flat-bottomed cup gives you a perfectly even layer. Once done, pop it in the fridge to chill while you make the filling.
Step 2: The Cloud-Like Cheesecake Filling
In a large bowl, beat the softened cream cheese with the powdered sugar and vanilla. The cream cheese must be soft! This prevents lumpy filling. Beat it until it’s completely smooth, creamy, and pale. Now, in a separate, clean bowl, whip the heavy cream. Watch it transform from liquid to soft peaks to beautiful, stiff peaks. This takes about 3-4 minutes. Gently fold the whipped cream into the cream cheese mixture. Use a big spatula and fold slowly to keep the filling light and airy.
Step 3: The Secret Pudding Layer
This step is the magic that makes the filling set so perfectly. In another bowl, whisk the instant vanilla pudding mix with the cold milk. Whisk for a full two minutes. You’ll see it thicken right before your eyes into a lovely, smooth pudding. Now, gently fold this pudding into your cream cheese mixture. Keep folding until no white streaks remain. You now have the most luscious, fluffy, stable filling. It’s like a cheesecake cloud!
Step 4: The First Sweet Layers
Take your chilled crust from the fridge. Spread half of your glorious cream cheese filling over it. Use a spatula to smooth it into an even layer, reaching all the corners. In a small bowl, toss your bright red, sliced strawberries with the granulated sugar. The sugar will pull out the strawberries’ natural juices and create a light syrup. Sprinkle half of these sugary berries evenly over the white filling layer. The red against the white is just gorgeous.
Step 5: The Finale with a Glossy Finish
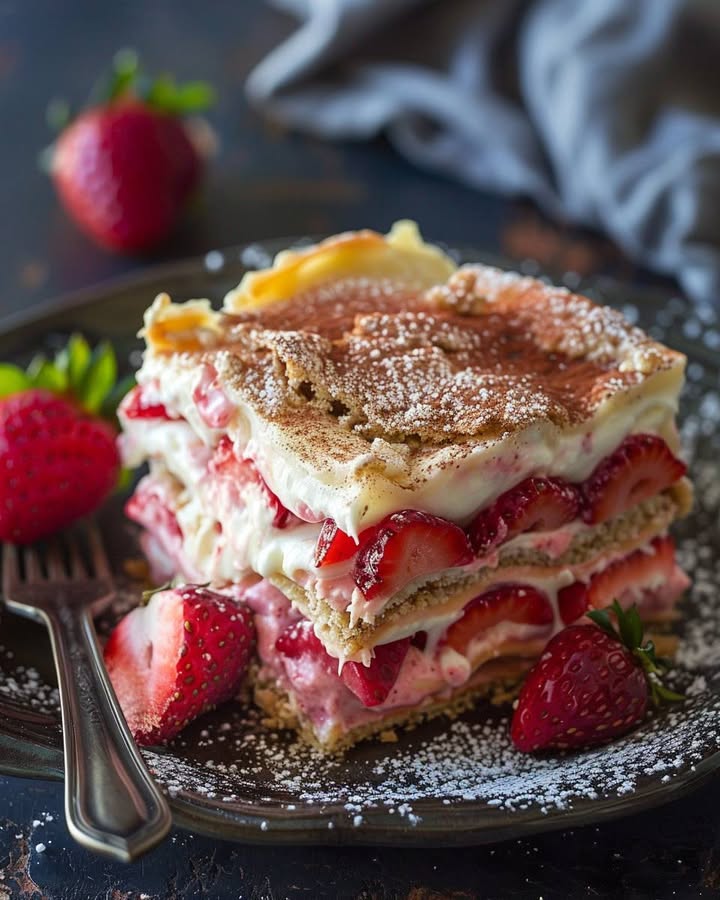
Now, spread the remaining half of the cream cheese filling over the strawberry layer. Smooth the top carefully. For the glossy finish, warm the strawberry preserves in a small saucepan over low heat for just a minute or two. Stir until it’s runny and smooth. Let it cool for a minute, then drizzle it artfully over the entire top of the dessert. Finally, arrange the remaining sugared strawberries on top. You can do neat rows or just scatter them for a rustic look.
Step 6: The Patience Game (Chill Time!)
This is the hardest part! Cover your dessert lasagna and refrigerate it for at least 4 hours, but overnight is even better. This chilling time is non-negotiable. It allows all the layers to set, meld, and become firm enough to slice. The crust solidifies, and the filling turns from soft to perfectly sliceable. When you’re ready, slice into squares and serve. Chef’s Tip: For super clean slices, dip your knife in hot water and wipe it dry between each cut.
Your Recipe Timing Breakdown
Here’s what to expect time-wise for your No-Bake Strawberry Cheesecake Lasagna:
- Prep Time: 30 minutes
- Chill Time: 4 hours (minimum)
- Total Time: 4 hours 30 minutes
The Chef’s Secret for Maximum Flavor
My little secret is to add a tiny pinch of salt to the cream cheese mixture. It doesn’t make it taste salty. Instead, it makes all the other flavors—the sweet cream cheese, the vanilla, the berries—pop and taste more vibrant. Just about 1/8 of a teaspoon will do the trick. Trust me on this one!
A Fun Fact About Graham Crackers
Did you know the graham cracker was invented in the 1830s by a Presbyterian minister named Sylvester Graham? He promoted them as part of a bland, vegetarian diet to curb unhealthy desires. I think he’d be very surprised (and maybe a little horrified) to see his “health food” crushed up with a stick of butter and layered with cream and sugar in our delicious dessert lasagna! How times have changed.
What You’ll Need to Make It
No special tools required! Just basic kitchen equipment:
- 9×13-inch baking dish (glass or metal)
- Electric mixer (hand or stand)
- Mixing bowls (small, medium, and large)
- Whisk and spatula
- Measuring cups and spoons
- Small saucepan for the preserves
Keeping Your Dessert Lasagna Fresh
This dessert stores beautifully, which makes it perfect for making ahead. Always keep it covered in the refrigerator. It will stay fresh and delicious for up to 3-4 days. The crust may start to soften slightly after day two, but it will still taste amazing.
I do not recommend freezing the assembled dessert. The creamy filling and juicy strawberries don’t freeze and thaw well. They can become watery and separate, ruining the wonderful texture we worked so hard to create.
If you want to prepare parts in advance, you can make the crust a day ahead and store it covered at room temperature. You can also slice the strawberries and toss them with sugar, storing them in a container in the fridge. Then, just assemble the day you want to serve it.
Tips for No-Bake Strawberry Cheesecake Lasagna Success
- Soft Cream Cheese is Key: Take your cream cheese out of the fridge at least an hour before. Soft cream cheese blends smoothly without lumps.
- Cold Bowl for Whipping Cream: For the fastest, fluffiest whipped cream, chill your mixing bowl and beaters in the freezer for 10 minutes first.
- Pat Strawberries Dry: If you wash your strawberries, dry them thoroughly before slicing. Extra water can make the dessert soggy.
- Be Patient with Chilling: Don’t shortcut the fridge time. It’s what gives you clean, beautiful layers when you cut into it.
Make It Look Like It Came From a Bakery
Presentation is half the fun!
- Serve each square on a white plate with a mint leaf for a pop of green.
- Right before serving, dust the top with a little powdered sugar using a fine-mesh sieve.
- For individual servings, layer the ingredients in clear glasses or mason jars.
- Add a small dollop of extra whipped cream on top of each slice.
Mix It Up! 6 Tasty Variations
Love this recipe? Try these fun twists on the classic.
- Mixed Berry Bliss: Use a combination of strawberries, blueberries, raspberries, and blackberries for a patriotic or summer-fruit medley.
- Chocolate Lovers’ Dream: Use an Oreo crust, chocolate pudding in the filling, and top with chocolate shavings and fresh raspberries.
- Lemon Berry Refresher: Use lemon pudding mix and add a tablespoon of lemon zest to the filling. Top with blueberries and raspberries.
- Tropical Escape: Use a coconut or vanilla wafer crust. Fold 1 cup of toasted coconut into the filling and top with sliced mango, kiwi, and pineapple.
- Cookies and Cream: Crush Oreos for the crust. Fold 1 cup of crushed Oreos into the filling and use chocolate pudding mix.
- Peaches and Cream: Swap the strawberries for thinly sliced, sweet peaches. Use peach preserves for the drizzle on top.
Common Mistakes to Avoid
Avoid these simple pitfalls for a perfect dessert every time.
Mistake 1: Not Softening the Cream Cheese
Using cold cream cheese straight from the fridge is the fastest way to a lumpy, difficult-to-mix filling. The hard chunks won’t blend smoothly with the powdered sugar or the whipped cream. Your filling will have little bits of cream cheese throughout. To avoid this, let the blocks sit on your kitchen counter for a good hour before you start. If you’re in a hurry, you can microwave them on low power for 15-second intervals. Just be careful not to melt them.
Mistake 2: Not Letting it Chill Long Enough
It’s so tempting to cut into this dessert after just an hour or two. But if you do, you’ll have a delicious but soupy mess. The chilling time is when the pudding sets and the whole dessert firms up. Skipping this step means you won’t get those beautiful, clean layers when you serve it. Plan ahead. Making it the night before is the absolute best plan. This gives it plenty of time to set and makes the flavors even better.
Mistake 3: Wet Strawberries on Top
If you rinse your strawberries and don’t dry them well, that extra water will drip down and make the top of your dessert wet. It can also water down the beautiful preserve glaze. Always wash your berries ahead of time and pat them completely dry with a paper towel before you slice and sugar them. This keeps your dessert looking fresh and tasting its best for days.
Your Questions, Answered
Can I use frozen strawberries instead?
You can use frozen strawberries, but you must be careful. Thaw them completely first in a colander. Then, pat them incredibly dry with many paper towels. Frozen berries release a lot of water as they thaw. If you add them while wet, they will make the entire dessert soggy and watery. For the best texture and appearance, fresh strawberries are highly recommended.
What can I use instead of heavy whipping cream?
If you don’t have heavy cream, the best substitute is an 8-ounce tub of frozen whipped topping (like Cool Whip), thawed. Prepare your cream cheese and pudding mixture as directed. Then, gently fold in the entire tub of thawed whipped topping at the very end. Do not try to whip something like half-and-half or milk; it will not thicken properly.
Why did my graham cracker crust fall apart when slicing?
A crumbly crust usually means it wasn’t pressed down firmly enough or the butter wasn’t mixed in well. When you combine the crumbs and butter, make sure every crumb is moistened. Then, press the mixture into the pan very firmly using the bottom of a glass or measuring cup. Applying good pressure helps the crust set into a solid base that can hold the weight of the filling.
Can I make this dessert a day ahead?
Absolutely! Making it a day ahead is actually ideal. The flavors have more time to blend together, and it ensures it is fully set. Just cover it tightly with plastic wrap or a lid and keep it in the refrigerator. Add any final strawberry decorations on top the morning you plan to serve it for the freshest look.
How long will leftovers last in the fridge?
Leftovers will stay delicious for 3 to 4 days when kept covered in the refrigerator. The crust will gradually get softer the longer it sits, but it will still taste wonderful. Because of the fresh fruit and dairy, I do not recommend keeping it longer than 4 days for food safety and quality.
Can I use a different fruit?
Yes, this recipe is very flexible! Blueberries, raspberries, peaches, or a mix of berries all work wonderfully. Just make sure to adjust the sugar you toss with the fruit based on its natural sweetness. Also, try to match the flavor of the preserves you melt for the top layer (like blueberry preserves for blueberries).
Do I need to use the pudding mix?
The instant pudding mix is important. It’s not just for flavor. It contains thickeners that help the creamy filling set properly without baking. If you leave it out, your dessert will be too soft and won’t hold its shape when sliced. Stick with the instant pudding for perfect results.
What size pan do I need?
A standard 9×13-inch baking dish is perfect for this recipe. It gives you the right depth for all the beautiful layers. If you only have a slightly smaller or larger pan, that’s okay. Just know your layers will be a bit thicker or thinner, which will slightly change the chilling time needed.
My whipped cream turned to butter. What happened?
You over-whipped it! When whipping heavy cream, watch it closely. It goes from soft peaks to stiff peaks to butter very quickly. Stop beating as soon as you can lift the beaters and the cream forms a sharp point that holds its shape. If you see it start to look grainy or clumpy, you’ve gone too far. Sadly, you can’t fix it. Start over with new cream.
Can I freeze No-Bake Strawberry Cheesecake Lasagna?
I don’t recommend freezing the finished dessert. The creamy filling and the fresh strawberries do not freeze well. They will become watery and separate when thawed, creating a mushy texture. It’s best enjoyed fresh from the fridge.
The Perfect Finish for Any Gathering
So there you have it! My famous No-Bake Strawberry Cheesecake Lasagna. It’s the dessert that looks like you fussed all day but secretly comes together with no oven and a whole lot of love. The layers of crunch, cream, and juicy berry are pure magic in a pan. I’ve made it for fussy toddlers and fancy dinner parties, and it’s always a hit. Give it a try this weekend. I promise your family will beg you to make it again. Happy no-baking!
Pineapple Mousse Delight
Ingredients
Equipment
Method
- Combine graham cracker crumbs and melted butter until it looks like wet sand; press into a 9x13-inch pan and chill in the fridge.
- Beat softened cream cheese with powdered sugar and vanilla until smooth.
- Whip heavy cream in a separate bowl until stiff peaks form.
- Fold whipped cream into the cream cheese mixture gently.
- Whisk instant pudding mix with cold milk for 2 minutes until thick.
- Fold pudding into the cream cheese mixture until smooth.
- Spread half of the cream cheese filling onto the chilled crust.
- Toss sliced strawberries with granulated sugar and sprinkle half over the filling.
- Spread the remaining cream cheese filling over the strawberries.
- Warm strawberry preserves, drizzle over the top, and arrange remaining strawberries.
- Cover and refrigerate for at least 4 hours or overnight for best results.