The Chocolate Cake That Saved My Last-Minute Party
You know those moments when you need a show-stopping dessert, but your clock is screaming “impossible”? I’ve been there more times than I can count. This Quick Chocolate Delight is my culinary superhero. It’s the cake I whip up when friends pop over unexpectedly, or when my kids announce a bake sale tomorrow morning. It’s fast, fabulously foolproof, and so rich you’d never guess it comes together in a flash. Let me share this family favorite with you.
My Love Affair with a Simple Chocolate Cake
This recipe isn’t from a fancy cookbook. I found a scribbled version in my grandma’s old recipe box, labeled “Emergency Chocolate Cake.” She was a practical woman who believed joy shouldn’t be complicated. Over the years, I’ve tweaked it here and there, but its soul remains. It’s a beautiful blend of tradition and modern convenience, proving that a from-scratch cake doesn’t need to be a weekend project. My modern twist? Using the blender for the batter makes it incredibly quick, a trick my grandma would have adored.
Why You’ll Fall for This Quick Chocolate Delight
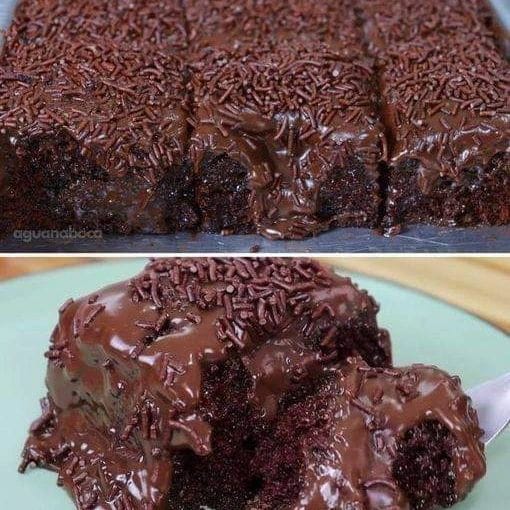
You’ll love this recipe for so many reasons! First, the deep, moist crumb is pure magic. The hot water in the batter makes the cocoa flavor explode. Second, it’s a one-bowl wonder (well, mostly!). You’ll dirty fewer dishes, which is always a win. Finally, that glossy, poured-on topping sets into a fudgy shell that crackles when you slice it. It’s a sublime texture contrast that feels gourmet, even on a Tuesday.
When to Bake Your Chocolate Masterpiece
This versatile cake fits any occasion. It’s perfect for weeknight dessert cravings. It’s a star at birthday parties when decorated with sprinkles. I love bringing it to potlucks because it travels well and always disappears. It’s also my go-to for comforting a friend or celebrating a small victory. Honestly, any day that ends with a slice of this cake is a good day.
Gathering Your Ingredients
You likely have most of this in your pantry right now! Here’s what you’ll need for 12 generous servings:
For the Cake:
- 3 large eggs
- 1 and 1/2 cups white sugar
- 2 cups all-purpose wheat flour
- 1 cup unsweetened cocoa powder (or chocolate drink powder)
- 1/2 cup vegetable oil
- 1 tablespoon baking powder
- 1 pinch of salt
- 1 cup hot water
For the Fudgy Topping:
- 4 tablespoons milk
- 1/2 cup unsweetened cocoa powder
- 1 tablespoon butter
- 1 cup sugar
Easy Ingredient Swaps
No cocoa powder? Use an equal amount of chocolate drink powder, but reduce the sugar in the cake by 1/4 cup as it’s often sweeter. Out of vegetable oil? Melted coconut oil or even applesauce (for a lighter texture) works beautifully. For a dairy-free topping, use almond or oat milk and a plant-based butter substitute. Feel free to add a teaspoon of vanilla extract to the cake batter for an extra flavor boost!
Creating Your Quick Chocolate Delight: Step-by-Step
Step 1: Blend the Base Batter
Grab your blender and crack in the three eggs. The sound is the start of something good! Add the sugar, oil, cocoa powder, and flour. Secure the lid and blend on medium-high until the mixture is completely smooth and looks like a thick, dark brown paste. This takes about a minute. You’ll see all those dry ingredients become one gloriously chocolaty river. Pro tip: Scrape down the sides once midway to ensure everything gets incorporated evenly.
Step 2: The Secret is in the Hot Water
Pour the thick batter into a large mixing bowl. Now, heat your water until it’s hot from the tap or just boiled. Sprinkle the baking powder and salt over the batter. Then, pour in the hot water. This is the secret weapon! The hot water “blooms” the cocoa, unlocking its deepest flavor. Whisk everything together vigorously for about a minute. You’ll see the batter thin out and become silky, almost like a thick hot chocolate.
Step 3: Bake to Perfection
Preheat your oven to 400°F (that’s 200°C). While it heats, grease a standard Bundt pan or a 9×13-inch baking dish. Pour your lovely, liquid batter into the prepared pan. It will slide in easily. Place it in the middle of the hot oven. The smell that will start to fill your kitchen in about 20 minutes is pure happiness. Bake for about 40 minutes, or until a toothpick inserted in the center comes out with just a few moist crumbs.
Step 4: Make the Magic Topping
While the cake bakes, start your topping. In a small saucepan, combine the milk, cocoa powder, butter, and sugar. Stir over medium heat. Watch as the butter melts and the sugar dissolves. Keep stirring until the mixture comes to a gentle boil. Let it bubble softly for one full minute. This cooking time is crucial for the topping to thicken properly later.
Step 5: The Hot Union
This step is key! As soon as the cake comes out of the oven, run a knife around the edges and unmold it onto your serving plate if using a Bundt pan. If using a 9×13, you can leave it in the pan. Immediately pour the hot fudge topping over the hot cake. Use a spatula to spread it gently to the edges. You’ll hear a wonderful sizzle. The heat helps the topping soak in just a tiny bit and then set into a shiny, crackly glaze as it cools.
Chef’s tip: For an extra professional touch, place strips of parchment paper under the cake edges on the plate before pouring the topping. Pull them away later for a clean, drip-free plate.
Your Time Investment
This recipe respects your busy schedule.
- Prep Time: 15 minutes (most of it is blending!)
- Cook Time: 40 minutes
- Cooling/Setting Time: 30 minutes (if you can wait!)
- Total Time: About 1 hour 25 minutes.
The One Little Secret I Learned
The absolute best trick is using really hot water. Not warm, but hot. This step makes the cocoa powder dissolve completely. It eliminates any chance of a gritty texture and makes the cake incredibly moist. It also helps create a smoother, thinner batter that bakes up with an even, tender crumb.
A Fun Chocolate Fact
Did you know the cocoa powder gives this cake its deep color and antioxidant boost? Natural cocoa powder is acidic, which is why we pair it with baking powder. That reaction helps our Quick Chocolate Delight rise beautifully. Think of it as a little science experiment you get to eat!
Tools You’ll Need
You don’t need fancy equipment. A standard blender is the star here. You’ll also need:
- A large mixing bowl
- A whisk or spatula
- A 9×13 inch rectangular pan or a standard Bundt pan
- A small saucepan
- Measuring cups and spoons
Keeping Your Cake Fresh and Delicious
To store any leftovers, let the cake cool completely first. If the topping has fully set, you can cover it loosely with plastic wrap or aluminum foil. Keep it at room temperature for up to 2 days for the best texture.
For longer storage, the fridge is your friend. Place the cake in an airtight container or wrap it well. It will keep for up to 5 days. The cool temperature makes the fudge topping firmer, which some people adore.
You can also freeze this cake for a future treat. Wrap individual slices tightly in plastic wrap and then place them in a freezer bag. Thaw at room temperature for a few hours when the craving hits.
My Best Tips and Advice
- Always preheat your oven! Putting the cake in a cold oven can affect the rise.
- Don’t open the oven door during the first 30 minutes of baking. The draft can make the cake fall.
- Use good quality cocoa powder. It’s the main flavor, so it makes a difference.
- If your topping seems too thick to pour, add a teaspoon of hot water at a time to thin it.
How to Present Your Masterpiece
Presentation is part of the fun! For a party, dust the glazed cake with powdered sugar. A sprinkle of sea salt on top of the warm topping elevates the flavor. Add fresh berries like raspberries around the plate. For birthdays, pile high with whipped cream and chocolate shavings. Serve it on a beautiful cake stand to make it the centerpiece of your table.
Healthier & Fun Variations to Try
Love this recipe but want to mix it up? Here are six delicious spins:
- Whole Wheat Wonder: Swap half the all-purpose flour for whole wheat flour. It adds a nutty depth and fiber.
- Gluten-Free Goodness: Use a 1-to-1 gluten-free flour blend instead of regular flour. The result is just as fudgy.
- Peanut Butter Swirl: Drop spoonfuls of creamy peanut butter onto the batter before baking. Swirl with a knife for a marbled effect.
- Orange Zest Delight: Add the zest of one orange to the cake batter. The chocolate-orange combo is classic and elegant.
- Mint Chocolate Chip: Add 1/2 teaspoon of peppermint extract to the batter and fold in 1/2 cup of dark chocolate chips.
- Dairy-Free Dream: Use almond milk and coconut oil in both the cake and topping. It’s rich and perfect for those avoiding dairy.
Common Mistakes to Avoid
Mistake 1: Using Cold Water
The hot water is not just a random step. Using cold or lukewarm water won’t “bloom” the cocoa powder. This can leave a slight chalky taste in your cake. It also makes the batter less smooth. Always use water that is hot from the tap or freshly boiled. This small detail makes a huge difference in flavor and texture.
Mistake 2: Skipping the “Unmold While Hot” Step
This cake is very moist. If you let it cool completely in the pan, it can stick. The steam helps it release cleanly. As soon as the cake is out of the oven, carefully run a thin knife around the edges. Then invert it onto a plate. Be sure to use oven mitts! The pan is very hot. Doing this ensures you get a perfect, unbroken cake every time.
Mistake 3: Overmixing After Adding the Hot Water
Once you add the hot water and baking powder, you should mix just until everything is combined. Overmixing at this stage can develop the gluten in the flour. This leads to a tough, dense cake instead of a tender one. A smooth, lump-free batter is the goal. Stop mixing as soon as you achieve it.
Mistake 4: Pouring Cool Topping on a Cool Cake
The magic of the glossy, crackly topping relies on heat. If the topping cools down too much, it will thicken into a paste. You won’t be able to pour it smoothly. If your cake has cooled before the topping is ready, briefly reheat the topping until it’s liquid again. Pouring hot topping on a warm cake helps it set into that beautiful, shiny finish.
Quick Chocolate Delight FAQs
Can I make this cake without a blender?
Absolutely! You can make it by hand with a whisk or with an electric mixer. Just combine the wet ingredients (eggs, sugar, oil) first until smooth. Then whisk in the dry ingredients (flour, cocoa powder, salt). Finally, stir in the hot water and baking powder until just combined. The blender just makes it faster and ensures no lumps.
My cake sunk in the middle. What happened?
A sunken cake is often caused by too much leavening or an under-baked center. Make sure your baking powder is fresh. Also, avoid opening the oven door too early. Use the toothpick test reliably. If it comes out clean, the cake is done. If your oven has hot spots, rotating the pan halfway through baking can help.
Can I frost this cake with buttercream instead?
Of course! This moist chocolate cake is a perfect base for any frosting. Let the cake cool completely first. If you frost a warm cake, the buttercream will melt and slide right off. Swiss meringue buttercream, classic chocolate buttercream, or a simple whipped cream frosting all pair wonderfully.
How do I know when the cake is perfectly baked?
The best test is the toothpick or skewer test. Insert it into the thickest part of the cake. It should come out with a few moist crumbs clinging to it, but not with wet batter. The edges of the cake will also start to pull away slightly from the sides of the pan. The top will spring back when lightly touched.
Can I use this batter for cupcakes?
Yes, this recipe adapts beautifully to cupcakes. Fill lined muffin tins about 2/3 full. Bake at 350°F (175°C) for about 18-22 minutes. The same toothpick test applies. The fudge topping works for cupcakes too, or you can top them with your favorite frosting.
What’s the difference between cocoa powder and chocolate drink powder?
Cocoa powder is pure, unsweetened cocoa with the fat removed. Chocolate drink powder (like Nesquik) contains sugar, milk solids, and flavorings. In this recipe, cocoa powder gives a richer, more intense chocolate flavor. If you use a chocolate drink powder, the cake will be sweeter and have a milder chocolate taste.
Why is oil used instead of butter?
Oil keeps this cake incredibly moist, even after a day or two. Butter can sometimes lead to a drier crumb as it solidifies. Oil also makes the mixing process simpler and faster, which fits the “quick” theme of our Quick Chocolate Delight. It’s a winner for texture and ease.
How can I prevent the topping from being too sweet?
If you prefer a less sweet topping, you can reduce the sugar to 3/4 cup. You can also use a dark cocoa powder, which has a more bitter chocolate flavor that balances sweetness. Taste the topping as you cook it, and adjust to your liking.
Can I add coffee instead of water?
Yes, and it’s a fantastic idea! Replacing the hot water with hot brewed coffee will make the chocolate flavor taste even deeper and richer. You won’t taste the coffee itself. It simply enhances the chocolate. Give it a try next time for a more complex flavor.
How long should I wait before slicing the cake?
It’s hardest part! Try to wait at least 30 minutes after adding the topping. This allows the glaze to set and the cake structure to firm up a bit. This makes for cleaner slices. For the neatest cuts, use a warm, dry knife. Wipe it clean between each slice.
A Slice of Simple Joy
So there you have it. My fail-safe recipe for a Quick Chocolate Delight that never lets me down. It’s more than just a cake. It’s a tool for making memories, for showing love, and for treating yourself without a huge hassle. I hope this recipe finds its way into your kitchen and becomes a trusted friend, just like it is in mine. Now, go preheat that oven. Your perfect slice of chocolate happiness is waiting.
Quick Chocolate Delight
Ingredients
Equipment
Method
- Blend the eggs, sugar, oil, cocoa powder, and flour in a blender until smooth.
- Pour the batter into a bowl, add baking powder and salt, then pour in the hot water and whisk until combined.
- Preheat the oven to 400°F (200°C) and grease a Bundt pan or 9x13-inch baking dish.
- Pour the batter into the prepared pan and bake for about 40 minutes.
- For the topping, combine milk, cocoa powder, butter, and sugar in a saucepan; stir over medium heat until bubbly.
- Immediately pour the hot topping over the cake as soon as it comes out of the oven.