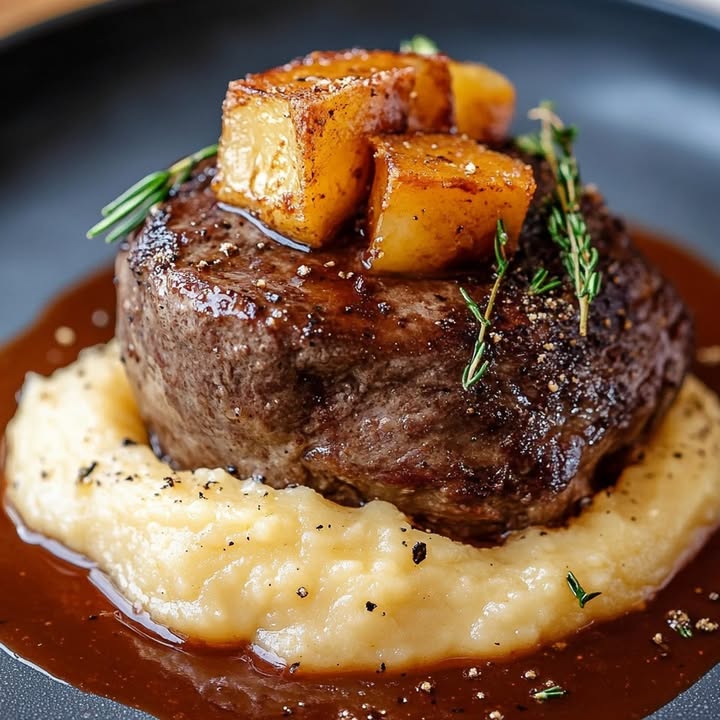
The Ultimate Comfort Food: Savory Braised Beef with Homemade Mash
You know that feeling when you walk into a house and the air smells like warm, slow-cooked goodness? It’s an instant hug. That’s exactly what happens when this braised beef is in my oven. My neighbor, Margot, first shared her version with me after my son’s soccer game, and I’ve been tweaking it ever since. It’s become my not-so-secret weapon for turning a regular Tuesday into a special occasion. Let’s make a cozy, impressive dinner that practically cooks itself.
A Tale of Two Textures: The Story of Braised Beef
This isn’t just another stew. It’s a classic technique that turns a tough cut of beef into something magical. Think of French country kitchens and grandmothers who know a thing or two about making less expensive meat taste heavenly. The method is ancient, really. Cooking meat low and slow in liquid is how people have made delicious meals for centuries. My modern twist? I don’t fuss over it too much. I let the oven do the work while I relax. I’ve even made it for my book club, and let’s just say the book discussion was secondary to the food compliments!
Why This Braised Beef Recipe Will Win Your Heart
You’ll love this because it’s forgiving. Busy day? No problem. The longer it cooks, the better it gets. The flavors of red wine, thyme, and beef broth melt together into a rich, velvety sauce. The meat becomes so tender you can cut it with a spoon. Paired with that creamy, buttery homemade potato mash? It’s pure comfort on a plate. It feels fancy but is secretly simple. Perfect for when you want a “wow” meal without the “wow” amount of work.
When to Serve This Cozy Masterpiece
This dish is your new best friend for so many events! It’s ideal for a cozy family Sunday dinner. It’s a superstar for holiday gatherings—imagine it on your Christmas table. Having friends over? It tastes even better made ahead, so you can enjoy your company. I love making it on a chilly weekend, so we have amazing leftovers for a couple of days. It’s the ultimate “feed a crowd with love” recipe.
What You’ll Need: Braised Beef & Mash Ingredients
Gathering your ingredients is the first step to flavor town! Here’s your shopping list:
- 1.5 kg (about 3.3 lbs) beef for braising (like chuck roast or brisket)
- 1 kg (2.2 lbs) potatoes (Yukon Gold or Russet are perfect)
- 2 carrots
- 2 onions
- 3 garlic cloves
- 500 ml (about 2 cups) beef broth
- 200 ml (about 3/4 cup) red wine (like a Cabernet or Merlot)
- 3 sprigs fresh thyme
- 2 bay leaves
- Olive oil
- Salt and black pepper
- Butter (for the mash)
- A splash of milk or cream (for the mash, optional)
No Worries! Handy Ingredient Substitutions
Don’t have something? No panic! Cooking is about creativity.
- No red wine? Use more beef broth or even a dark beer.
- Out of fresh thyme? Use 1 teaspoon of dried thyme.
- No bay leaves? You can skip them, but they add a lovely depth.
- For a richer mash: Swap the milk for sour cream or cream cheese.
- Want more veggies? Toss in some chopped celery or mushrooms with the carrots.
Your Step-by-Step Guide to Perfect Savory Braised Beef
Follow these steps for a foolproof, delicious result. Put on some music and enjoy the process!
Step 1: Get Your Oven Ready
First things first, preheat your oven to 160°C (325°F). This low and slow temperature is the secret to meltingly tender beef. It’s not about rushing; it’s about letting time work its magic. While it heats up, get your big, heavy pot (a Dutch oven is perfect) and all your ingredients ready. This “mise en place” makes everything go smoothly. Pro tip: Make sure your oven rack is in the middle so the heat circulates evenly around your pot.
Step 2: Sear the Beef to Perfection
Heat a good drizzle of olive oil in your pot over medium-high heat. Pat your beef dry with a paper towel—this is key for a good sear! Carefully place the beef in the hot oil. Listen to that wonderful sizzle. Let it cook undisturbed for a few minutes until a beautiful, deep brown crust forms. Then, turn it to sear the other side. This browning isn’t just for looks; it builds incredible flavor for the whole dish. Once it’s gorgeously browned all over, move it to a plate.
Step 3: Sauté the Aromatic Vegetables
In that same pot, with all those tasty browned bits, add your chopped onions, sliced carrots, and minced garlic. The smells that will fill your kitchen are amazing! Stir them around, letting them soften and soak up the beefy flavor. They’ll become sweet and fragrant. This base, called a mirepoix, is the flavor foundation of so many great dishes. Let them cook for about 5-7 minutes until the onions are translucent.
Step 4: Bring It All Together with Liquids
Now, nestle the seared beef back into the pot, right on top of the veggies. Pour in the red wine and beef broth. The wine will sizzle and steam, lifting those stuck-on bits from the pot bottom—that’s flavor gold! Tuck in the thyme sprigs and bay leaves. Season generously with salt and pepper. The liquid should come about halfway up the side of the beef. Don’t worry if it’s not fully submerged.
Step 5: The Low and Slow Oven Braise
Put the lid on your pot and carefully place it in the preheated oven. Now, walk away for 2 to 3 hours. Seriously, go do something else! The magic is happening inside that pot. The beef will slowly relax and become fork-tender. About halfway through, you can peek and maybe turn the beef over. You’ll know it’s done when you poke it with a fork and it almost falls apart.
Chef’s tip: If you want a thicker sauce at the end, remove the cooked beef and simmer the liquid on the stovetop for 10-15 minutes until it reduces and coats the back of a spoon.
Step 6: Cook the Potatoes for Mash
While the beef is braising, prep your potatoes. Peel them and cut them into even-sized chunks so they cook at the same rate. Put them in a large pot, cover them with cold, salted water, and bring to a boil. Cook them for 15-20 minutes, or until a knife slides in easily. Be careful not to overcook them, or your mash can become gluey.
Step 7: Create the Creamiest Homemade Mash
Drain the potatoes well in a colander. Let them steam-dry for a minute in the pot—this removes excess water. Now, mash them with a potato masher or ricer until smooth. Add a good chunk of butter and a splash of warm milk or cream. Stir vigorously until you get a creamy, dreamy consistency. Season well with salt and pepper. Taste it! The mash should be delicious on its own.
Step 8: The Grand Finale: Plate and Serve
When the beef is done, take it out of the oven. Let it rest in the pot for about 10 minutes. Then, carefully transfer the beef to a cutting board. It might just pull apart with forks. Spoon a generous heap of that fluffy mash onto each warm plate. Top with thick slices or chunks of the succulent braised beef. Ladle the rich, vegetable-studded sauce over everything. Dig in immediately!
Timing is Everything: Your Recipe Schedule
Good food takes time, but most of it is hands-off! Here’s the breakdown:
- Active Prep Time: 30 minutes (chopping, searing, mashing)
- Braising Time: 2 to 3 hours (oven time for the beef)
- Potato Cook Time: 20 minutes (while the beef braises)
- Total Time: Approximately 3 to 3.5 hours
- Resting Time: 10 minutes (for the beef before serving)
Chef’s Secret for the Best Braised Beef
My secret weapon? Patience during the sear. Don’t move the beef around in the pot. Let it sit and develop that deep, caramelized crust. That crust, called the Maillard reaction, is where a huge amount of the deep, savory flavor comes from. If you rush this step, you’re missing out on layers of taste. Let it get really brown—it’s not burnt, it’s flavor!
A Little Extra Food for Thought
Did you know braising is one of the oldest cooking methods? Before modern ovens, cooks would bury a sealed pot in the embers of a fire to slow-cook tough meats. It’s a timeless technique that proves simple, patient cooking yields the most satisfying results. This dish is a beautiful example of how ordinary ingredients become extraordinary together.
Gear Up: Necessary Kitchen Equipment
You don’t need fancy gadgets, just a few key pieces:
- A large, heavy-bottomed pot or Dutch oven with a tight-fitting lid (this is essential).
- A sharp knife and cutting board.
- A potato masher or ricer for the smoothest mash.
- Measuring cups and spoons.
- Tongs for turning the beef.
- A large pot for boiling the potatoes.
Storing Your Delicious Leftovers
This dish stores wonderfully, often tasting even better the next day. Let the beef and mash cool completely before storing. Keep them in separate airtight containers in the refrigerator. The braised beef and its sauce will keep for up to 4 days. The mash is best enjoyed within 2-3 days.
To reheat, warm the beef and sauce gently in a covered pot on the stove over low heat, adding a splash of broth or water if needed. You can microwave individual portions if you’re in a hurry. Reheat the mash in the microwave with a little extra butter or milk to bring back its creaminess.
You can also freeze the braised beef (without the mash) for up to 3 months. Portion it into freezer-safe containers with its sauce. Thaw overnight in the fridge before reheating. This makes for the ultimate easy freezer meal on a busy night!
Pro Tips & Advice for Flawless Results
- Choose the right cut: Chuck roast, brisket, or short ribs are perfect. They have fat and connective tissue that melts during braising.
- Don’t skip the sear: It’s your flavor foundation.
- Keep the oven temp low: A gentle simmer, not a boil, makes the meat tender.
- Season every layer: Season the beef before searing, season the veggies, and taste the sauce before serving.
- Use warm liquid: Adding cold broth or wine to a hot pan can slow cooking. Room temp is fine.
Presentation Ideas to Impress Your Guests
Make it look as good as it tastes!
- Spoon the mash into a ring mold on the plate for a restaurant-style look.
- Top the beef with a pat of herb butter (parsley and thyme mixed with soft butter) just before serving.
- Garnish the whole plate with a sprinkle of fresh, finely chopped parsley for a pop of color.
- Serve in individual shallow bowls to cradle all that glorious sauce.
- Place a whole thyme sprig or a single bay leaf on top for a rustic touch.
6 Tasty Twists: Healthier & Fun Variations
Love the base recipe? Try these delicious spins!
- Herb-Infused Braised Beef: Add a tablespoon of Dijon mustard and a handful of chopped fresh rosemary to the braising liquid for a fragrant twist.
- Mushroom & Pearl Onion Version: Swap the carrots for a mix of wild mushrooms and a cup of pearl onions. It’s earthy and elegant.
- Lighter Cauliflower Mash: For a lower-carb side, replace half (or all) of the potatoes with steamed cauliflower. Mash with a bit of garlic and Parmesan.
- Spicy Tomato-Braised Beef: Add a can of crushed tomatoes and a pinch of red pepper flakes to the braising liquid for a hearty, Italian-inspired flavor.
- Beef & Root Veggie Pot: Add parsnips, turnips, and sweet potato chunks to the pot with the carrots for a complete one-pot meal.
- Stout-Braised Beef: Use a dark stout or porter instead of red wine for a deep, malty, and rich sauce that’s simply incredible.
If you love hearty, one-dish wonders, you must try this easy One-Pot Ground Beef and Zucchini Skillet. For another classic pairing, this Sheet Pan Lemon Garlic Chicken and Potatoes is a weeknight lifesaver. For a modern, protein-packed bowl, check out our Hot Honey Cottage Cheese Sweet Potato Beef Bowl. And if you’re in an Asian-inspired mood, this simple Teriyaki Chicken Bowl comes together in a flash.
Common Mistakes to Avoid for Your Braised Beef
Avoid these simple errors to guarantee a perfect dish every single time.
Mistake 1: Not Searing the Beef Properly
This is the biggest flavor killer. If you put pale, un-seared beef into the braising liquid, you miss out on hundreds of complex, savory notes. The sear creates a foundation. To avoid this, make sure your pot is hot before adding the oil. Pat the beef completely dry with paper towels. Don’t crowd the pot—you might need to sear in batches. Let it develop a deep, dark brown crust on each side without moving it too soon.
Mistake 2: Cooking at Too High a Temperature
Braising is not boiling. If your oven is too hot or your stovetop burner is too high, the meat will tighten up and become tough, not tender. The connective tissue needs a gentle, prolonged heat to break down. Always use a low oven setting (around 300-325°F) and ensure the liquid is at a bare simmer, not a rolling boil. The pot should have a tight-fitting lid to keep the moisture in.
Mistake 3: Using Lean, Expensive Cuts of Beef
Filet mignon or sirloin will turn dry and stringy in a braise. You need a cut with marbling and connective tissue. Chuck roast, brisket, short ribs, or shoulder are ideal. These affordable cuts transform into something luxurious with slow cooking. The fat and collagen melt, basting the meat from within and creating a luscious sauce. Don’t waste your money on lean steaks for this recipe!
Mistake 4: Underseasoning the Dish
Braising requires seasoning in layers. A big pot of liquid and a large piece of meat need ample seasoning. If you only add a pinch of salt at the end, your dish will taste bland. Season the beef generously with salt and pepper before searing. Season the vegetable sauté. Finally, always taste the sauce before serving and adjust the seasoning. Remember, potatoes in the mash also need plenty of salt.
Mistake 5: Overcrowding the Pot with Vegetables
While veggies are great, adding too many can change the cooking process. They release a lot of water, which can prevent proper browning and dilute your sauce. Stick to the aromatic base of onions, carrots, and garlic as specified. If you want more vegetables, consider roasting them separately and adding them at the end, or use heartier roots that can handle the long cook time.
Frequently Asked Questions (FAQ)
Can I make braised beef ahead of time?
Absolutely, and it might even taste better! Braised beef is a fantastic make-ahead dish. Let it cool completely after cooking, then store it covered in the refrigerator for up to 3 days. The flavors have more time to meld together. When you’re ready to serve, gently reheat it on the stovetop over low heat. You can also reheat it in a covered dish in the oven at 300°F until warmed through. This makes it perfect for stress-free entertaining.
What is the best cut of beef for braising?
The best cuts come from the shoulder or leg of the cow, where the muscles work hard. These cuts have more connective tissue (collagen), which breaks down into gelatin during slow cooking, making the meat tender and the sauce rich. My top picks are chuck roast, beef brisket (point or flat cut), boneless short ribs, or bottom round. They are often more affordable than steak cuts, making this a budget-friendly gourmet meal.
Do I have to use red wine in the recipe?
No, you don’t! While red wine adds wonderful depth and acidity, you can substitute it. Use an equal amount of additional beef broth, a dark beer like a stout, or even a non-alcoholic option like unsweetened grape juice mixed with a tablespoon of vinegar. The goal is to have a flavorful liquid that helps deglaze the pan. The dish will still be delicious without the wine.
Why is my braised beef still tough?
If your beef is tough, it likely hasn’t cooked long enough. The connective tissue needs sufficient time to break down. Don’t go strictly by the clock; go by feel. The beef should be easily pierced with a fork and should start to pull apart. If it’s still tough, put the lid back on and return it to the oven. Check it every 30 minutes until it reaches that fall-apart tenderness. Low and slow is the rule.
Can I cook this in a slow cooker or Instant Pot?
Yes, you can adapt this recipe for both! For a slow cooker, follow steps 1-3 on the stovetop (sear beef and sauté veggies). Then transfer everything to your slow cooker, add liquids and herbs, and cook on LOW for 8 hours or HIGH for 4-5 hours. For an Instant Pot, use the Sauté function for steps 1-3, then add everything, seal the lid, and cook on High Pressure for about 60-75 minutes, followed by a natural pressure release.
How can I thicken the sauce if it’s too thin?
The easiest way is to remove the cooked beef and vegetables to a platter. Then, simmer the sauce on the stovetop over medium heat, uncovered, for 10-20 minutes. This reduces and concentrates it. For a quicker method, you can make a slurry: mix 1 tablespoon of cornstarch with 2 tablespoons of cold water until smooth. Whisk this into the simmering sauce and cook for 1-2 minutes until thickened.
What should I serve with braised beef besides mashed potatoes?
While mashed potatoes are classic, many sides work beautifully. Try creamy polenta, buttery egg noodles, or fluffy rice to soak up the sauce. For a lighter option, serve it over a bed of cauliflower puree or with a side of roasted seasonal vegetables like green beans, carrots, or Brussels sprouts. A simple green salad with a sharp vinaigrette also balances the richness perfectly.
Can I freeze leftover braised beef?
You sure can! Braised beef freezes exceptionally well. Let it cool completely first. Portion the beef and its sauce into airtight freezer-safe containers or heavy-duty freezer bags, leaving a little space for expansion. It will keep well for up to 3 months. To serve, thaw it overnight in the refrigerator and reheat gently on the stovetop. This is a fantastic way to have a gourmet meal ready on a busy night.
Is this dish healthy? What’s the nutritional value?
This is a hearty, balanced meal. It’s rich in high-quality protein from the beef. The vegetables provide vitamins and fiber. A serving (with mash) has roughly 450 calories, 30g of protein, and 25g of fat. While it’s a satisfying comfort food, enjoying it as part of a varied diet is key. For more on building a healthy plate, reputable sources like the NIH offer great insights on dietary balance and nutrient-rich eating.
My mashed potatoes turned out gluey. What did I do wrong?
Gluey mash usually happens from overworking the potatoes. When you over-mash or use a food processor, the starch cells burst and release too much starch, creating a gummy texture. To avoid this, use a potato ricer or a standard masher—never a blender. Also, make sure your potatoes are well-drained and dry before mashing. Start with cold, salted water and cook just until fork-tender, not mushy.
I hope this recipe brings as much warmth to your table as it has to mine. It’s a celebration of simple, slow food that truly nourishes. For more inspiration like this, explore all our favorite main dish recipes where flavor and comfort always come first.
There you have it, friends—your guide to the most comforting, impressive, and delicious braised beef dinner. It’s a recipe built for memories. So, gather your ingredients, be patient with the sear, and let your oven do the hard work. Before you know it, your home will be filled with that incredible aroma, and you’ll have a meal that feels like a warm embrace. Now, go forth and braise! Don’t forget to tell me how it turns out.
Savory Braised Beef
Ingredients
Equipment
Method
- Preheat your oven to 160°C (325°F).
- Heat olive oil in a pot over medium-high heat and sear the beef until browned.
- Remove the beef and sauté chopped onions, carrots, and minced garlic in the pot.
- Return the beef to the pot, pour in red wine and beef broth, add thyme and bay leaves, and season.
- Cover and braise in the oven for 2 to 3 hours.
- While the beef cooks, prepare the potatoes by peeling and cutting them into chunks.
- Boil the potatoes for 15-20 minutes until tender.
- Drain potatoes, then mash with butter and optional milk or cream; season to taste.
- Let the braised beef rest, then serve topped with the mash and sauce.