Picture this: it’s December 23rd, your kitchen is a whirlwind of cookie dough and wrapping paper, and you realize you forgot to plan a centerpiece dessert. Panic sets in. Then, you remember this no-bake cheesecake. I’ve been there, and let me tell you, this Festive Christmas Tree No-Bake Cheesecake was my holiday salvation. It’s cool, creamy, and decorated with little cake “trees” that make everyone, from kids to grandparents, light up with joy. It’s the edible magic your holiday table needs.
A Sweet Slice of Holiday Cheer: The Story of No-Bake Desserts
The beauty of no-bake cheesecakes lies in their simplicity and modern convenience. While traditional baked cheesecakes have roots in ancient Greece, the no-bake version became a mid-20th century superstar, thanks to the widespread availability of cream cheese and electric mixers. My twist, the Christmas tree version, is my own happy accident. I wanted to use up some holiday snack cakes and created a dessert that’s now requested every year. It’s a fun, playful take on a classic that honors tradition while embracing the ease we all crave during the busy season.
Why This Christmas Tree Cheesecake Will Steal Your Heart
You’ll adore this recipe for three big reasons. First, it’s incredibly easy—no oven, no water bath, no cracking fears. Second, it’s a make-ahead dream, freeing you up on the big day. Finally, the customizable decoration lets you play with different festive treats and colors. It’s a dessert that feels fancy but is secretly a breeze, giving you more time to sip cocoa and watch holiday movies.
When to Whip Up This Festive Showstopper
This cheesecake isn’t just for Christmas Day. It’s perfect for cookie exchanges, potluck parties, or as a festive treat for neighbors. I love bringing it to holiday gatherings because it travels well and always gets compliments. It’s also a fantastic project to do with kids on a cozy weekend afternoon, letting them decorate their own edible forest.
Gathering Your Ingredients
Here’s what you’ll need for this magical no-bake Christmas dessert:
- For the Crust: Graham cracker crumbs, granulated sugar, melted unsalted butter.
- For the Filling: Softened cream cheese, powdered sugar, vanilla extract, cold heavy whipping cream, chopped festive cake treats (like holiday snack cakes).
- For Decoration: Whole festive cake treats, red and green sprinkles, extra whipped cream for garnish.
Smart Swaps: Your Cheesecake, Your Rules
Don’t stress if you’re missing an ingredient. Here are easy swaps:
- Graham crackers: Use digestive biscuits or vanilla wafers.
- Festive cake treats: Swap with crushed peppermint candies, chopped chocolate Santas, or even dried cranberries for a tart twist.
- Heavy cream: For a lighter version, well-chilled full-fat coconut milk can be whipped, though it may be less stable.
Crafting Your Christmas Tree Masterpiece
Follow these simple steps for a perfect no-bake cheesecake every time.
Step 1: Build the Foundation
Grab a medium bowl and mix your graham cracker crumbs with the granulated sugar. The sugar isn’t just for sweetness; it helps the crust hold together. Now, pour in that golden, melted butter. Stir until the mixture looks like damp sand and holds together when you squeeze it. Press this firmly into your springform pan. Get it nice and even—this is your cheesecake’s cozy bed. Pro tip: Use the bottom of a measuring cup to press the crust down flat and tight. Pop it in the fridge to chill and set while you make the filling.
Step 2: Whip Up the Dreamy Filling
In a large bowl, beat the softened cream cheese and powdered sugar until it’s completely smooth. No lumps allowed! Add the vanilla extract and mix it in. Now, in another chilled bowl, take your cold heavy cream and whip it until you have beautiful, stiff peaks. This is what gives the cheesecake its light, cloud-like texture. Gently fold the whipped cream into the cream cheese mixture. Be patient and use a spatula in big, sweeping motions to keep it airy. Finally, fold in those chopped festive cakes. You’ll see pops of color and fun throughout the creamy white filling.
Step 3: Assemble and Let the Magic Happen
Pull your chilled crust from the fridge. Scoop all that gorgeous filling on top and spread it out evenly. Smooth the top with your spatula. Now, the hardest part: waiting. Cover the pan tightly with plastic wrap and let it chill in the fridge for at least 4 hours, but overnight is best. This sets the texture perfectly so every slice is firm and dreamy.
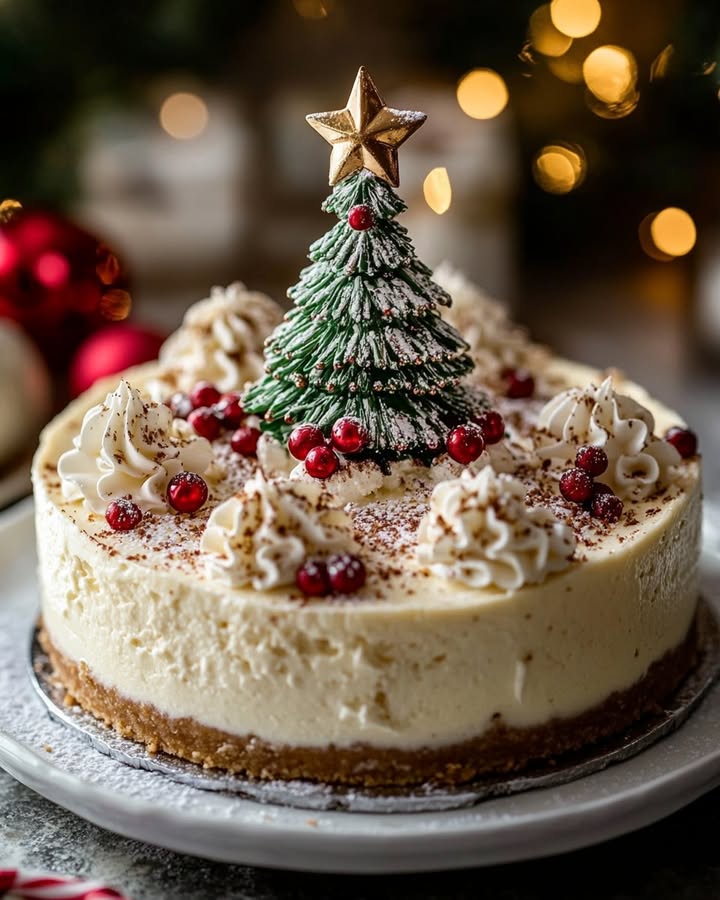
Step 4: The Grand Finale: Decorate!
Once set, carefully release the springform pan. Place your whole festive cake treats on top to look like little Christmas trees. Generously shower everything with red and green sprinkles for that festive sparkle. Chef’s tip: For extra flair, use a piping bag to add little whipped cream “snow” around the base of your cake trees just before serving.
Your Cheesecake Timeline
Planning is key for stress-free baking!
- Active Prep Time: 20 minutes
- Chilling Time: 4 hours (or overnight)
- Total Time: 4 hours 20 minutes
- Servings: 8-10 happy people
The Chef’s Secret for Ultimate Flavor
My secret weapon is toasting the graham cracker crumbs. Before mixing them with the butter and sugar, spread the crumbs on a baking sheet and toast them in a 350°F oven for 5-7 minutes. Let them cool completely. This deepens the flavor, giving your crust a wonderful, nutty aroma that pairs amazingly with the sweet filling.
A Fun Fact About Your Ingredients
Did you know the cream cheese in your fridge has a New York connection? While cheesecakes date back centuries, the dense, creamy style we love in America was popularized in New York City delis in the early 1900s. Our no-bake version is a cooler, quicker cousin to that iconic dessert, perfect for the modern home cook.
Tools of the Trade
You don’t need fancy gear! Here’s your checklist:
- 9-inch springform pan
- Mixing bowls (medium and large)
- Electric hand mixer or stand mixer
- Spatula
- Measuring cups and spoons
Keeping Your Cheesecake Fresh and Delicious
Proper storage is crucial for your no-bake cheesecake. Always keep it refrigerated, as the filling contains dairy and can spoil if left out. Cover it tightly with plastic wrap or store it in an airtight container. This prevents it from absorbing any other odors from your fridge and keeps the texture perfect.
For longer storage, you can freeze this cheesecake. Wrap the whole cheesecake or individual slices tightly in plastic wrap, then a layer of aluminum foil. It will keep in the freezer for up to 2 months. When you’re ready to enjoy it, thaw it overnight in the refrigerator.
If you have leftovers, they will stay fresh in the fridge for 3-4 days. The crust may soften slightly over time, but the flavor will still be wonderful. I don’t recommend re-freezing previously frozen cheesecake, as it can affect the texture.
Pro Tips for Cheesecake Success
- Make sure your cream cheese is truly softened at room temperature. This prevents lumps in your filling.
- Chill your mixing bowl and beaters before whipping the heavy cream. Cold tools help the cream whip up faster and higher.
- When folding, be gentle! Overmixing can deflate the whipped cream and make the filling dense.
Presenting Your Edible Evergreen Forest
Make it even more special with these ideas:
- Dust the plate with a little powdered sugar “snow” before placing the slice.
- Serve with a side of warm chocolate or caramel sauce for dipping.
- Garnish each plate with a fresh mint sprig for a touch of green.
Lighter Twists on the Festive Classic
If you’re looking for a healthier version, try these six delicious alternatives:
- Greek Yogurt Swap: Replace half the cream cheese with plain, full-fat Greek yogurt. It adds tang and protein while cutting calories.
- Nut-Crust Delight: Use a mix of finely ground almonds and dates instead of the graham cracker crust for a fiber-rich, gluten-free base.
- Fruit-Forward Filling: Fold in a cup of pureed raspberries or strawberries into the filling for a natural pink hue and vitamins, reducing the need for extra sugar.
- Coconut Cream Dream: Use chilled coconut cream instead of heavy whipping cream for a dairy-free, vegan-friendly version. It whips up beautifully.
- Sweetener Switch: Use a natural sweetener like maple syrup or honey instead of powdered sugar. You may need to adjust the chilling time as it can be softer.
- Mini Cheesecake Bites: Make individual servings in a muffin tin. This helps with portion control, and you can decorate each one with a single cake tree.
Common Mistakes to Avoid
Mistake 1: Using Cold Cream Cheese
This is the biggest culprit for lumpy filling. Cold cream cheese doesn’t blend smoothly with the sugar or whipped cream. Always take your cream cheese out of the fridge at least an hour before you start. If you’re short on time, you can soften it by placing the sealed blocks in a bowl of warm water for 10-15 minutes. Smooth cream cheese means a silky, dreamy cheesecake texture.
Mistake 2: Not Whipping the Cream Enough
If your heavy cream is only softly whipped, your cheesecake won’t set properly. It will be runny and sad. Whip the cream until you have stiff peaks—this means when you lift the beaters, the cream stands straight up and doesn’t flop over. A chilled bowl and beaters are your best friends here for getting those perfect peaks that give structure to your no-bake dessert.
Mistake 3: Skipping the Chill Time
Impatience can ruin a good cheesecake. If you don’t let it chill for the full 4 hours (or better yet, overnight), the filling won’t have time to firm up. You’ll end up with a delicious but soupy mess when you try to slice it. Plan ahead. This dessert is designed to be made in advance, so embrace the wait. Your future self will thank you when you serve perfect, neat slices.
Mistake 4: Overmixing the Filling
Once you add the whipped cream to the cream cheese, you need to fold, not stir. Stirring or beating too vigorously knocks out all the air you just whipped into the cream. This leads to a dense, heavy cheesecake instead of a light and fluffy one. Use a wide spatula and gentle, sweeping motions from the bottom of the bowl up and over the top until just combined.
Your Festive Cheesecake Questions, Answered
Can I make this cheesecake gluten-free?
Absolutely! Making this Christmas tree cheesecake gluten-free is very simple. Just swap the graham cracker crumbs for your favorite gluten-free cookie crumbs. Gluten-free shortbread or ginger snaps work wonderfully. Also, double-check that your festive cake treats are certified gluten-free, as many snack cakes contain wheat. The rest of the ingredients are naturally gluten-free, so you can easily enjoy a festive dessert that meets your dietary needs without compromising on taste or fun.
How far in advance can I make this dessert?
This is one of the best make-ahead desserts for the holidays. You can prepare the entire cheesecake, including decoration, up to two days in advance. Keep it covered in the refrigerator until you’re ready to serve. If you want to prepare even earlier, you can make and freeze the undecorated cheesecake for up to two months. Thaw it in the fridge overnight, then add your cake trees and sprinkles the day of serving so they stay fresh and crisp.
My filling is too runny. What did I do wrong?
A runny filling usually points to two issues: under-whipped cream or insufficient chilling time. First, ensure you whipped the heavy cream to stiff, firm peaks. Second, the cheesecake must chill for at least 4 hours to set properly. If you’ve done both and it’s still soft, your kitchen might have been too warm. Don’t worry—pop it back in the fridge for a few more hours. For next time, make sure all your ingredients, especially the cream cheese and cream, are cold when you start whipping.
Can I use a different pan if I don’t have a springform?
Yes, you can use a regular 9-inch pie dish or a square baking dish. The presentation will be different, and slicing might be a bit messier, but it will still taste delicious. If using a solid dish, line it with parchment paper, leaving an overhang on two sides. This creates “handles” to help you lift the cheesecake out for cleaner serving. A springform pan is ideal for its removable sides, but don’t let it stop you from making this treat!
What can I use instead of heavy whipping cream?
For a similar texture, full-fat coconut cream is the best substitute. Chill a can of coconut milk overnight, then scoop out the solid cream that rises to the top. Whip it just like heavy cream. The flavor will have a slight coconut taste, which can be lovely with the holiday spices. Another option is to use a store-bought whipped topping, but the flavor will be sweeter and less rich. I prefer the real cream or coconut cream for the best results.
How do I get perfect, clean slices?
Slicing cheesecake can be tricky. For the cleanest cuts, use a long, thin knife. Run the knife under very hot water, wipe it dry with a towel, and then make your slice. The heat helps the knife glide through the creamy filling without sticking. Repeat this process—heat, wipe, slice—for every cut. This method gives you beautiful, restaurant-style slices that make your dessert look even more impressive on the plate.
Is it okay to use low-fat cream cheese?
I don’t recommend using low-fat or fat-free cream cheese. The fat content in full-fat cream cheese is what gives the cheesecake its sturdy, set structure and rich, creamy mouthfeel. Low-fat versions have more water and additives, which can lead to a softer, sometimes grainy texture that may not set properly. For the best flavor and texture, stick with regular, full-fat cream cheese. It’s a holiday treat, so indulge a little!
Can I add other flavors to the filling?
Of course! This recipe is a fantastic canvas for your favorite flavors. Try adding a tablespoon of lemon zest for brightness, a teaspoon of cinnamon or nutmeg for warmth, or even a few tablespoons of peanut butter for a nutty twist. Just add these extras when you’re mixing the cream cheese and sugar. Be careful not to add too much liquid, like fruit juice, as it can thin out the filling and prevent it from setting.
My crust is too crumbly and falls apart. How can I fix it?
A crumbly crust usually needs more “glue.” The melted butter is what binds the crumbs together. If your crust is falling apart, you likely didn’t use enough butter, or you didn’t press it firmly enough into the pan. Next time, ensure you’re using the full amount of butter and really press the mixture down hard and evenly with the bottom of a cup. For a rescue on this batch, you can press it down again after chilling, or simply serve it in bowls—it will still taste amazing!
Can I decorate this with fresh fruit instead of cake treats?
Fresh fruit makes a beautiful and tasty decoration. Try using starfruit slices for natural stars, or arrange kiwi slices and pomegranate arils into tree shapes. The key is to add fresh fruit right before serving. If placed on top and refrigerated for too long, the fruit’s moisture can make the topping soggy and cause colors to bleed. For a make-ahead option, stick with the cake treats or sprinkles, and add fresh fruit garnishes at the last minute.
And there you have it—your guide to creating the most festive, fuss-free dessert of the season. This Christmas Tree No-Bake Cheesecake is more than just a recipe; it’s a memory maker. It’s the laugh you share with your kids while sprinkling decorations, the “wow” from your guests, and the sweet, creamy bite that tastes like holiday joy. So grab your mixer, embrace the no-bake ease, and get ready for a dessert that will become a cherished part of your family’s Christmas tradition. Happy holidays and happy baking!
Oklahoma Onion Burgers
Ingredients
Equipment
Method
- In a medium bowl, mix graham cracker crumbs with granulated sugar and melted butter until it resembles damp sand.
- Press the mixture into a 9-inch springform pan and chill in the fridge.
- In a large bowl, beat softened cream cheese and powdered sugar until smooth, then mix in vanilla extract.
- Whip cold heavy cream in another bowl until stiff peaks form, then gently fold it into the cream cheese mixture.
- Fold in the chopped festive cake treats until evenly distributed.
- Pour the filling into the chilled crust and spread evenly. Cover and refrigerate for at least 4 hours (overnight is best).
- Once set, release from the springform pan, decorate with whole festive cake treats and sprinkles, and serve.