Sunshine in a Pan: My “Visiting Pirate” Lemon Cake
Have you ever baked a cake so good it disappears before you can even offer it to guests? That’s the story of this magical lemon cake in my house. We call it the “Torta para Visitas Piratas” – which translates to “Cake for Pirate Visitors.” The silly name stuck because any friend who drops by unannounced (like a happy pirate boarding your ship!) gets a slice, and it’s always a treasure. This isn’t just a cake; it’s a joyful, zesty hug in dessert form.
The Story Behind the Pirate Cake
This recipe is my take on a classic Spanish “Bizcocho” that every abuela seems to have in her back pocket. The “cake mix + gelatin” trick is a beloved shortcut in many Spanish-speaking homes, creating an incredibly moist and flavorful crumb without fuss. I first tasted a version at my neighbor Maria’s house. She served it on a mismatched plate with a dollop of whipped cream, and I begged for the recipe. Over the years, I’ve made it my own with that tangy, creamy lemon glaze that hardens just enough to be irresistible. It’s tradition meets simplicity, and it never fails.
Why You Will Adore This Lemon Pirate Cake
You’ll love this recipe because it is unbelievably easy but tastes like you spent hours. The combination of lemon cake mix and lemon gelatin creates a double punch of citrus flavor that’s bright but not sour. The yogurt ensures it stays beautifully moist for days. And that glaze? It’s a three-ingredient miracle that transforms the simple cakes into something spectacular. It’s the perfect “wow” factor with minimal effort.
When to Serve Your Pirate-Worthy Lemon Cake
This cake is your secret weapon for so many occasions! It’s perfect for those “pirate visits” – unexpected drop-ins. Bring it to potlucks, bake sales, or book club meetings. It shines at spring brunches, summer picnics, and even as a light dessert after a heavy dinner. I always make it for my husband’s work events, and he comes home with an empty plate and requests for the recipe every single time.
Gathering Your Ingredients
Here’s what you need to make this sunny delight. The beauty is in how many are pantry staples!
- 1 packet (about 15-16 oz) of lemon flavor cake mix
- 1 box (3 oz) of lemon flavor gelatin (the small box, not sugar-free)
- 1 tablespoon of baking powder (yes, a full tablespoon!)
- 4 large Eggs
- 1 Pot (6 oz) of natural yogurt (use the empty pot to measure!)
- The same yogurt-pot measure of neutral oil (like vegetable or canola)
- Butter for greasing
- Wheat flour for sprinkling
For the Legendary Lemon Glaze:
- 1/2 can of sweetened condensed milk (about 7 oz)
- Juice of 2 medium lemons (you’ll need about 1/3 cup)
No Problem! Handy Substitution Options
Don’t have something? No worries, a pirate adapts!
- Yogurt: Sour cream or buttermilk work wonderfully for similar tang and moisture.
- Oil: Any flavorless oil is fine. Melted, cooled butter will give a richer flavor.
- Cake Mix & Gelatin: This recipe is very forgiving. Use a vanilla or yellow cake mix with the lemon gelatin, or try orange gelatin for a different citrus twist.
- Fresh Lemons for Glaze: In a pinch, you can use bottled pure lemon juice. The flavor of fresh is best, but it will still work.
Let’s Bake: Step-by-Step Instructions
Step 1: Combining the Dry Crew
Grab a large bowl. Pour in the entire packet of lemon cake mix. Next, sprinkle in that entire box of bright yellow lemon gelatin powder. Finally, add your tablespoon of baking powder. Now, take a whisk and stir these three dry ingredients together. You’ll see the colorful speckles of gelatin mix in. This ensures every bite gets an even boost of lemon flavor and lift from the baking powder. Set this sunny dry mix aside for a moment.
Step 2: The Wet Mix Whirlwind
In another bowl, crack your four eggs. Pour in the entire pot of creamy, tangy yogurt. Now, take that empty yogurt pot, dry it quickly, and fill it to the brim with your oil. Add that to the bowl. Using a hand mixer or a strong whisk, beat these wet ingredients together for a good two minutes. You want them completely combined, pale, and slightly frothy. This incorporates air, which helps make your cake light and fluffy.
Step 3: Bringing the Crew Together
With your mixer on a low speed, start adding the dry ingredients to the wet bowl. Do this spoonful by spoonful, just like the recipe says. It might feel fussy, but it prevents a huge cloud of powder and helps the batter come together smoothly without overmixing. Once all the dry mix is in, crank the speed up to medium and beat for another two minutes. You’ll end up with a beautifully smooth, thick, and vibrantly yellow batter that smells like a lemon grove.
Pro tip: Scrape down the sides of the bowl halfway through mixing to catch any stray dry ingredients.
Step 4: Prepare for the Oven Voyage
Preheat your oven to 160°C (320°F). While it warms, prepare your two round cake pans. Generously grease them with butter, getting into all the crevices. Then, add a spoonful of flour to one pan, shake and tap it around until the bottom and sides are coated, then tap the excess into the next pan and repeat. This “grease and flour” method is your insurance for a clean unmolding later. Divide the gorgeous yellow batter evenly between the two pans.
Step 5: Baking to Golden Perfection
Place your pans in the middle of the preheated oven. Set your timer for 40 minutes. Resist the urge to open the oven door before at least 30 minutes have passed! The cakes are done when they are a deep golden brown on top, the edges pull away slightly from the pans, and a toothpick inserted in the center comes out clean. The smell will be absolutely divine. Once baked, remove them and place them on a cooling rack.
Step 6: The Crucial Resting Period
This step is key for texture. Lay a clean, lightweight kitchen cloth (like a tea towel) directly over the hot cake pans. Don’t wrap it tightly, just drape it. This traps a little steam and lets the cakes cool slowly and gently, preventing them from drying out. Let them sit like this until they are just warm to the touch, not hot. This patience makes all the difference.
Step 7: Crafting the Magic Lemon Glaze
While the cakes cool, make the glaze. Pour your half-can of sweetened condensed milk into a medium bowl. Juice your two lemons—you want about 1/3 cup of fresh juice. Now, start adding the juice to the condensed milk a little at a time, stirring vigorously with a fork after each addition. Watch as the mixture thickens and changes texture. It will become smooth, creamy, and slightly stiff. It’s like a science experiment you can eat!
Chef’s tip: If your glaze seems too thin, you added the juice too fast. Just keep stirring vigorously for a few minutes; it will often thicken up. If it’s too thick, a tiny drizzle of cream or milk can loosen it.
Step 8: The Grand Finale Assembly
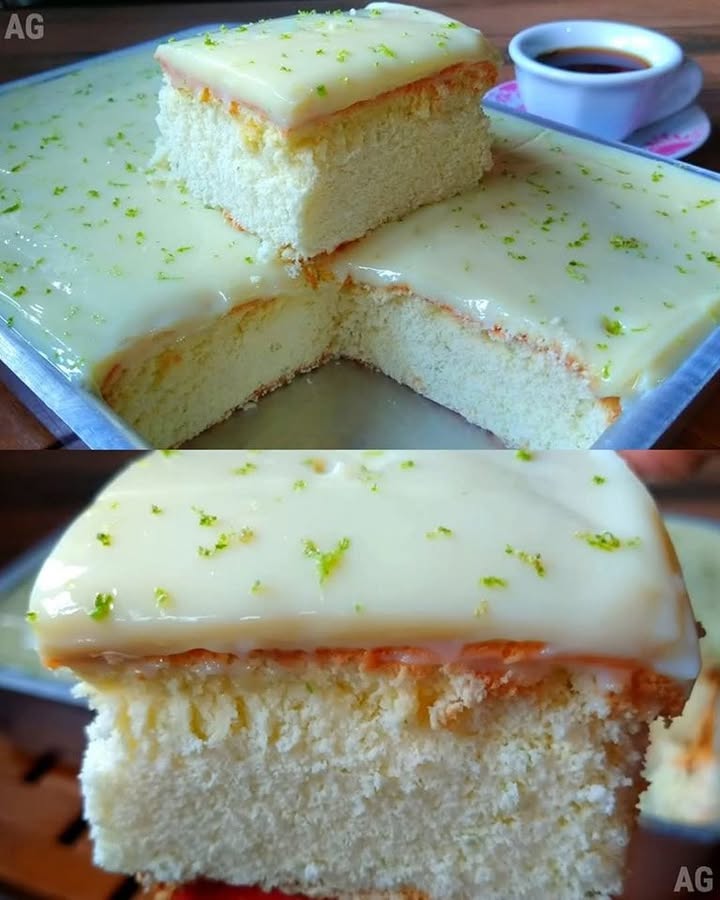
Once the cakes are warm, run a thin knife around the edges of the pans. Invert them onto your hand or the rack and gently tap to release. Place one cake layer on your serving dish. Spread a generous amount of that luscious lemon glaze over the top. Carefully place the second layer on top. Now, cover the entire top and let the glaze drizzle artistically down the sides. Don’t be neat about it—the rustic look is charming! Slice and serve with big smiles.
Your Pirate Cake Timeline
Here’s a quick map of your baking journey:
- Prep Time: 20 minutes
- Cooking Time: 40 minutes
- Resting/Cooling Time: 1 hour
- Total Time: About 2 hours (most of it hands-off!)
My Secret Pirate Weapon
For an extra moist and flavorful crumb, I sometimes add the grated zest of one lemon to the wet ingredients in Step 2. Those little yellow flecks pack a huge aromatic punch and make the lemon flavor feel fresher and more real. It’s a tiny step that elevates the cake from great to extraordinary.
A Fun Fact About That Glaze
That magical hardening of the glaze when lemon juice hits condensed milk is a simple acid-meets-cream reaction. It’s essentially a no-cook lemon curd! Chefs call it a “magic” or “3-ingredient” lemon filling. It’s so versatile—you can use it as a dip for fruit, a topping for pancakes, or a filling between cookies.
Tools for Your Galley Kitchen
You don’t need fancy gear:
- Two 8-inch or 9-inch round cake pans
- Two large mixing bowls
- Hand mixer or sturdy whisk
- Measuring spoons
- Whisk and spatula
- Juicer or fork for lemons
- Cooling rack
Keeping Your Treasure Fresh: Storage Tips
If your cake somehow doesn’t get eaten in one sitting (a rare event!), storing it right keeps it delicious. The best method is to place any leftover slices in an airtight container. You can keep it at room temperature for up to two days, thanks to the sugar and glaze acting as preservatives.
For longer storage, the refrigerator is your friend. The cold will firm up the glaze even more. It will stay moist and tasty for up to 5 days in the fridge. Just let a slice come to room temperature for about 15 minutes before eating to soften the texture and bring back the full flavor.
This cake also freezes beautifully. Wrap the unglazed cake layers tightly in plastic wrap and then aluminum foil. Freeze for up to 3 months. Thaw overnight in the refrigerator, then bring to room temperature and glaze just before serving for the best texture and taste.
Tips and Advice for Baking Success
- Room Temperature Eggs: Using eggs straight from the fridge can make your batter harder to combine smoothly. If you have time, let them sit out for 30 minutes.
- Don’t Overmix: Once the dry and wet ingredients are combined, stop mixing. Overworking the batter can lead to a tough, dense cake.
- Oven Thermometer: Oven temperatures can be off. An inexpensive oven thermometer ensures you’re baking at the right heat.
- Cool Completely Before Glazing: If the cakes are too hot, the glaze will melt and slide right off. Warm is perfect; hot is a mess.
Presentation Ideas to Impress Your Crew
- Top with fresh raspberries or blueberries for a pop of color.
- Add a light dusting of powdered sugar over the glaze for a snowy effect.
- Serve with a dollop of softly whipped cream or a scoop of vanilla ice cream.
- Garnish with thin slices of lemon or a sprig of fresh mint.
Set Sail for New Flavors: Recipe Variations
This recipe is a fantastic base for so many adventures!
- Tropical Pirate Cake: Use a vanilla cake mix with coconut gelatin. Substitute coconut milk for the yogurt and top with a toasted coconut glaze.
- Berry Burst Cake: Use a white cake mix with strawberry gelatin. Fold 1 cup of fresh chopped strawberries into the batter and top with a fresh berry compote.
- Chocolate Orange Delight: Use a chocolate cake mix with orange gelatin. The chocolate-orange combo is divine. Top with a simple chocolate ganache.
- Lime & Coconut Refresher: Use a white cake mix with lime gelatin. Add 1 cup of shredded coconut to the batter and use a lime juice glaze.
- Piña Colada Cake: Use a vanilla cake mix with pineapple gelatin. Use coconut cream yogurt and add 1/2 cup of crushed, drained pineapple to the batter.
- Seasonal Spice Cake: In fall, use a spice cake mix with orange gelatin. Add a pinch of extra cinnamon and nutmeg. Top with a cream cheese frosting.
Common Mistakes to Avoid on Your Baking Voyage
Mistake 1: Using the Wrong Size Gelatin Box
This mistake happens because gelatin comes in different sizes. The recipe needs the standard 3-ounce box of sweetened lemon gelatin. Using a sugar-free box or a larger 6-ounce box will completely throw off the sweetness and texture. The cake could end up too dry, too sweet, or not set properly. Always grab the small, brightly colored box from the Jell-O section.
Mistake 2: Adding All the Lemon Juice to the Glaze at Once
When making the glaze, dumping all the lemon juice into the condensed milk at once can cause it to seize up unevenly or become too runny. The key is to add it gradually, stirring hard after each splash. This allows the acid to react with the dairy slowly, creating that perfect, spreadable thickening. Go slow and stir vigorously—it’s worth the extra minute.
Mistake 3: Not Letting the Cakes Cool Enough Before Glazing
The excitement to finish the cake is real! But if you try to spread that gorgeous glaze onto a hot cake, disaster strikes. The heat will cause the glaze to melt, become super runny, and soak into the cake or drip right off the sides. You lose
Crispy Endives Pears
Ingredients
Equipment
Method
- In a large bowl, mix the lemon cake mix, lemon gelatin, and baking powder together.
- In another bowl, whisk together the eggs, yogurt, and oil until well combined and slightly frothy.
- Gradually add the dry ingredients to the wet mixture, mixing until smooth.
- Preheat your oven to 160°C (320°F) and prepare two round cake pans by greasing them with butter and coating with flour.
- Pour the batter evenly between the two pans.
- Bake for 40 minutes until golden brown, and a toothpick inserted comes out clean.
- Cover the baked cakes with a clean kitchen cloth and let them cool until warm.
- For the glaze, mix the sweetened condensed milk with fresh lemon juice until thick and smooth.
- Once the cakes have cooled, invert them onto a serving dish, layer with glaze, and drizzle more on top.