Vanilla Cheesecake with Chocolate Base: A Dreamy Duo
Is there anything better than slicing into a perfectly set cheesecake? I don’t think so. The first time I made this vanilla cheesecake with a chocolate cookie crust, my family went completely silent. That’s how you know it’s a winner. It’s not just a dessert; it’s an experience. A rich, crumbly chocolate foundation cradling the dreamiest, smoothest vanilla filling you can imagine. It’s classic, elegant, and honestly, a whole lot of fun to make. Let’s get baking!
A Slice of Cheesecake History (With a Chocolate Twist!)
Cheesecake has been around since ancient Greece, but our modern version owes a big thanks to American cream cheese. The chocolate cookie base is a more recent and glorious innovation. I like to think of it as the best of both dessert worlds coming together on one plate. My version is a “no-bake” base with a delightfully “baked” filling, which gives you that fantastic texture contrast without extra fuss. It’s the recipe I pull out when I want to impress without stress, and it never, ever lets me down.
Why You’ll Absolutely Adore This Recipe
You’ll love this because it’s a showstopper that doesn’t require chef-level skills. The flavors are a perfect balance—not too sweet, with the vanilla and chocolate complementing each other beautifully. It’s also wonderfully forgiving. A little crack on top? No problem, that’s what the whipped cream and chocolate shavings are for! It’s a make-ahead dream, so you can enjoy your own party. Most importantly, it creates pure joy with every creamy, chocolatey bite.
Perfect Occasions for This Glorious Cheesecake
This cheesecake is your secret weapon for so many events! It’s a birthday party superstar, a lovely finish to a holiday dinner, or the perfect centerpiece for a summer picnic (just keep it cool!). I’ve brought it to potlucks where it disappears first, and it’s my go-to for “just because” weekend treats. It says “I care” without you having to say a word.
Gathering Your Ingredients
Let’s gather our cast of characters. Using full-fat, room-temperature ingredients is the key to a smooth, lump-free filling.
For the Chocolate Base:
- 1 1/2 cups crushed chocolate cookies (like Oreo crumbs, filling included!)
- 1/4 cup melted butter
- 1/4 cup granulated sugar
For the Vanilla Filling:
- 24 oz (680 g) cream cheese, softened
- 1 cup granulated sugar
- 3 large eggs, at room temperature
- 1 cup sour cream
- 1 tablespoon pure vanilla extract
- 1/4 cup of milk (whole or 2% works great)
For the Decoration:
- 1 cup of heavy whipping cream, cold
- Chocolate shavings (use a vegetable peeler on a chocolate bar!)
- Fresh strawberries, for a pop of color
Handy Substitution Options
Out of something? Don’t worry! Here are some easy swaps:
- Cookies: Use graham cracker crumbs instead of chocolate cookies for a different base flavor.
- Sour Cream: Plain full-fat Greek yogurt is a fantastic substitute.
- Milk: Any milk you have on hand, even a non-dairy alternative like almond milk, will work in the filling.
- Topping: Use a can of store-bought whipped topping if you’re short on time, though fresh whipped cream is divine.
Crafting Your Vanilla Cheesecake Masterpiece
Follow these steps for a flawless result. Remember, patience is your friend, especially during cooling!
Step 1: Building the Chocolate Foundation
First, preheat your oven to 350°F (175°C). While it heats, let’s make the base. Take your finely crushed chocolate cookies—they should look like dark, sandy soil—and mix them with the melted butter and sugar. The mixture will become damp and hold together when pinched. Press it firmly and evenly into the bottom of your 9-inch springform pan. I use the bottom of a measuring cup to get it nice and flat. Bake this for just 10 minutes, then let it cool completely on a rack. You’ll smell that wonderful chocolate aroma filling your kitchen!
Pro tip: For easier removal, you can line the bottom of your pan with a round of parchment paper before adding the crust.
Step 2: Creating the Dreamy Vanilla Filling
Now for the magic! In a large bowl, beat your softened cream cheese and sugar together on medium speed. Keep going until it’s completely smooth, creamy, and no lumps remain. This is crucial. Next, add the eggs one at a time, mixing just until each yellow yolk disappears into the pale mixture. Finally, blend in the sour cream, vanilla extract, and milk. The vanilla will perfume the whole bowl. The filling should be silky and uniform. Pour this luscious cream over your cooled chocolate base and gently smooth the top.
Step 3: The Gentle Bake
Reduce your oven temperature to 325°F (165°C). Place your cheesecake in the oven and bake for 50-60 minutes. The goal is for the edges to be set and puffed, but the center should still have a slight jiggle—like Jell-O—when you gently tap the pan. It will continue to set as it cools. Do not overbake! Once done, turn the oven off, crack the door open, and let the cheesecake cool inside for an hour. This prevents sudden temperature shifts that can cause cracks.
Step 4: The Grand Finale – Decorating!
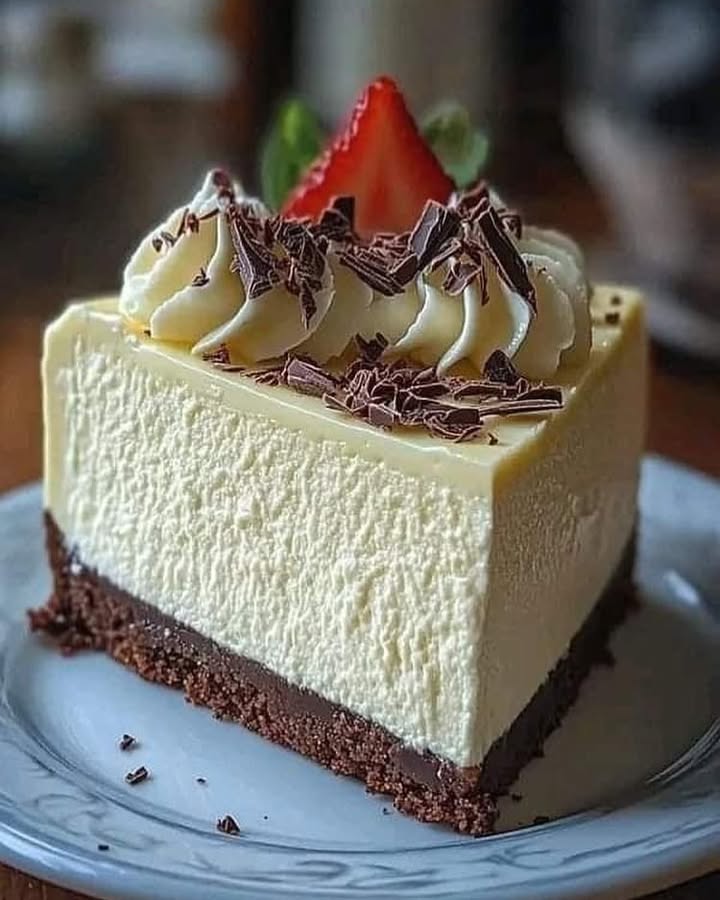
After the cheesecake has chilled in the fridge for at least 4 hours (overnight is best), it’s time to dress it up. Whip your cold heavy cream until firm peaks form. Spread or pipe it over the top of the chilled cake. Then, shower it with delicate chocolate shavings and crown it with a few perfect fresh strawberries. That first slice, revealing the dark chocolate layer against the creamy white filling, is pure artistry.
Chef’s tip: For ultra-neat slices, dip your knife in hot water and wipe it clean between each cut.
Your Cheesecake Timeline
- Prep Time: 30 minutes
- Cook Time: 60 minutes
- Cooling & Chilling Time: 5 hours (minimum), preferably overnight
- Total Time (with chilling): About 6 hours 30 minutes
The Secret to a Crack-Free Top
My number one secret? Room temperature ingredients and a water bath. If you really want a perfect, silky-smooth surface without a single crack, wrap the bottom of your springform pan in heavy-duty foil. Place it in a larger roasting pan and pour hot water into the larger pan until it comes about halfway up the side of the springform. The steam creates an even, gentle heat. It’s a game-changer for texture!
A Fun Cheesecake Fact
Did you know the largest cheesecake ever made weighed over 6,900 pounds? It was created in Mexico in 2016! Thankfully, our home-kitchen version is a much more manageable (and delightful) size.
Equipment You’ll Need
- 9-inch springform pan
- Electric mixer (hand or stand)
- Mixing bowls
- Measuring cups and spoons
- Spatula
- Aluminum foil (for the water bath method)
Storing Your Lovely Cheesecake
This cheesecake stores beautifully. Keep it covered in the refrigerator for up to 5 days. The flavors actually deepen and meld after a day, making leftovers a real treat.
For longer storage, you can freeze it. Place the undecorated, cooled cheesecake (wrap it well in plastic wrap and then foil) in the freezer for up to 2 months. Thaw it overnight in the fridge before decorating and serving.
Always store it in the springform pan or on a flat plate with a dome lid to protect the topping. The chocolate base may soften slightly over time, but it will still be delicious.
Tips and Advice for Success
- Softening Cream Cheese: Leave it on the counter for a few hours. Microwaving can create hot spots that lead to lumps.
- Mixing: Don’t overmix after adding the eggs. This incorporates too much air, which can cause cracking.
- Patience: The long, slow cooling and chilling is non-negotiable for the perfect creamy texture. Plan ahead!
Presentation Ideas to Wow Your Guests
- Drizzle individual slices with a raspberry or caramel sauce just before serving.
- Create a “naked” look by just adding a few artful dollops of whipped cream and berries.
- Serve with a small cup of espresso or a glass of dessert wine for a truly elegant finish.
Healthier and Fun Recipe Variations
Love the idea but want to mix it up? Here are six delightful twists:
- Lemon Swirl: Add a swirl of homemade lemon curd to the filling before baking for a bright, tangy burst.
- Berry Bliss: Top the cheesecake with a mixed berry compote instead of whipped cream for a fruit-forward version.
- No-Bake Version: Use gelatin to set the filling and skip the oven entirely for a summer-friendly dessert.
- Mini Cheesecakes: Bake the filling in a muffin tin lined with cupcake papers for adorable individual portions.
- Mocha Madness: Dissolve 2 tablespoons of instant espresso powder into the milk for a coffee-chocolate delight.
- Gluten-Free: Use your favorite gluten-free chocolate cookies for the crust to make it celiac-friendly.
Common Mistakes to Avoid
Avoid these pitfalls for a perfect cheesecake every single time.
Mistake 1: Using Cold Ingredients
This is the biggest culprit for a lumpy filling. Cold cream cheese and eggs don’t blend smoothly. They create tiny bits of unmixed cheese that will bake into lumps. Always let your cream cheese, eggs, and sour cream sit on the counter for at least an hour before you start. Your filling will be velvety smooth.
Mistake 2: Overmixing the Eggs
Once you add the eggs, you need to mix gently. Beating them on high speed pumps too much air into the batter. This air expands in the oven and then collapses as the cake cools, leading to cracks and a less dense texture. Mix on low speed just until each egg is incorporated, then stop.
Mistake 3: Overbaking the Cheesecake
A dry, crumbly cheesecake is often an overbaked cheesecake. It should still wobble slightly in the very center when you take it out. Remember, it continues to cook from residual heat as it cools. The goal is a creamy, uniform texture from edge to center. When in doubt, err on the side of underbaking slightly.
Mistake 4: Skipping the Slow Cool Down
Pulling a hot cheesecake out of the oven and plopping it in the fridge is a surefire way to make it crack. The sudden temperature shock makes the top contract faster than the body. Let it cool in the turned-off oven with the door ajar, then on the counter, then in the fridge. This gradual cooling is your best defense.
Frequently Asked Questions
Can I make this cheesecake without a springform pan?
It’s tricky but possible. A deep 9-inch pie dish can work, but serving neat slices will be much harder. The springform’s removable sides are really the ideal tool for this job. If you’re in a pinch, line a regular cake pan with foil or parchment paper with long “handles” to help lift the cheesecake out after chilling.
Why did my cheesecake crack on top?
Cracks usually happen from too much air in the batter (overmixing), a too-rapid temperature change, or overbaking. Don’t worry! It’s still totally delicious. That’s why we have lovely toppings like whipped cream and chocolate shavings—they make every cheesecake look perfect and taste even better.
How do I know when the cheesecake is done baking?
The edges should look set and may have puffed up slightly. The center (about a 3-inch circle) should still look moist and have a gentle, wobbly jiggle when you lightly shake the pan. It should not be liquidy, but it should not be firm either. It will firm up perfectly during the long cooling process.
Can I use low-fat cream cheese and sour cream?
You can, but the texture and flavor won’t be as rich, creamy, or stable. Full-fat dairy products have less water and more fat, which gives the cheesecake its luxurious mouthfeel and helps it set properly. For the best results, I strongly recommend using the full-fat versions.
How far in advance can I make this cheesecake?
This is a fantastic make-ahead dessert! You can bake it 1-2 days before you need it. In fact, I think it tastes even better the next day after the flavors have fully melded. Just wait to add the whipped cream and fresh fruit decorations until a few hours before you plan to serve it.
My crust stuck to the pan bottom. How can I prevent this?
To easily release the crust, line the bottom of your springform pan with a circle of parchment paper before you press in the cookie mixture. After chilling, you can run a thin spatula under the parchment to transfer the whole cheesecake to a serving plate, or simply serve it from the pan base.
What’s the best way to crush the cookies for the crust?
You can use a food processor for a fine, uniform crumb in seconds. No processor? Place the cookies in a sturdy zip-top bag, seal it, and roll over them with a rolling pin. Keep going until you have fine crumbs. A few small bits are okay for texture.
Can I freeze the baked cheesecake?
Absolutely! Wrap the cooled, undecorated cheesecake tightly in plastic wrap, then a layer of aluminum foil. Freeze for up to 2 months. Thaw it slowly in the refrigerator overnight. Add your decorations after it’s fully thawed. This is a great way to always have a spectacular dessert on hand.
What does the sour cream do in the filling?
Sour cream adds a wonderful, subtle tang that balances the sweetness. More importantly, its acidity and fat content help make the filling incredibly smooth and creamy. It also adds moisture and helps prevent the cheesecake from drying out or cracking during baking.
The center of my cheesecake is still runny after chilling. What happened?
This means it was underbaked. Unfortunately, you can’t fix it after the fact. In the future, bake until the center jiggle is very small. For this one, you can still enjoy it—just scoop it into bowls like a pudding! It will still taste amazing. Consider it a delicious learning experience.
Your New Go-To Celebration Dessert
And there you have it! Your guide to creating a stunning vanilla cheesecake with a chocolate base. This recipe is a labor of love, but each step is simple. The reward is a dessert that feels fancy but comes straight from your heart and kitchen. So preheat that oven, take a deep breath, and get ready for the compliments. You’ve got this. Now go make some memories—one creamy, chocolatey slice at a time.
Lemon Meringue Delight
Ingredients
Equipment
Method
- Preheat your oven to 350°F (175°C).
- Mix crushed chocolate cookies, melted butter, and sugar until damp; press into a 9-inch springform pan.
- Bake the crust for 10 minutes and let it cool completely on a rack.
- In a large bowl, beat the softened cream cheese and sugar until smooth.
- Add eggs one at a time, mixing until just incorporated.
- Blend in sour cream, vanilla extract, and milk until silky.
- Pour the mixture over the cooled chocolate base and smooth the top.
- Reduce oven temperature to 325°F (165°C) and bake for 50-60 minutes until the edges are set and the center has a slight jiggle.
- Once baked, turn off the oven, crack the door open, and let the cheesecake cool inside for 1 hour.
- Chill the cheesecake in the fridge for at least 4 hours or overnight.
- Whip the cold heavy cream to firm peaks and spread over the cheesecake.
- Decorate with chocolate shavings and fresh strawberries.