A Slice of Autumn Magic: The Easiest Pumpkin Fudge You’ll Ever Make
There’s a moment every fall when the air turns crisp and all I can think about is pumpkin spice. But you know me, I want all the cozy flavor with minimal fuss. I was determined to create a pumpkin fudge that didn’t require a candy thermometer or cause a kitchen meltdown. After a few delightful (and one slightly grainy) experiments, this recipe was born. It’s the one my family now demands as soon as the leaves start to change.
From Holiday Treat to Year-Round Joy
Fudge has a rich history, often linked to holiday gatherings and family recipes passed down through generations. Traditional fudge is a symphony of sugar, butter, and milk, cooked to a precise temperature. This pumpkin fudge, however, is a beautiful modern shortcut. It takes the creamy, foolproof magic of sweetened condensed milk and melting chocolate and swirls in the warm, spiced soul of pumpkin pie. It’s a fusion that honors tradition while making it accessible for any home cook, anytime a little autumn comfort is needed.
Why You’ll Fall Head Over Heels for This Pumpkin Fudge
You will adore this recipe because it’s incredibly simple yet tastes like you spent hours in the kitchen. The texture is unbelievably creamy and smooth, melting right on your tongue. The flavor is pure pumpkin pie, but in a rich, bite-sized form. It’s also the perfect make-ahead treat. Whip up a batch, stash it in the fridge, and you’re always ready for guests, a school event, or a secret midnight snack. No special skills required!
The Perfect Occasions for Pumpkin Spice Fudge
This fudge isn’t just for Thanksgiving! It’s a star player for so many events. Picture it on a Halloween party platter, packed in fall picnic baskets, or wrapped as sweet Thanksgiving favors. I love bringing it to harvest festivals or sending squares home with guests after a cozy weekend dinner. It even makes a wonderful edible gift during the holiday season, beautifully packaged in a little tin.
Gathering Your Pumpkin Fudge Ingredients
Here’s what you’ll need to create this autumn masterpiece. Quality matters here, especially for the chocolate!
- 4 cups (24 ounces) white chocolate chips: The base of our fudge. Use a good brand for best melting.
- 1 cup (8 fl oz) sweetened condensed milk: This is the key to creamy, set fudge. Do not use evaporated milk.
- 2 ½ tablespoons 100% pumpkin puree: The star! Use plain canned pumpkin, not pumpkin pie filling.
- 1 teaspoon vanilla extract: Adds a warm, sweet depth.
- 1 teaspoon ground cinnamon: Essential for that classic spice.
- ¼ teaspoon ground nutmeg: Adds a warm, nutty note.
- ⅛ teaspoon ground cloves: Just a tiny pinch for a spicy kick.
Simple Swaps: Substitution Options
Out of something? No worries! Here are some easy swaps.
- White Chocolate Chips: You can use a high-quality white chocolate baking bar, chopped.
- Spices: No nutmeg or cloves? Use 1 ¼ teaspoons of pre-mixed pumpkin pie spice instead of the individual spices.
- Add-Ins: After mixing, fold in ½ cup of toasted pecans or crushed gingersnap cookies for extra crunch.
Crafting Your Creamy Pumpkin Fudge
Follow these simple steps for foolproof fudge every single time.
Step 1: Prep Your Pan
First, grab an 8×8-inch baking pan. Line it neatly with aluminum foil, letting some foil hang over the edges. This little “handle” will be your best friend later when you need to lift the whole slab of fudge out for cutting. A light spritz of cooking spray on the foil helps, but isn’t always necessary. Set your prepared pan aside.
Step 2: Stir That Milk
Open your can of sweetened condensed milk. You’ll often see it has separated a bit, with thicker, gooier stuff at the bottom. Give it a really vigorous stir right in the can with a spoon. We want it perfectly smooth and uniform. This ensures our fudge will have an even texture throughout, with no strange streaks.
Step 3: Melt to Perfection
Now, for the magic part. In a medium saucepan, combine the white chocolate chips and the 1 cup of stirred sweetened condensed milk. Place it over low heat. Stir almost constantly with a silicone spatula. You’ll watch the chips slowly lose their shape, merging with the milk into a silky, pale lagoon. Pro tip: Low and slow is the rule! High heat will scorch the chocolate. If you prefer, microwave in a large bowl: heat for 1 minute at 50% power, stir well, then continue in 30-second bursts at half power, stirring between each, until fully melted.
Step 4: Bring in the Pumpkin Spice
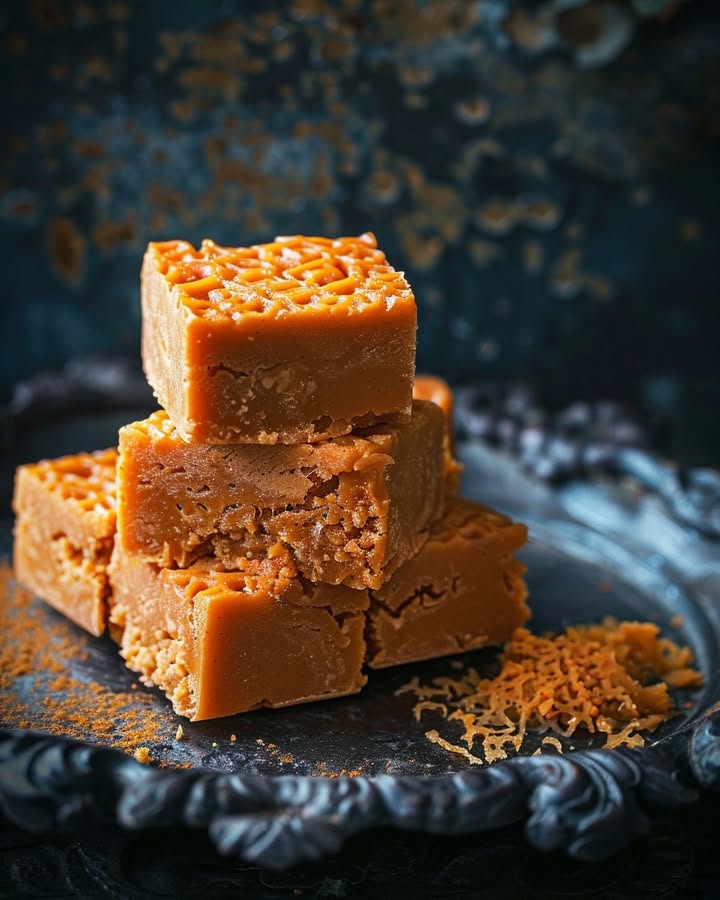
Once your chocolate mixture is completely smooth, take it off the heat. Now, add in all your flavor heroes: the pumpkin puree, vanilla, cinnamon, nutmeg, and cloves. Stir, stir, stir! The color will transform from bright white to a lovely muted orange. The aroma that wafts up is pure autumn heaven—warm, spicy, and inviting. Make sure everything is fully combined with no streaks of spice remaining.
Step 5: Set and Forget
Pour your fragrant fudge mixture into your waiting foil-lined pan. Use your spatula to spread it into an even layer, getting into all the corners. Tap the pan gently on the counter to release any air bubbles. Now, the hard part: patience. Slide the pan into the refrigerator. Let it chill undisturbed for at least 4 hours, or ideally overnight. This sets the fudge perfectly so you get clean, sharp squares.
Step 6: Slice and Savor
When the wait is over, use the foil handles to lift the entire fudge block onto a cutting board. Peel the foil away carefully. Using a large, sharp knife (wiped clean between cuts for neat edges), cut the fudge into small squares. I like 1-inch pieces because it’s so rich. Arrange them on a platter and watch them disappear! Chef’s tip: For super clean cuts, you can slightly warm the knife under hot water and dry it quickly.
Your Pumpkin Fudge Timeline
Here’s a quick breakdown of how your time will be spent.
- Prep Time: 10 minutes
- Cook Time: 10 minutes (melting)
- Chill Time: 4 hours minimum
- Total Time: 4 hours 20 minutes
A Chef’s Secret for the Smoothest Fudge
My absolute best trick is to stir the sweetened condensed milk in the can before you even measure it. That separation is normal, but if you don’t mix it, you might pour out mostly thin liquid first, leaving the thick sugar behind. This can throw off your fudge texture. A good stir in the can ensures every tablespoon has the perfect balance.
Pumpkin Puree: Not Just for Pie
That humble can of pumpkin puree is a powerhouse! It’s packed with vitamin A and fiber. In this recipe, it adds not only flavor and that iconic color but also a touch of moisture. However, it’s crucial we don’t add extra. Too much pumpkin can prevent the fudge from setting firmly because of the added water content. We want creamy, not soupy!
Tools You’ll Need
You likely have everything already:
- 8×8-inch baking pan
- Aluminum foil
- Medium saucepan (or large microwave-safe bowl)
- Silicone spatula or wooden spoon
- Measuring cups and spoons
- Sharp knife for cutting
Keeping Your Fudge Fresh: Storage Tips
This fudge must be stored in the refrigerator. Once set and cut, layer the squares between sheets of parchment or wax paper in an airtight container. This prevents them from sticking together.
Properly stored, your pumpkin fudge will stay deliciously creamy and fresh for up to two weeks. The cold keeps the texture perfect and the flavors bright.
You can also freeze this fudge for longer storage! Wrap the whole block or individual pieces tightly in plastic wrap, then place in a freezer bag. It will keep well for 2-3 months. Thaw overnight in the fridge before serving.
My Best Tips for Fudge Success
- Chocolate Quality is Key: Splurge on a name-brand white chocolate chip. Off-brands sometimes have different fats that don’t melt as smoothly.
- Don’t Rush the Melt: Patience over low heat guarantees a silky base. Rushed, grainy chocolate won’t become smooth later.
- Chill Completely: I know it’s tempting, but don’t cut the fudge early. A full 4-hour chill ensures clean cuts and the right firm, creamy bite.
- Room Temp Serving: For the best flavor and texture, let the squares sit at room temperature for about 10 minutes before serving.
Presenting Your Pumpkin Fudge with Panache
Make your fudge look as good as it tastes!
- Dust the tops lightly with a mix of cinnamon and powdered sugar before chilling.
- Arrange squares on a rustic wooden board with some whole cinnamon sticks and pecans for decor.
- For gifts, place a few squares in small cellophane bags tied with brown ribbon and a fall leaf.
- Stack them in a clear glass jar for a beautiful countertop display.
Mix It Up! Healthier & Fun Variations
Love this base recipe? Try these tasty twists!
- Dairy-Free Delight: Use dairy-free white chocolate chips and full-fat coconut milk instead of sweetened condensed milk (reduce by 2 tbsp and whisk with 1 tbsp cornstarch first).
- Sugar-Conscious Swirl: Substitute sugar-free sweetened condensed milk and sugar-free white chocolate chips. The spice and pumpkin will still shine!
- Nutty Crunch: Fold ½ cup of finely chopped toasted pecans or walnuts into the mixture just before pouring for added texture and healthy fats.
- Dark Chocolate Pumpkin: Swap the white chocolate for dark chocolate chips. The result is a deeper, less sweet, but equally spiced fudge.
- Gingersnap Spice: Replace the individual spices with 2 teaspoons of gingerbread spice. Add ¼ cup of crushed gingersnaps on top before chilling.
- Maple Kissed: Replace the vanilla extract with ½ teaspoon of maple extract. Top each square with a tiny flake of sea salt after cutting.
Common Mistakes to Avoid
Steer clear of these pitfalls for perfect fudge every time.
Mistake 1: Using the Wrong White Chocolate
Not all white chocolate is created equal for melting. Cheap brands or “white baking morsels” often contain less cocoa butter and more stabilizers. They can seize up, become greasy, or refuse to melt smoothly. This leads to grainy, oily fudge. Always choose a high-quality white chocolate chip or baking bar labeled as “real white chocolate.” It makes all the difference in achieving that luxurious, creamy melt.
Mistake 2: Confusing Sweetened Condensed and Evaporated Milk
These two cans look very similar on the shelf, but they are not interchangeable. Evaporated milk is just milk with water removed. Sweetened condensed milk has had water removed and has a lot of sugar added. This sugar is what helps the fudge set properly. Using evaporated milk will result in a soft, saucy mixture that never firms up. Always double-check the label to ensure you have “sweetened condensed milk.”
Mistake 3: Adding Too Much Pumpkin
It’s tempting to add more pumpkin for a stronger flavor. Resist! Pumpkin puree contains a lot of water. Our recipe uses just the right amount to impart flavor and color without adding so much moisture that the fudge can’t set. Adding extra, even just another tablespoon, can make the fudge too soft and prevent it from ever getting that perfect, sliceable texture. Trust the measured amounts.
Mistake 4: Cooking Over Too High Heat
White chocolate is delicate and scorches easily. If you melt it over medium or high heat, it can burn, become lumpy, or separate into a grainy, oily mess. This ruins the entire batch. Always use the lowest heat setting on your stove and stir constantly. If using a microwave, use the half-power (50%) setting and short intervals. Gentle heat is your friend for smooth, velvety fudge.
Your Pumpkin Fudge Questions, Answered
Can I use fresh pumpkin puree instead of canned?
You can, but you need to be careful. Fresh pumpkin puree often has more water than canned. If you use it, you must first strain it very well. Wrap the puree in cheesecloth and squeeze out as much liquid as possible. Even then, the result might be slightly softer. For guaranteed consistency, I highly recommend using 100% canned pumpkin puree. It’s reliably thick and gives the same perfect result every time.
Why is my fudge not setting or too soft?
If your fudge is too soft, a few things could have happened. First, check that you used sweetened condensed milk and not evaporated milk. Second, you might have added too much pumpkin puree. Third, the fudge may not have chilled long enough—it needs a full 4 hours. Finally, the chocolate might not have been high quality, affecting the set. Always chill it overnight if you have the time for the firmest result.
Can I make this fudge without a stove?
Absolutely! The microwave method works beautifully. Combine the chips and milk in a large microwave-safe bowl. Heat on 50% power for 1 minute. Stir well. Then, continue heating in 30-second intervals at half power, stirring vigorously after each, until the mixture is completely smooth. This method gives you more control and less risk of scorching. Just be sure not to use full power.
How long will this pumpkin fudge last?
Because it contains dairy and pumpkin, this fudge must be stored in the refrigerator. In an airtight container with layers separated by parchment paper, it will stay fresh and delicious for up to two weeks. You can also freeze it for 2-3 months. Thaw it in the fridge overnight before serving. Always keep it chilled for food safety and the best texture.
Can I double this recipe?
Yes, you can easily double it! Use a larger saucepan and a 9×13-inch pan lined with foil. The melting process will take a little longer, so be patient and keep stirring over low heat. Ensure your pan is big enough to comfortably hold all the ingredients while you stir. The chilling time remains the same, at least 4 hours.
My white chocolate seized and got chunky. What did I do wrong?
This usually happens if even a tiny drop of water got into the chocolate while melting, or if the heat was too high. White chocolate is very sensitive. Unfortunately, once it seizes (becomes a thick, grainy mass), it’s very hard to fix. It’s best to start over. To prevent this, ensure your spoon and pan are completely dry before starting, and always melt over the lowest possible heat.
What can I use instead of cloves?
If you don’t have cloves or don’t enjoy their strong flavor, simply leave them out. You can increase the cinnamon to 1 ¼ teaspoons instead. Another great option is to use a pre-mixed pumpkin pie spice. Use 1 ¼ teaspoons of pumpkin pie spice in place of the cinnamon, nutmeg, and cloves listed.
Is there a way to make this recipe less sweet?
The sweetness mainly comes from the white chocolate and sweetened condensed milk. For a less sweet version, try using a darker white chocolate (one with a higher cocoa percentage) or even switching to semisweet dark chocolate chips. You can also add a pinch of salt to the mixture to help balance the sweetness. Remember, fudge is meant to be a sweet treat, so it will always be on the sugary side.
Can I add nuts or other mix-ins?
Of course! Adding ½ to ¾ cup of mix-ins is a great way to customize. Fold them in at the very end, after all the spices are combined. Toasted pecans or walnuts are classic. Crushed pretzels add a sweet-salty crunch. Even a handful of mini chocolate chips or dried cranberries would be lovely. Just ensure any add-ins are chopped to a small size for easy cutting.
How do I get perfectly clean cuts on my fudge?
Clean cuts are all about the right tool and technique. First, make sure the fudge is fully chilled. Use a large, sharp chef’s knife. Wipe the blade clean with a warm, damp cloth between each cut. For the absolute cleanest lines, some people even run the knife under hot water, dry it quickly, and then slice. This helps the knife glide through the creamy fudge without dragging.
Your New Go-To Fall Treat
This pumpkin fudge truly is a little square of autumn joy. It’s simple enough for a beginner but impressive enough for any gathering. The magic is in how a few basic ingredients come together to create something so special. I hope this recipe finds its way into your fall traditions, creating cozy moments and happy bellies. Now, go make a batch, pour yourself a cup of coffee, and enjoy the delicious taste of the season!
S'mores Crunchwrap Delight
Ingredients
Equipment
Method
- Line an 8x8-inch baking pan with aluminum foil, leaving some overhang for easy removal.
- Stir the sweetened condensed milk in the can until smooth and uniform.
- In a medium saucepan over low heat, combine the white chocolate chips and the sweetened condensed milk, stirring constantly until melted and smooth.
- Remove from heat and stir in the pumpkin puree, vanilla, cinnamon, nutmeg, and cloves until fully combined.
- Pour the mixture into the prepared pan, smoothing it out evenly; tap gently to release air bubbles.
- Refrigerate for at least 4 hours or ideally overnight until set.
- Lift the fudge out of the pan using the foil overhang and cut into squares.