The Magical Snow Cake: A Dessert as Simple and Lovely as a Winter Morning
You know that feeling when you wake up to a quiet, snowy day? Everything feels soft, peaceful, and a little bit magical. That’s exactly the feeling I wanted to capture in a dessert for my family last Christmas Eve. I was tired of heavy, dense cakes and wanted something light, airy, and as pretty as the frost on the windowpane. After a few happy kitchen experiments (and one minor powdered sugar explosion that my kids still laugh about), this beautiful Snow Cake was born. It’s become our go-to celebration treat, and I’m so excited to share it with you!
A Slice of Sweet History: The Story of Snow Cake
While this specific recipe is my family’s twist, light, egg-white-leavened cakes have a charming history. They pop up in many cultures under names like “angel food cake” or “sponge cake.” The magic lies in the technique of whipping egg whites into stiff, snowy peaks. This wasn’t just for show! Before baking powder was widely available, cooks relied on the air trapped in egg whites to make their cakes rise. My version is a bit richer with butter and milk, making it tender and moist inside while keeping that gorgeous, cloud-like texture. It’s a lovely blend of old-world technique and simple, modern comfort.
Why You’ll Absolutely Adore This Snow Cake Recipe
First, it’s stunningly simple. You probably have all the ingredients in your pantry right now. Second, the texture is a dream—it’s moist and tender but also wonderfully light. It’s not overly sweet, making it perfect for an afternoon snack or a fancy dinner finale. And the best part? Watching that simple batter puff up into a glorious golden-top cake in the oven never gets old. It’s like a little edible miracle.
When to Whip Up Your Own Snow Cake
This cake is wonderfully versatile! It’s perfect for a quiet Sunday brunch, a book club meeting, or a baby shower where you want something elegant but not fussy. I love serving it during the holidays—it’s a beautiful, wintry white dessert that doesn’t compete with all the rich chocolate and peppermint. It’s also my secret weapon for potlucks because it travels like a champ and everyone always asks for the recipe.
Gathering Your Snowy Ingredients
Let’s gather our simple, wholesome ingredients. Quality matters here, so use the freshest eggs you can find for the best volume in your egg whites!
- 1/2 cup unsalted butter, melted
- 2 cups warm milk
- 4 eggs (separated)
- 1 1/4 cups powdered sugar
- 1 tablespoon water
- 1 cup all-purpose flour
- 1 teaspoon vanilla extract
- Powdered sugar for dusting
Smart Substitutions for Your Snow Cake
No worries if you’re missing something! Here’s how to adapt:
- Dairy-Free? Use a plant-based butter and unsweetened almond or oat milk. They work beautifully.
- Out of All-Purpose Flour? A gluten-free 1-to-1 baking blend can be used cup-for-cup.
- Vanilla Variety: Feel free to swap the vanilla extract for almond extract for a different, equally lovely flavor.
- Butter Choice: If you only have salted butter, use it but omit any added salt in the recipe (not that this one has any!).
Crafting Your Cloud: Step-by-Step Instructions
Step 1: Create Your Snowy Peaks
Start by carefully separating your eggs. Place the whites in a spotlessly clean, dry bowl. Any trace of yolk or grease can deflate your whites. Now, beat them with an electric mixer until stiff, glorious peaks form. This means when you lift the beaters, the peaks stand straight up. Set this fluffy white cloud aside for now. In another bowl, beat the egg yolks with the powdered sugar. Watch as it transforms into a pale, thick, and creamy mixture. This step gives the cake its rich color and structure.
Pro tip: For the best egg white volume, ensure your bowl and beaters are completely grease-free. A quick wipe with a lemon wedge or vinegar can help!
Step 2: Bringing the Golden Mixture Together
Take your melted, slightly cooled butter and whisk in that one tablespoon of water. This helps it blend more smoothly. Slowly drizzle and whisk this butter mixture into your fluffy egg yolk and sugar cream. You’ll see it become even silkier and richer in color. The aroma of sweet, creamy butter starts to fill your kitchen—it’s heavenly!
Step 3: Building the Batter Base
Now, pour in your warm milk. Not hot, just nicely warm to the touch. This helps everything combine smoothly without clumping. Sift in your all-purpose flour and add that splash of vanilla extract. Whisk it all together gently but thoroughly until you have a smooth, thin, golden batter. It will feel quite liquid, but don’t fret! This is exactly what you want for a tender cake.
Step 4: The Gentle Fold
This is the most important step! Take your bowl of stiff egg whites. Using a wide spatula, gently scoop about one-third of them into the batter. Fold them in very gently—you’re trying to keep as much of that air as possible. Think of it as a slow, respectful hug for the ingredients. Once incorporated, fold in the remaining whites just until no big white streaks remain. The batter will be light, airy, and full of bubbles.
Chef’s tip: Use a figure-eight motion with your spatula, cutting down through the center and folding over. This incorporates without deflating.
Step 5: Baking to Golden Perfection
Pour this dreamy batter into your prepared pan—I use a greased and floured 9×13 inch baking dish. Gently smooth the top. Place it in your preheated 350°F (180°C) oven. Now, resist the urge to open the door! Let it bake for about 50 minutes. It’s done when the top is a lovely light gold and feels firm when lightly pressed. A toothpick inserted in the center should come out clean.
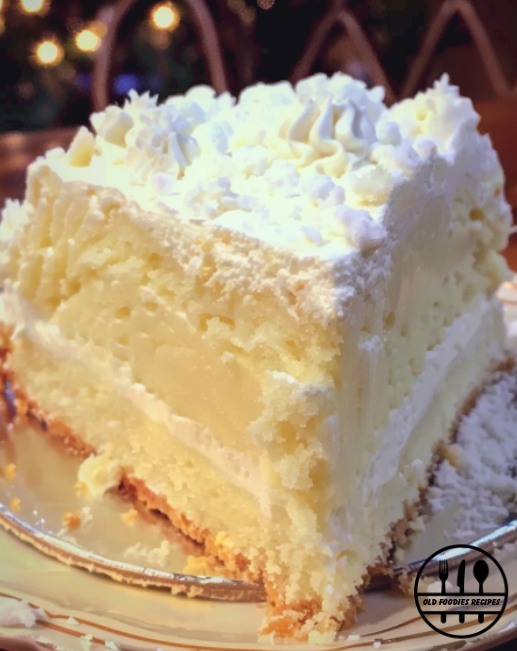
Step 6: The Final Frosty Touch
Take the cake out and let it cool completely in the pan on a wire rack. This patience is key for the perfect texture. Once cool, take a fine-mesh sieve and generously dust the entire top with a fresh layer of powdered sugar. It should look like a fresh dusting of snow. Cut into squares, serve, and get ready for the compliments!
Timing Your Snow Cake Creation
- Prep Time: 20 minutes
- Cook Time: 50 minutes
- Cooling Time: 1 hour (very important!)
- Total Time: About 2 hours 10 minutes
My Secret for the Fluffiest Cake Ever
Here’s my little secret: make sure your milk is truly warm, not hot. I heat mine for about 45 seconds in the microwave until it’s just slightly warmer than my finger. This temperature helps the flour blend in seamlessly without activating the gluten too much, which keeps the cake tender instead of tough. It also helps the melted butter stay fluid so it distributes evenly throughout the batter.
A Fun Fact About Those Egg Whites
Did you know that the science behind whipping egg whites is all about trapping air? The proteins in the egg whites unwind and form a network around air bubbles when you beat them. The sugar you add (in our case, it’s in the yolk mixture) helps stabilize this network. That’s why your “snowy peaks” are the literal foundation that makes this cake rise so beautifully without any chemical leavening!
What You’ll Need to Make It
- Two mixing bowls (one very clean for egg whites)
- Electric hand mixer or stand mixer
- Whisk
- Rubber spatula or large spoon for folding
- 9×13 inch baking pan
- Fine-mesh sieve for dusting
Storing Your Snow Cake
Once cooled and cut, this cake stores wonderfully. Keep any leftovers in the baking dish, tightly covered with plastic wrap or foil, at room temperature. It will stay fresh and moist for up to 2 days. The powdered sugar topping will eventually melt into the cake, but it will still taste delicious.
If you need to store it longer, you can refrigerate it for up to 4 days. Let it come to room temperature before serving for the best texture and flavor. The cold fridge can make it a bit denser.
Can you freeze Snow Cake? Absolutely! Wrap individual squares or the whole cake (without the final powdered sugar dusting) tightly in plastic wrap and then in foil. Freeze for up to 2 months. Thaw overnight in the fridge and dust with fresh powdered sugar just before serving.
Tips and Advice from My Kitchen to Yours
- For the highest peaks, make sure your egg whites are at room temperature before beating.
- Sifting your flour, even if it seems like an extra step, leads to a finer, more even crumb.
- Don’t skip the step of greasing and flouring the pan. This ensures your cake releases cleanly.
- Let the cake cool completely before dusting with sugar or cutting. Cutting it warm can make it gummy.
Pretty Ways to Present Your Snow Cake
- Serve on a plain white plate for a truly elegant, minimalist winter look.
- Add fresh berries like raspberries or strawberries on the side for a pop of color.
- Dust the powdered sugar over a paper doily placed on the cake for a beautiful lacy pattern.
- For a festive touch, add a sprig of fresh mint or edible flowers next to each slice.
Healthier Twists on the Classic Snow Cake
Love the idea but want a lighter version? Here are some simple swaps:
- Whole Wheat Snow Cake: Substitute half the all-purpose flour with whole wheat pastry flour for added fiber.
- Reduced-Sugar Snow Cake: Cut the powdered sugar in the batter by 1/4 cup. The cake will be less sweet but still delicious.
- Dairy-Free Snow Cloud: Use vegan butter and unsweetened soy or almond milk for a completely plant-based treat.
- Lemon Snow Cake: Add the zest of one lemon to the batter along with the vanilla for a bright, citrusy flavor.
- Berry Swirl Snow Cake: Before baking, gently swirl 1/4 cup of raspberry or strawberry jam into the batter for a marbled effect.
- Orange Blossom Snow Cake: Replace the vanilla extract with orange blossom water for a delicate, floral Middle Eastern twist.
Common Mistakes to Avoid for Snow Cake Success
Mistake 1: Not Beating the Egg Whites Enough
This is the number one reason a Snow Cake can fall flat. Stiff peaks are non-negotiable. If your peaks flop over when you lift the beaters, keep going! Properly beaten whites should look glossy and hold a sharp point. They are the only thing making this cake rise. Under-beaten whites won’t hold enough air, resulting in a dense cake.
Mistake 2: Over-mixing When Folding
After you’ve worked so hard to get those fluffy whites, be gentle! Vigorously stirring them into the batter will pop all the tiny air bubbles. Fold slowly and patiently, just until the white streaks disappear. It’s okay if you still see a few small streaks of white; that’s better than a deflated batter.
Mistake 3: Opening the Oven Door Too Early
I know it’s tempting to check on your cake. But don’t do it for at least the first 35 minutes! The rush of cold air from opening the door can cause the delicate cake structure to collapse. Trust the process and the timer. Use your oven light to peek instead.
Mistake 4: Not Cooling the Cake Completely
This cake needs time to set its structure. If you try to dust it with sugar or cut it while it’s still warm, the sugar will melt into a glaze (which is tasty, but not snowy) and the cake may tear or look gummy. Let it cool fully in the pan on a wire rack for the perfect texture.
Frequently Asked Snow Cake Questions
Can I make this cake in a different pan?
Yes, you can! A 9×13-inch pan is standard, but two 8-inch round cake pans will also work. Just reduce the baking time to about 30-35 minutes. Always check for doneness with a toothpick. A Bundt pan is not recommended as the delicate batter might not release cleanly from all the details.
Why did my cake sink in the middle?
A sunken cake is often a sign of under-baking or too much moisture. Make sure your oven temperature is accurate with an oven thermometer. Also, ensure the top is firm and golden and a toothpick comes out completely clean. Another cause could be over-folding the egg whites, which let too much air escape before baking.
My egg whites won’t stiffen. What did I do wrong?
The most common culprit is a dirty bowl. Even a tiny bit of grease or egg yolk can prevent whites from whipping. Use a glass, metal, or ceramic bowl (plastic can hold grease) and clean it with vinegar or lemon juice before starting. Also, make sure your beaters are perfectly clean. Room temperature egg whites whip up higher and faster than cold ones.
Can I use granulated sugar instead of powdered sugar?
It’s not recommended for the batter. Powdered sugar contains cornstarch, which affects the texture, and it dissolves much more easily into the egg yolks, creating a smoother cream. Using granulated sugar might give you a grainy texture. For the final dusting, powdered sugar is a must for that “snowy” look.
How can I tell if my egg whites are at “stiff peak” stage?
Turn off your mixer and lift the beaters straight up. The peak of egg white that forms should stand straight up without bending over at the tip. If the tip curls over, it’s just a “soft peak.” Keep beating. Also, the whites should look glossy and feel thick. If they look dry or clumpy, you’ve gone too far into over-beaten territory.
Can I add flavors like chocolate or fruit to this cake?
You can, but be careful! Any heavy addition can weigh down the batter. For chocolate, try folding in 1/2 cup of mini chocolate chips very gently at the end. For fruit, I recommend serving fresh berries on the side or making a fruit compote to spoon over the top. Mixing wet fruit directly into the batter will likely make it soggy.
Can I make this recipe ahead of time?
Absolutely! This cake actually tastes better the next day as the flavors settle. Bake it the day before, let it cool completely, cover it tightly, and store it at room temperature. Wait to dust it with the final layer of powdered sugar until just before you’re ready to serve it for that fresh, snowy appearance.
Is this cake suitable for people with dietary restrictions?
As written, it contains dairy, eggs, and gluten. However, it’s naturally nut-free. See the substitution section above for easy swaps to make it dairy-free or gluten-free. Always check your specific ingredient labels if allergies are a concern.
Why is the milk warmed?
Warm milk helps the melted butter stay in a liquid state so it blends smoothly into the batter. Cold milk would cause the butter to solidify into little specks. It also helps the flour incorporate more easily without clumping, leading to a smoother, more consistent batter.
The powdered sugar topping disappeared! What happened?
This is totally normal if the cake is even slightly warm or if it’s stored in a sealed container. The moisture from the cake absorbs the sugar. That’s why it’s best to add the powdered sugar “snow” right before serving. For storage, don’t worry about it—the flavor is still all there.
Your New Go-To Celebration Cake
And there you have it—my family’s favorite Snow Cake. It’s more than just a recipe; it’s a little piece of quiet joy, a celebration of simple ingredients coming together to make something truly special. I hope it brings as much light and happiness to your table as it has to mine. Now go on, preheat that oven, and get ready to make some magic. Happy baking!
Garlic Butter Tortellini
Ingredients
Equipment
Method
- Carefully separate the eggs, placing the whites in a clean bowl.
- Beat the egg whites with an electric mixer until stiff peaks form.
- In another bowl, beat the egg yolks with the powdered sugar until thick and creamy.
- Whisk the melted butter and water together, then slowly mix into the egg yolk mixture.
- Pour in the warm milk and sift in the all-purpose flour and vanilla extract, whisking until smooth.
- Gently fold one-third of the egg whites into the batter, then fold in the remaining whites until just combined.
- Pour the batter into a greased and floured 9x13 inch baking dish and smooth the top.
- Bake in a preheated 350°F (180°C) oven for about 50 minutes, until golden and firm.
- Cool completely in the pan on a wire rack, then dust with powdered sugar before serving.