Last summer, I stood in my backyard at 5 AM with a cup of coffee in one hand and a meat thermometer in the other. The smoke was rolling from my pit, carrying that sweet hickory scent that makes neighbors peek over fences. After years of making pulled pork, I’ve learned that magic happens when you combine patience, the right cut of meat, and a little bit of BBQ wisdom.
Hey there, fellow BBQ lovers! I’m someone who lives and breathes smoked meats. My weekends revolve around fire, smoke, and creating food that brings people together. There’s nothing quite like pulling apart tender, juicy pork that’s been kissed by smoke for hours.
So what makes a smoked BBQ pulled pork sandwich truly great? It starts with meat that falls apart at the slightest touch. You want pork that’s so tender it shreds with just a fork. The outside should have that dark, flavorful bark while the inside stays moist and packed with smoky goodness. Pile that on a soft bun with your favorite sauce and coleslaw, and you’ve got yourself a sandwich worth bragging about.
In this guide, I’m going to walk you through everything you need to know. We’ll cover picking the perfect cut of meat, preparing it for the smoker, getting that smoke just right, and building a sandwich that’ll have everyone asking for seconds. Whether you’re new to smoking meat or you’ve been doing it for years, I’ve got tips that’ll take your pulled pork to the next level.
Selecting the Right Cut of Meat for Your Smoked Pulled Pork
Here’s the truth: you can’t make amazing pulled pork without starting with the right cut of meat. I learned this the hard way when I tried using a pork loin years ago. It came out dry and disappointing. The cut you choose will make or break your entire cook.
The best cut of pork for pulled pork is hands down the pork shoulder. When you head to the butcher or grocery store, you might see two names: pork shoulder and Boston butt. Don’t let the name fool you. The Boston butt isn’t actually from the rear of the pig. Both cuts come from the upper part of the front leg and shoulder area.
Let me break down what you need to know about these cuts:
Understanding Pork Shoulder and Boston Butt
The whole pork shoulder is actually two different cuts. The lower part is called the picnic shoulder or picnic roast. The upper part is the Boston butt, also known as pork butt. Most pitmasters prefer the Boston butt for pulled pork, and I’m right there with them.
The Boston butt typically weighs between 6 and 10 pounds. It has a nice fat cap on top and plenty of marbling throughout the meat. This fat is your friend. As the pork smokes low and slow for hours, that fat melts and bastes the meat from the inside out. You end up with pork that’s rich, juicy, and incredibly tender.
The picnic shoulder is a bit leaner and includes the leg bone. It can absolutely work for pulled pork, but it takes a little more attention to keep it moist. I’ve used it plenty of times when it’s on sale, and the results can be fantastic if you monitor it closely.
Why These Cuts Work So Well for Smoking
These cuts are tough when raw. They’re full of connective tissue and collagen. You definitely don’t want to grill them quickly like a steak. But here’s where the magic of low and slow smoking comes in.
When you smoke pork shoulder at around 225-250 degrees for several hours, something amazing happens. The tough collagen breaks down and transforms into gelatin. This process takes time, usually one to one and a half hours per pound. That gelatin coats every fiber of meat and keeps everything moist and tender.
The fat marbling throughout the meat also melts slowly. It flavors the pork from within and helps it stay juicy even after hours in the smoker. Leaner cuts just can’t do this. They dry out and get tough when cooked for extended periods.
What to Look for When Buying Your Pork
I always look for certain things when I’m shopping for pork shoulder:
- Good marbling: Look for white streaks of fat running through the red meat. More marbling means more flavor and moisture.
- A thick fat cap: The fat layer on top should be at least a quarter inch thick. You can trim it down later if needed, but it protects the meat during smoking.
- Fresh color: The meat should be pink to light red, not gray or brown.
- No strong smell: Fresh pork should smell clean, not sour or off.
- Bone-in when possible: The bone adds flavor and helps the meat cook more evenly. Plus, it makes handling easier.
Size matters too. I usually go for an 8-pound Boston butt. It feeds a crowd and gives you enough meat to make it worth the long cook time. Smaller cuts work fine if you’re cooking for fewer people, but they can dry out faster.
My Personal Preference and Why
After smoking dozens of pork shoulders, I always reach for a bone-in Boston butt. The bone helps conduct heat to the center of the meat. It also gives me a built-in handle for moving the meat around. When the pork is done, that bone should slide right out with almost no effort.
I once tried a boneless Boston butt because it was cheaper. The flavor was fine, but it cooked unevenly. The outside was perfect while the center was still tough. With the bone in, the heat distribution is much better.
Some people ask about getting the pork pre-trimmed or enhanced with added solution. I skip both. Pre-trimmed means someone else decided how much fat to leave, and I like to control that myself. Enhanced pork has been injected with a salt and water solution. It might seem juicier, but it can taste salty and artificial. Natural, untrimmed pork gives you the best flavor and lets you season it exactly how you want.
Where to Buy Your Meat
You can find pork shoulder at pretty much any grocery store. The quality is usually decent, and the price is right. I’ve gotten great results from standard supermarket pork.
If you want to step it up, visit a local butcher shop. They often carry higher quality meat and can cut exactly what you need. I’ve found some amazing heritage breed pork from small farms through my butcher. The flavor is richer and the fat quality is noticeably better.
Warehouse stores like Costco sell large packs of pork shoulder at fantastic prices. If you’re feeding a big group or want to stock your freezer, this is the way to go. Just make sure you have enough room in your smoker.
One last tip: don’t be shy about asking the butcher questions. They can tell you when fresh shipments arrive, which cuts are best right now, and even give you cooking advice. Building a relationship with your butcher pays off in better meat and insider knowledge.
Now that you know what cut to buy and what to look for, you’re ready to start your smoked BBQ pulled pork sandwich journey. The right meat is your foundation. Everything else builds on this choice. Pick a nice marbled Boston butt, and you’re already halfway to pulled pork perfection.


How to Prepare Pork Shoulder for Smoking
Once you’ve got that beautiful piece of meat sitting on your counter, it’s time to get it ready for its long journey through smoke and heat. I’ll be honest, the first time I smoked pork, I just threw it on the grill without much prep. Big mistake. The seasoning barely penetrated the meat, and the fat rendered unevenly. Preparation might not be the most exciting part, but it’s absolutely crucial.
Proper preparation sets the stage for everything that follows. Think of it like building a house. You wouldn’t skip the foundation and just start putting up walls, right? Same deal here. The time you spend preparing your pork shoulder for smoking directly impacts how that final sandwich tastes.
Trimming Your Pork Shoulder
Here’s where things get hands-on. You’ll want a sharp knife, a cutting board, and about fifteen minutes of your time. I grab my favorite boning knife for this job, but any sharp blade will do.
Start by examining that fat cap on top. Some people leave it completely intact. Others trim it down to nothing. I land somewhere in the middle. My rule is to trim it down to about a quarter inch thickness. Any thicker and the smoke and rub can’t penetrate properly. Any thinner and you lose that protective layer that keeps the meat moist.
Run your hands over the entire surface of the meat. Feel for any hard pieces of fat or silverskin. That shiny membrane doesn’t break down during cooking, so it needs to go. Slide your knife under it at a shallow angle and peel it away. Don’t worry about being perfect. I’ve left some on plenty of times, and the meat still turned out great.
Flip the shoulder over and check the other side too. Sometimes there are loose flaps of fat or uneven spots. Trim those off so the meat cooks evenly. The goal isn’t to make it look pretty for a magazine. You just want relatively even thickness all around so heat penetrates consistently.
One thing I learned from a pitmaster friend: save those trimmings. Seriously. I render them down and use the fat for cooking other things, or I toss them right in the smoker alongside the pork. They crisp up and make fantastic little treats. My dog also thinks I’m the greatest human alive when trimming day comes around.
Creating and Applying Your Dry Rub
Now comes the fun part. The rub is where you get to put your personal stamp on the meat. I’ve tried dozens of combinations over the years. Some were way too salty. Others were so sweet they practically caramelized into candy. Through trial and error, I’ve landed on a formula that works every time.
My go-to base includes brown sugar for sweetness and to help form that gorgeous bark, paprika for color and mild flavor, garlic powder and onion powder for savory depth, black pepper for bite, and of course salt to bring everything together. The ratio matters less than you’d think, as long as you’re in the ballpark. I usually go heavy on the paprika and brown sugar, moderate on the garlic and onion, lighter on the salt and pepper.
Mix your rub in a bowl before you touch the meat. Get it all combined and break up any clumps. Pro tip: make way more than you think you need. You’re coating a large piece of meat, and running out halfway through is annoying. I always make double and store the extra in a mason jar.
Pat the pork shoulder completely dry with paper towels. This is important. Moisture prevents the rub from sticking properly. Once it’s dry, start applying the rub generously. And I mean really go for it. Don’t be shy. Press it into the meat with your hands, getting it into every crevice and covering every surface.
Work methodically around the entire shoulder. I do the top first, then the sides, then flip it over and hit the bottom. The bone side usually needs less since it won’t develop much bark anyway. Make sure the edges are well covered, as they can dry out faster during the long cook.
Some folks ask about using a binder like mustard or oil before the rub. Honestly? I’ve done it both ways. The mustard helps the rub stick and adds a tiny bit of tanginess, but it’s not necessary. The natural moisture in the meat usually does the job. If your pork seems particularly dry, a light coating of yellow mustard or olive oil won’t hurt. Similar to how you might prep BBQ honey chicken drumsticks, that base layer can help seasonings adhere better.
The Overnight Rest: Why It Matters
This is where patience really pays off. After you’ve applied that beautiful rub, wrap the pork loosely in plastic wrap and stick it in the refrigerator overnight. Twelve hours is ideal. Eight hours minimum if you’re pressed for time.
During this rest, something magical happens. The salt in the rub starts pulling moisture out of the meat. Then that moisture dissolves the seasonings and gets reabsorbed back into the pork, taking all those flavors with it. It’s basically a dry brine. The spices penetrate much deeper than they would if you just rubbed and smoked immediately.
The meat also dries out slightly on the surface, which helps form a better bark. That crusty, flavorful exterior doesn’t develop well on wet meat. The overnight rest gives you that tacky surface that smoke adheres to beautifully.
I learned this lesson the hard way at a cookout. I rubbed the meat in the morning and threw it on the smoker two hours later. The bark was pale and the flavor stayed mostly on the surface. Now I always prep the night before. It’s become part of my ritual. I’ll prep the pork after dinner, clean up the kitchen, and know that tomorrow’s going to be a good day.
By the way, take the pork out of the fridge about an hour before it goes on the smoker. You want it at room temperature. Cold meat takes longer to cook and can absorb smoke unevenly.
Smoking Pork Shoulder at Low and Slow Temperatures
Alright, this is where everything comes together. Your meat is prepped. Your rub has worked its magic overnight. Now it’s time to introduce smoke and heat. If you’ve never smoked meat before, don’t stress. The principles are straightforward, though mastering them takes practice.
Setting Up Your Smoker Properly
I use an offset smoker, but these techniques work for any type, whether you’ve got a pellet grill, a vertical water smoker, or even a basic kettle grill set up for indirect heat. The key is controlling temperature and maintaining steady smoke.
Start by cleaning out any ash or debris from your last cook. Old ash can block airflow and make temperature control nearly impossible. Check that all your vents are working smoothly. Airflow is how you control heat in most smokers.
Fill your water pan if your smoker has one. This helps regulate temperature and adds humidity to the cooking environment. I use hot water from the tap to speed up the heating process. Some people add apple juice or beer to the water pan for extra flavor, though I’m not convinced it makes much difference.
Now for the fuel. I use charcoal as my heat source with wood chunks for smoke. Light your charcoal in a chimney starter rather than using lighter fluid. Lighter fluid can leave chemical flavors on your meat, and that’s the last thing you want after all this preparation. Once the coals are covered with white ash, they’re ready.
Arrange your coals for indirect heat. This means the fire is on one side and the meat sits on the other. Direct heat will just burn the outside before the inside is done. We’re cooking with hot air and smoke, not flames.
The Ideal Temperature for Smoking Pork Shoulder
This is where a lot of people get confused. You want your smoker running between 225 and 250 degrees Fahrenheit. I aim for 235 as my sweet spot. This range is low enough to break down that tough connective tissue slowly, but high enough that you’re not cooking for two days straight.
Get yourself a good thermometer. Actually, get two. One for the smoker temperature and one for the meat’s internal temperature. The built-in thermometer on most smokers is notoriously unreliable. I wasted several cooks before I invested in proper thermometers. Trust me, it’s worth every penny.
Place your thermometer probe at grate level, right next to where the meat will sit. That’s the temperature that matters, not what the gauge on the lid says. Make adjustments to your vents until you’re holding steady in your target range. This might take thirty minutes or more. Don’t rush it.
Wood Selection for Perfect Smoke Flavor
The wood you choose impacts your final flavor significantly. I prefer fruit woods like apple or cherry for pork. They give a mild, slightly sweet smoke that complements the meat without overwhelming it. Hickory is classic BBQ wood and works great too, though it’s stronger. Pecan sits somewhere between fruit woods and hickory and is one of my favorites.
Avoid woods like mesquite for long cooks. It’s too intense and can make your pork taste bitter after hours of exposure. Save mesquite for quick grilling sessions. Also skip any wood that’s been treated, painted, or comes from unknown sources. Stick to chunks or chips specifically sold for smoking.
I use three or four fist-sized chunks of wood throughout the cook. Don’t overdo it. Too much smoke creates an acrid, unpleasant flavor. You want thin, blue smoke, not thick white billowing clouds. If you’re seeing heavy white smoke, you’ve got incomplete combustion. Let the fire settle down before adding meat.
Soak your wood chips if you’re using those, but chunks can go on dry. Add them at the start and then every couple hours as needed. The meat stops taking on smoke after about four hours anyway, so don’t stress about constant smoke the entire time. Similar to how you’d approach grilled steak with chimichurri sauce where technique matters more than constant fussing, pork shoulder benefits from a steady, patient approach.
The Long Cook: Time and Temperature Guidelines
Plan on about one to one and a half hours per pound at 225-250 degrees. An eight-pound Boston butt will take roughly 12 to 16 hours. Yeah, it’s a commitment. This is why most people start their smoker before sunrise.
Place your pork shoulder on the grate fat cap up. There’s debate about this, but I’ve found fat cap up works better. As the fat renders, it bastes the meat naturally. Position it away from direct heat, close the lid, and now comes the hardest part: leave it alone.
Resist the urge to keep opening the lid to check on things. Every time you open the smoker, you’re losing heat and extending your cook time. “If you’re lookin’, you ain’t cookin’,” as they say. Check it every couple hours to monitor temperature and add wood if needed, but otherwise, let it be.
Around the 160-degree internal temperature mark, you’ll hit what’s called the stall. The meat’s temperature will plateau and barely budge for hours. This is normal. It’s evaporative cooling as moisture leaves the meat. Some people wrap their pork in foil at this point to push through the stall faster. I do this if I’m running behind schedule, though unwrapped gives you better bark.
You’re aiming for an internal temperature of 195 to 205 degrees. This is way past well-done by normal standards, but remember, we’re breaking down collagen. At this temperature range, the meat should feel like it’s going to fall apart when you touch it. The bone, if there is one, will slide out clean with almost no resistance.
Use your probe thermometer to check tenderness. Insert it into the thickest part of the meat. It should slide in like you’re poking warm butter. If there’s resistance, it needs more time, even if the temperature says it’s done.
Funny enough, some of my best pulled pork has come from cooks that went longer than expected. I’ve had shoulders stall for four hours and wasn’t sure they’d ever finish. But I kept the faith, maintained steady heat, and ended up with incredibly tender meat. Just like when you’re making loaded nachos with ground beef or crispy onion blossom bites, patience with your cooking process always delivers better results than rushing.
Once your pork hits that perfect temperature and tenderness, take it off the smoker. Let it rest for at least thirty minutes, wrapped in foil and towels. This lets the juices redistribute. Then it’s time to pull it apart, mix it with your favorite sauce, and build the sandwich you’ve been dreaming about for the last twelve hours.


Shredding and Sauces: Finishing Your Smoked Pulled Pork
After all those hours of smoking, your pork shoulder is finally ready. The meat thermometer reads perfect, the bark looks incredible, and that smoky aroma has probably drawn every neighbor within three blocks to your backyard. Now comes a critical moment that can make or break your sandwich: how you shred the meat and dress it with sauce.
The Art of Shredding Smoked Pork Shoulder
Let me tell you about the time I got impatient and tried to shred pork right off the smoker. I burned my fingers through the gloves and ended up with uneven chunks instead of beautiful pulled pork. Learn from my mistakes and let that meat rest properly first.
Transfer your pork shoulder to a large cutting board or aluminum pan. Tent it loosely with foil and let it rest for at least thirty minutes. Forty-five is even better. I know it’s torture to wait when you’re hungry, but this rest period allows the juices to redistribute throughout the meat. Cut into it too early and all those precious juices run out onto the board instead of staying in the pork where they belong.
Once it’s rested, grab a pair of heat-resistant gloves or two forks. Honestly, I prefer using my hands with gloves. You get better control and can feel the texture of the meat. Start by removing any large chunks of fat that didn’t render down. Not all fat is created equal, and some pieces stay rubbery even after hours of smoking.
Pull the bone out first if you left it in. It should slide out without any effort. If it doesn’t, your pork needs more time. Assuming it comes out clean, start pulling the meat apart along the natural grain. The muscle fibers will separate easily when the pork is properly cooked. Work your way through the entire shoulder, pulling it into bite-sized shreds.
I like a mix of textures. Some pieces get pulled into fine shreds while others stay in larger chunks. Those crispy, crusty bits from the bark are absolute gold, so don’t discard them. Mix them throughout the pulled pork. They add incredible texture and concentrated flavor to every bite.
Here’s something I learned from a competition pitmaster: save any accumulated juices from the resting pan. Pour them back over the shredded pork. These juices are packed with rendered fat and smoke flavor. They’ll keep your meat moist and add another layer of richness.
Understanding BBQ Sauces for Pulled Pork
The sauce debate in BBQ circles gets heated. Some folks believe good smoked pork needs no sauce at all. Others won’t eat it without a generous coating. I’m somewhere in the middle. The meat should be delicious on its own, but the right sauce can absolutely elevate it to another level entirely.
Different regions have their own traditional styles. Kansas City sauce is thick, sweet, and tomato-based. It’s what most people picture when they think BBQ sauce. Carolina-style comes in several varieties, with vinegar-based sauces being tangy and thin, while mustard-based versions add a sharp kick. Alabama white sauce uses mayonnaise as a base and offers a completely different flavor profile. Then there’s Memphis-style, which often skips sauce entirely in favor of a dry rub finish.
My personal preference? A vinegar-based sauce with a touch of sweetness. It cuts through the richness of the pork fat without overwhelming the smoke flavor you worked so hard to develop. But honestly, this is entirely up to your taste.
The timing of when you add sauce matters too. Never sauce your pork while it’s still on the smoker. The sugars in most sauces will burn and turn bitter. Always add sauce after you’ve pulled the meat. I typically mix about half the pulled pork with sauce and leave the other half naked. This gives people options and lets them control how much sauce they want.
Homemade BBQ Sauce Recipes Worth Trying
Store-bought sauces are fine and convenient. I’ve used them plenty of times. But homemade BBQ sauce for pulled pork takes things to another level. You control the sweetness, tanginess, heat, and thickness. Plus, it’s easier than you might think.
My go-to vinegar sauce comes together in minutes. Mix two cups of apple cider vinegar with a quarter cup of brown sugar, two tablespoons of your favorite hot sauce, one tablespoon of black pepper, one tablespoon of red pepper flakes, and a tablespoon of salt. Whisk it all together and let it sit for at least an hour. The flavors meld and the sugar dissolves completely. This sauce is thin and tangy with a nice kick. It soaks into the pulled pork beautifully without making it soggy.
For those who prefer something thicker and sweeter, I’ve got a tomato-based recipe that’s become a family favorite. Start with two cups of ketchup as your base. Add half a cup of apple cider vinegar, a third cup of brown sugar, two tablespoons of Worcestershire sauce, one tablespoon of smoked paprika, two teaspoons of garlic powder, one teaspoon of onion powder, and half a teaspoon of cayenne pepper. Combine everything in a saucepan and simmer on low heat for twenty minutes. The sauce will thicken slightly and all those flavors come together into something special.
Want to try something completely different? A peach bourbon sauce adds fruity sweetness with a grown-up edge. Dice two ripe peaches and cook them down with a quarter cup of bourbon until soft. Add a cup of ketchup, half a cup of apple cider vinegar, a quarter cup of molasses, two tablespoons of Dijon mustard, and a tablespoon of hot sauce. Simmer for thirty minutes until thick. The peaches break down and create this gorgeous, complex sauce that pairs amazingly well with smoked pork.
By the way, all these sauces keep in the refrigerator for weeks. I usually make a big batch and use it for multiple meals. They’re also fantastic on chicken, ribs, or even as a dipping sauce for fries.
What Is the Best BBQ Sauce for a Pulled Pork Sandwich?
This question comes up constantly. The honest answer? The best sauce is the one you enjoy eating. I’ve been to competitions where vinegar sauces won big. I’ve also seen thick, sweet sauces take home trophies. Regional preferences play a huge role, but so does personal taste.
If your pork came out perfectly smoky and tender, lean toward lighter sauces that don’t cover up your hard work. Vinegar-based or thin tomato sauces let the meat shine. If the smoke flavor didn’t come through as strongly as you hoped, a bolder, thicker sauce can help balance things out. There’s no shame in adjusting based on how your cook turned out.
I always taste my pulled pork plain before adding sauce. This tells me what the meat needs. Sometimes it’s sweet enough from the rub and just needs acidity. Other times it could use more depth and richness. Let the meat guide your choice.
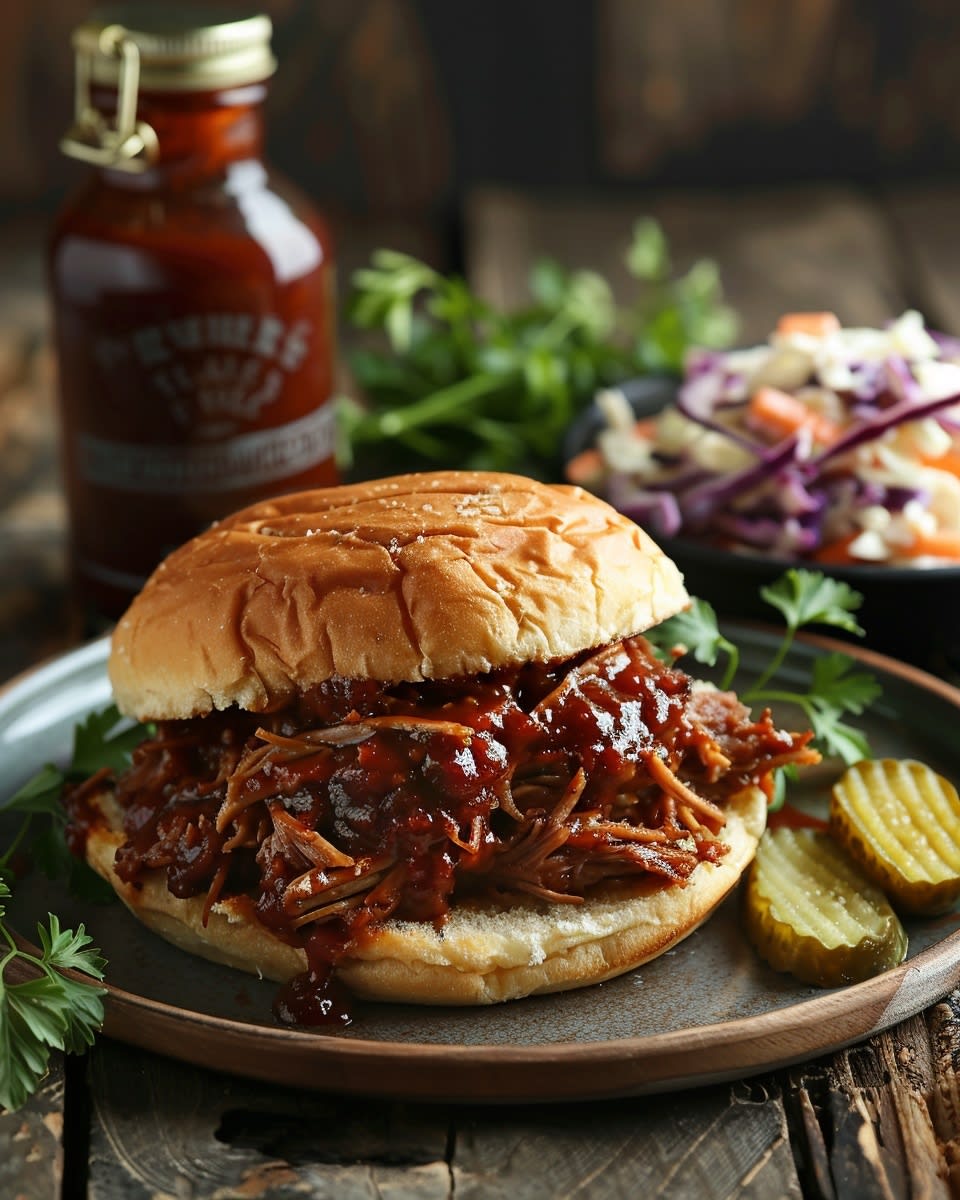
Assembling the Perfect Pulled Pork Sandwich
You’ve smoked incredible pork. You’ve got sauce ready. Now it’s time to build a sandwich that does justice to all that effort. This isn’t just about piling meat on bread. The right combination of components creates something greater than the sum of its parts.
Choosing the Best Bun for Your Sandwich
The best bun for pulled pork sandwich needs to check several boxes. It should be soft enough to bite through easily but sturdy enough to hold up against juicy, sauced meat. Nothing worse than a sandwich that falls apart halfway through eating it. Trust me, I’ve had plenty of those disasters.
Potato rolls are my top choice. They’re soft, slightly sweet, and have just enough structure to contain everything without getting soggy too quickly. Martin’s potato rolls are the gold standard, but most grocery stores carry decent versions. The slight sweetness complements the savory, smoky pork beautifully.
Brioche buns work great too. They’re rich and buttery with a tender crumb. The sweetness level is similar to potato rolls. My only complaint is they can be a bit delicate. Handle them gently when you’re loading up the pork.
Kaiser rolls offer more substantial structure. They’ve got a firmer crust and denser interior. These are perfect if you’re piling on lots of toppings or extra sauce. They won’t fall apart, though they can be slightly harder to bite through.
Some people swear by Texas toast or regular sandwich bread. I’ve done this when I ran out of proper buns. It works in a pinch, but it’s definitely not my first choice. The texture just doesn’t match the meat as well.
Here’s a pro tip that elevates any bun: toast it lightly. Brush the cut sides with melted butter and place them face-down on a hot griddle or pan for a minute or two. This creates a slight barrier that prevents the bun from getting soggy immediately. The butter adds richness and the toasted surface adds a subtle crunch.
Essential Toppings and How to Layer Them
Classic pulled pork sandwiches usually include coleslaw. It’s not just tradition, it actually serves a purpose. The cool, crunchy, tangy slaw contrasts perfectly with warm, rich, tender pork. The acidity cuts through the fat and the texture difference makes every bite more interesting.
I make a simple vinegar slaw that takes five minutes. Shred half a head of cabbage, add a grated carrot for color, then dress it with a quarter cup of apple cider vinegar, two tablespoons of sugar, a tablespoon of mayo, and salt and pepper to taste. Mix it up and let it sit in the fridge for at least an hour. The cabbage softens slightly and absorbs all that tangy flavor.
Some folks prefer creamy coleslaw. That’s totally fine too. Use whatever style you enjoy. Just make sure it’s well-drained before it goes on the sandwich. Excess liquid will make your bun soggy faster than anything else.
Pickles are another classic topping. Dill pickle chips add crunch and sharp acidity. I usually put three or four chips on each sandwich. Some people go wild with pickles and that’s their choice, but I find too many overpower the pork.
Pickled jalapeños or banana peppers work great if you want heat. A few rings add spice without making the sandwich aggressively hot. I keep a jar in my fridge specifically for sandwiches like this.
Now, let’s talk about assembly order because it actually matters. Start with your bottom bun, toasted side up. Add a base layer of pulled pork, about a half-inch thick. Pile it evenly so every bite gets meat. Drizzle with sauce if you haven’t already mixed it in. Next comes the coleslaw, spread evenly across the pork. Add pickles or other toppings now. Finally, crown it with the top bun, toasted side down.
Why this order? The pork goes directly on the toasted surface where it’s less likely to cause sogginess. The slaw creates a barrier between the top bun and the hot, wet pork. Pickles go on top of the slaw so they don’t slide around. It’s a method I figured out after making dozens of messy sandwiches.
Don’t overstuff your sandwich. I know it’s tempting to pile on as much pork as possible, but an overstuffed sandwich is impossible to eat properly. You want to be able to get your mouth around it and taste every component in each bite. I aim for about a three-quarter-inch layer of meat total. That’s plenty to satisfy without requiring you to unhinge your jaw like a python.
Creative Variations to Try
Once you’ve mastered the classic pulled pork sandwich, there’s a whole world of variations worth exploring. I like to experiment when I’ve got leftover pork, which happens pretty often since I usually smoke more than I need.
Try adding a slice of pepper jack cheese to your sandwich. Place it on the bottom bun before the pork so the heat melts it slightly. The creamy, spicy cheese adds another dimension entirely. I discovered this combination by accident at a food truck and now I crave it regularly.
Crispy fried onions on top of the slaw provide amazing crunch and savory depth. You can use the canned ones or make your own by dusting sliced onions in flour and frying them until golden. They add texture and a hit of umami that complements the pork wonderfully.
A drizzle of honey or hot honey right before you close the sandwich creates sweet and spicy notes that play beautifully with smoke. Hot honey has become one of my favorite ingredients for BBQ. It’s honey infused with chili peppers, and it brings complexity that regular sauce can’t match.
I’ve also done Asian-inspired versions with quick-pickled vegetables and sriracha mayo. Hawaiian rolls with a pineapple slaw. Even a version with apple butter and sharp cheddar. The smoked pork is versatile enough to handle all kinds of flavor combinations. If you’re looking for more ideas and inspiration for creative takes on grilled and smoked dishes, check out our complete collection of BBQ and grilling recipes where you’ll find everything from classic approaches to unique twists.
Serving Suggestions and Side Dishes
A great pulled pork sandwich deserves equally good sides. I always serve mine with classic BBQ sides that round out the meal.
Mac and cheese is the ultimate comfort food pairing. The creamy, cheesy pasta contrasts with the smoky meat. I make mine extra creamy with a blend of sharp cheddar and Gruyere. Bake it until the top gets golden and crusty.
Baked beans are another traditional choice. The sweet and savory flavors echo the BBQ sauce on the pork. I doctor up canned beans with extra molasses, mustard, and some of the leftover pork mixed in. Simmer them on the smoker alongside the pork for extra smoke flavor.
Corn on the cob, grilled or boiled and brushed with butter and chili powder, adds freshness and sweetness. The crunch of the corn kernels provides textural variety that makes the meal more interesting.
Fresh cucumber salad dressed with vinegar and dill offers a light, refreshing counterpoint to the heavy, rich sandwich. It’s palate-cleansing and helps you tackle another sandwich without feeling overwhelmed.
Don’t forget the drinks. Sweet iced tea is classic for a reason. The sweetness and cold temperature refresh your palate between bites. Beer works great too, particularly lighter lagers or wheat beers that won’t compete with the food. I’m partial to a crisp pilsner with my pulled pork.
Funny enough, I once served pulled pork sandwiches at a party with fresh fruit salad as the only side, thinking it would be a nice light option. People devoured it and several mentioned how well the fruit worked as a palate cleanser between sandwiches. Sometimes the unexpected pairings turn out to be the best ones. Thinking about food sustainability and using seasonal, local ingredients not only supports better environmental practices but often leads to fresher, more flavorful meals that pair naturally with smoked meats.
So there you have it. You’ve gone from selecting the perfect cut of meat to building a sandwich that showcases every bit of your effort. The combination of tender, smoky pulled pork, the right sauce, a quality bun, and thoughtful toppings creates something truly special. It’s not just food, it’s an experience that brings people together and creates memories around the table.
Frequently Asked Questions About Smoked BBQ Pulled Pork Sandwiches
What is the best cut of pork for making pulled pork?
The Boston butt, also called pork shoulder, is hands down the best choice for pulled pork. It comes from the upper part of the front leg and shoulder area of the pig. This cut has excellent marbling and a fat cap that keeps the meat moist during the long smoking process. The connective tissue and collagen break down during low and slow cooking, creating incredibly tender meat that pulls apart easily. An eight to ten-pound bone-in Boston butt is ideal for most smoking sessions.
How do I prepare my pork shoulder before smoking?
Start by trimming the fat cap down to about a quarter inch and removing any hard fat or silverskin. Pat the meat completely dry with paper towels so your rub adheres properly. Apply a generous coating of dry rub, pressing it into every surface of the meat. Wrap the rubbed pork loosely in plastic wrap and refrigerate overnight, ideally for twelve hours. This allows the seasonings to penetrate deeply and helps develop a better bark. Remove it from the fridge about an hour before smoking so it comes to room temperature.
What is the best way to smoke a pork shoulder?
Maintain your smoker temperature between 225 and 250 degrees Fahrenheit. Use fruit woods like apple or cherry for a mild, sweet smoke flavor. Place the pork shoulder fat cap up on the grate away from direct heat. Plan for one to one and a half hours per pound of meat. Don’t open the smoker frequently as this releases heat and extends cooking time. Smoke until the internal temperature reaches 195 to 205 degrees and the meat feels tender when probed. Let it rest for at least thirty minutes before shredding.
What is the best BBQ sauce for a pulled pork sandwich?
The best sauce depends on your personal preference and regional traditions. Vinegar-based sauces are tangy and thin, allowing the smoke flavor to shine through without overwhelming the meat. Tomato-based Kansas City style sauces are thick and sweet, providing bold flavor. Carolina mustard sauces add sharp tanginess while Alabama white sauce offers something completely different. I prefer a vinegar-based sauce with a touch of sweetness because it cuts through the richness of the pork fat. Taste your meat plain first and choose a sauce that complements what you’ve created.
What type of bun should I use for a pulled pork sandwich?
Potato rolls are my top recommendation for pulled pork sandwiches. They’re soft, slightly sweet, and sturdy enough to hold juicy meat without falling apart too quickly. Brioche buns work wonderfully too, with their rich, buttery flavor complementing the smoky pork. Kaiser rolls offer more structure if you’re loading up with extra toppings. Whatever bun you choose, lightly toast it with butter on a griddle before assembling. This creates a barrier that prevents immediate sogginess and adds a subtle crunch and richness to each bite.
How long can I store leftover pulled pork?
Properly stored pulled pork lasts three to four days in the refrigerator. Place it in an airtight container with any accumulated juices to keep it moist. You can also freeze pulled pork for up to three months. Divide it into meal-sized portions before freezing so you can thaw only what you need. When reheating, add a splash of apple juice or broth to restore moisture. I usually reheat it slowly in a covered pan on the stovetop or in the oven at 250 degrees until warmed through.
Can I make pulled pork without a smoker?
Yes, you can absolutely make pulled pork in a regular oven or slow cooker, though you’ll miss out on that authentic smoke flavor. For oven method, season your pork and place it in a roasting pan with a little liquid. Cover tightly with foil and cook at 250 degrees for about the same time you’d smoke it. Add liquid smoke to your rub or sauce for smoky flavor. Slow cookers work great too, cooking on low for eight to ten hours. The texture will be similar to smoked pork even if the flavor isn’t quite the same.
Should I wrap my pork shoulder during smoking?
Wrapping is optional and depends on your priorities. When pork hits the stall around 160 degrees internal temperature, wrapping it in foil or butcher paper pushes through this plateau faster. Foil creates a tighter seal and steams the meat, speeding up cooking but softening the bark. Butcher paper is more breathable and maintains better bark texture. I wrap if I’m running behind schedule or need dinner at a specific time. For the best bark development, leave it unwrapped the entire cook if you have the time.
How do I know when my pulled pork is done?
Temperature is important, but tenderness matters more. Your pork should reach an internal temperature between 195 and 205 degrees. However, the true test is how it feels when you probe it. The thermometer should slide in and out like warm butter with no resistance. The bone should pull out completely clean if you left it in. When you touch the meat, it should feel like it’s about to fall apart. If there’s any firmness or resistance, it needs more time regardless of what the temperature reads.
What should I do if my pulled pork turns out dry?
If your pork ended up drier than you hoped, there are ways to salvage it. Mix the shredded meat with any accumulated juices from the rest. Add a little bit of apple juice, chicken broth, or even melted butter to restore moisture. Mix in extra BBQ sauce which will add both moisture and flavor. Serve it immediately rather than letting it sit, as the added liquid will keep it juicy temporarily. For next time, make sure you’re cooking to tenderness rather than just hitting a target temperature, and consider wrapping during the stall to retain more moisture.
Now you’ve got everything you need to create an amazing smoked BBQ pulled pork sandwich from start to finish. Fire up that smoker, take your time with the process, and enjoy the incredible results of your patience and effort. The first bite of that perfectly tender, smoky pork piled high on a soft bun will make every hour worth it.
Ingredients
Equipment
Method
- Sélectionnez une épaule de porc Boston butt bien marbrée.
- Coupez la couche de graisse à une épaisseur d'environ un quart de pouce et retirez toute peau argentée.
- Séchez l'épaule de porc avec des serviettes en papier.
- Mélangez les ingrédients du mélange d'épices dans un bol.
- Appliquez généreusement le mélange d'épices sur l'épaule de porc.
- Enveloppez le porc dans du film plastique et réfrigérez toute la nuit.
- Préchauffez votre fumeur à 225-250°F.
- Ajoutez des morceaux de bois pour une saveur fumée (pomme ou cerise de préférence).
- Placez l'épaule de porc, la couche de graisse vers le haut, sur la grille du fumeur, loin de la chaleur directe.
- Fumez pendant environ 1 à 1,5 heure par livre jusqu'à ce que la température interne atteigne 195-205°F.
- Laissez le porc reposer pendant au moins 30 minutes après l'avoir retiré du fumeur.
- Effilochez le porc à l'aide de vos mains ou de fourchettes, en mélangeant les jus accumulés.
- Assemblez votre sandwich avec le porc effiloché, la slaw et les garnitures souhaitées sur un petit pain.