Introduction: Your New Favorite High Protein Chicken Quinoa Power Bowl
I’ll never forget the day I hit a wall at 2 PM, staring at my computer screen with zero energy and a growling stomach. I had grabbed whatever was quick that morning, and by midday, I was paying the price. That’s when I discovered the magic of a well-built power bowl. Now, my High Protein Chicken Quinoa Power Bowl has become my secret weapon against afternoon crashes and endless hunger pangs.
This isn’t just another trendy food bowl you’ll see on social media. It’s a complete meal that actually keeps you full, energized, and satisfied for hours. Whether you’re an athlete training hard, a busy professional juggling meetings, or simply someone who wants to feel better throughout the day, this bowl checks all the boxes.
The beauty of this dish lies in its simplicity and power. You get lean protein from tender chicken, complete protein and fiber from quinoa, and a rainbow of vegetables that bring vitamins and minerals to the table. It’s balanced nutrition in one convenient bowl that takes less time to make than ordering takeout.
I’m excited to walk you through everything you need to know about this incredible meal. From the science behind why it works so well to practical tips for making it part of your weekly routine, you’ll discover why this power bowl deserves a spot in your meal rotation. Let’s dig into what makes this recipe so special and how it can transform the way you eat.
Why Choose a High Protein Chicken Quinoa Power Bowl?
Protein is the building block your body craves. It repairs muscles after workouts, keeps your metabolism humming along, and helps you feel full longer than carbs or fats alone. Most people don’t get enough protein throughout their day, which leads to constant snacking, energy dips, and that frustrating feeling of never being quite satisfied after meals.
This is where the High Protein Chicken Quinoa Power Bowl steps in as a real solution. A single serving delivers around 40-45 grams of protein, which is roughly half of what most adults need daily. That’s not something you get from a sad desk salad or a carb-heavy pasta dish.
Chicken breast brings about 30 grams of lean protein per serving. It’s low in fat, easy to digest, and your body uses it efficiently to build and maintain muscle tissue. I’ve tried countless protein sources over the years, and chicken remains one of the most affordable and versatile options available.
Quinoa adds another 8-10 grams of protein per cup, but here’s what makes it special. Unlike most grains and plant proteins, quinoa contains all nine essential amino acids your body can’t make on its own. That makes it a complete protein, which is rare in the plant world. For anyone reducing meat intake or looking to diversify protein sources, this matters.
The combination of chicken and quinoa creates what nutritionists call a protein-packed lunch with complementary nutrients. Chicken provides B vitamins, selenium, and phosphorus. Quinoa brings magnesium, iron, and manganese to the mix. Together, they cover more nutritional bases than either ingredient could alone.
Power bowls have exploded in popularity for good reason. They’re infinitely customizable, easy to prep ahead, and portable enough to take anywhere. I make mine on Sunday afternoons and have healthy meal prep sorted for the next three days. No more scrambling for lunch or giving in to the vending machine when hunger strikes.
The format itself is brilliant. Everything sits in one bowl, which means balanced bites with every forkful. You’re not eating plain chicken, then plain quinoa, then vegetables separately. Each bite brings different flavors and textures together, making meals more interesting and satisfying.
From a practical standpoint, power bowls work with real life. You can eat them cold straight from the fridge or warm them up in two minutes. They pack well for lunch boxes, gym bags, or road trips. I’ve eaten mine at my desk, in the car between appointments, and on hiking trails. The convenience factor is unmatched.
Let’s talk about what this meal actually does for your body throughout the day. That high protein content stabilizes your blood sugar, preventing the roller coaster of energy spikes and crashes. You know that shaky, irritable feeling you get a few hours after eating something sugary or carb-heavy? That doesn’t happen here.
The fiber from quinoa and vegetables slows digestion in a good way. Your body releases energy steadily over several hours instead of all at once. I’ve noticed I can go four to five hours after eating this bowl without even thinking about food. That’s compared to two hours max with my old lunch habits.
For athletes and active people, the benefits multiply. Your muscles need protein within a few hours after training to repair and grow stronger. This bowl delivers that protein along with complex carbs to refill energy stores. I’ve made this my post-workout meal countless times, and recovery feels noticeably faster.
The nutrient density deserves attention too. We’re not talking about empty calories that fill you up temporarily. Every ingredient brings something valuable. Dark leafy greens add iron and calcium. Bell peppers provide vitamin C. Avocado offers healthy fats that help you absorb fat-soluble vitamins. It’s balanced nutrition in action.
Weight management becomes easier when you eat meals like this regularly. High protein foods require more energy to digest than carbs or fats, slightly boosting your metabolism. They also preserve muscle mass when you’re in a calorie deficit, which keeps your metabolism from slowing down. I’m not saying this bowl is magic for weight loss, but it definitely supports those goals better than most alternatives.
The mental clarity that comes from stable blood sugar and proper nutrition is real. I used to blame afternoon brain fog on needing more coffee. Turns out, I just needed better fuel. When I eat this bowl for lunch, I stay sharp and focused through the end of my workday. No mid-afternoon zombie mode.
Building this into your routine takes minimal effort once you get the hang of it. The ingredients are straightforward and available at any grocery store. You don’t need fancy equipment or advanced cooking skills. If you can boil water and bake chicken, you can make this bowl. That accessibility matters when you’re trying to maintain healthy eating habits long-term.
One aspect I really appreciate is how this meal adapts to different dietary needs. Need it dairy-free? Done. Want it gluten-free? Already is. Prefer different vegetables based on the season? Swap them in. This flexibility means you won’t get bored eating the same thing repeatedly. I change up my add-ins every week, and it feels like a completely different meal.
The cost factor makes this sustainable too. Compared to restaurant meals or pre-made health foods, making your own power bowls saves serious money. I spend about five to six dollars per serving when I prep ingredients in bulk. That’s half the price of most takeout options and a fraction of what trendy health food spots charge.


What Goes Into Your High Protein Chicken Quinoa Power Bowl
Now that you understand why this bowl works so well, let’s get into the actual ingredients that make it happen. I’ve tweaked this recipe dozens of times, and what I’m sharing here is the version that hits the sweet spot between nutrition, flavor, and practical prep time.
The foundation starts with chicken breast, your primary lean protein source. I use about six ounces per bowl, which sounds like a lot but shrinks down during cooking. You want quality chicken here—not the weird slimy stuff that’s been sitting in the discount bin for three days. Fresh or properly frozen chicken breasts work equally well. I actually prefer buying individually wrapped frozen breasts because they thaw quickly and there’s zero waste.
Next up is quinoa, and this is where things get interesting nutritionally. One cup of cooked quinoa brings that complete protein profile I mentioned earlier, plus it’s packed with fiber—about 5 grams per cup. That high fiber quinoa content is a big reason why this bowl keeps you full so long. Quinoa comes in white, red, and black varieties. I usually go with white because it cooks fastest, but red quinoa has a nuttier flavor that I love when I have extra time.
Here’s something I learned the hard way: always rinse your quinoa before cooking. There’s a natural coating called saponin that tastes bitter and soapy if you don’t wash it off. I spent years wondering why my quinoa tasted weird until someone finally told me this. Just run it under cold water in a fine-mesh strainer for about thirty seconds. Problem solved.
The vegetable lineup brings color, crunch, and a massive dose of vitamins. I rotate through whatever looks good at the market, but my go-to combination includes cherry tomatoes, cucumber, red bell pepper, and baby spinach or kale. Bell peppers are legitimately antioxidant-rich vegetables, loaded with vitamin C and compounds that fight inflammation. Red peppers actually have way more vitamin C than oranges, which blew my mind when I first read it.
Cherry tomatoes add a pop of sweetness and bring lycopene, an antioxidant that’s easier for your body to absorb when tomatoes are slightly cooked or paired with fat. That’s where the avocado comes in. Half an avocado per bowl gives you creamy texture and healthy monounsaturated fats that help your body grab all those fat-soluble vitamins from the other vegetables.
For greens, I’m partial to baby spinach because it’s tender and doesn’t need chopping, but massaged kale works beautifully too. If you haven’t tried massaging kale, it sounds weird but totally changes the texture. Just squeeze and work the leaves with your hands for a minute until they soften and turn darker green. Makes them way easier to digest and less tough to chew.
Cucumbers bring refreshing crunch and tons of water content, which actually helps with hydration. I leave the skin on for extra fiber and nutrients, but peel them if that texture bothers you. Red onion adds sharpness—I use it sparingly because raw onion can be intense. Sometimes I quick-pickle thin slices in vinegar and a pinch of sugar to mellow them out.
The seasonings matter more than you’d think. I keep it simple with garlic powder, smoked paprika, cumin, salt, and black pepper for the chicken. The smoked paprika is key—it adds depth without extra calories or sodium. For the quinoa, I cook it in low-sodium chicken broth instead of water, which bumps up the flavor significantly without any extra effort.
Fresh herbs take everything up a notch. Cilantro is my personal favorite, though I know it tastes like soap to some people thanks to genetics. If you’re in that camp, try fresh parsley or basil instead. I also keep a lemon on hand because a squeeze of fresh lemon juice right before eating brightens all the flavors.
Optional add-ins that I rotate through include chickpeas for extra plant protein and fiber, feta cheese for tanginess (though I usually skip this to keep it dairy-free), pumpkin seeds for crunch and magnesium, and a drizzle of tahini or a spoonful of hummus for creaminess. The beauty here is flexibility. Once you nail the base recipe, you can customize endlessly based on what you have or what sounds good that day.
From a pure numbers standpoint, this bowl delivers roughly 450-500 calories with 40-45 grams of protein, 45-50 grams of complex carbs, and 12-15 grams of healthy fats. The fiber content sits around 10-12 grams, which is about a third of your daily target. You’re also getting significant amounts of vitamins A, C, K, several B vitamins, iron, magnesium, and potassium. It’s the kind of nutritional profile that would make any dietitian nod approvingly.
How Do You Make a High Protein Chicken Quinoa Power Bowl?
Alright, let’s get cooking. I’m going to walk you through this step-by-step, including the little tricks that make everything come together smoothly. The whole process takes about thirty-five minutes from start to finish, but most of that is hands-off cooking time.
Start with your quinoa because it needs to cook and cool slightly. Measure out one cup of dry quinoa, which will give you about three cups cooked—enough for three bowls. After rinsing thoroughly, combine it with two cups of low-sodium chicken broth in a medium saucepan. Some people use a 2:1 liquid ratio, but I find this makes quinoa mushy. The 2:1 ratio works perfectly every time.
Bring the liquid to a boil over high heat, then immediately reduce to low, cover with a tight-fitting lid, and let it simmer for fifteen minutes. Don’t peek during this time. Seriously. Every time you lift that lid, steam escapes and you mess with the cooking process. After fifteen minutes, remove from heat but keep the lid on for another five minutes. This steaming step makes the quinoa fluffy instead of gummy.
While the quinoa does its thing, prep your chicken. Pat the breasts dry with paper towels—this helps them brown better and prevents steaming. I usually pound them to an even thickness using a meat mallet or even a heavy pan. Sounds aggressive, but uneven chicken breasts cook unevenly, leaving you with dry edges and undercooked centers.
For seasoning, I mix my spices in a small bowl first: one teaspoon each of garlic powder, smoked paprika, and cumin, plus half a teaspoon each of salt and black pepper. This is enough for two chicken breasts. Rub the spice mixture all over both sides of the chicken, really working it in. If you want to get fancy with best chicken marinades, you can absolutely do that. I sometimes marinate chicken for an hour in olive oil, lemon juice, garlic, and herbs, which adds incredible flavor.
You have two solid cooking options here. For grilling, preheat your grill or grill pan to medium-high heat, brush the grates with oil to prevent sticking, and cook the chicken for six to seven minutes per side until it reaches 165°F internally. I’m a big fan of the grill method because those char marks add flavor complexity.
For baking, which is what I do most often because it’s less hands-on, preheat your oven to 425°F. Place the seasoned chicken on a lightly oiled baking sheet and bake for twenty to twenty-five minutes, depending on thickness. I always use a meat thermometer because guessing doneness leads to either rubber chicken or undercooked protein. Neither is fun.
Funny enough, the best cooking tip I ever got came from a chef friend who told me to let the chicken rest for five minutes after cooking before slicing. Those juices redistribute throughout the meat instead of running all over your cutting board. It’s the difference between moist, tender chicken and dry, disappointing chicken. Once rested, slice it against the grain into strips. This makes it easier to eat and more visually appealing in your bowl.
While your protein cooks, chop your vegetables. I aim for similar-sized pieces so each bite has good variety. Cherry tomatoes get halved, cucumber gets diced into half-inch pieces, bell pepper gets cut into thin strips, and red onion gets sliced super thin. If you’re using heartier greens like kale, remove the tough stems and chop or tear the leaves into bite-sized pieces. For spinach, just give it a quick rinse and you’re done.
Here’s the thing about quick meal prep ideas—you can absolutely cook everything in one session and assemble bowls throughout the week. I do this every Sunday. Cook a big batch of quinoa, grill or bake four to five chicken breasts, prep all the vegetables, and store everything separately in airtight containers. Then assembling a bowl takes literally two minutes. This approach has saved my lunch routine more times than I can count.
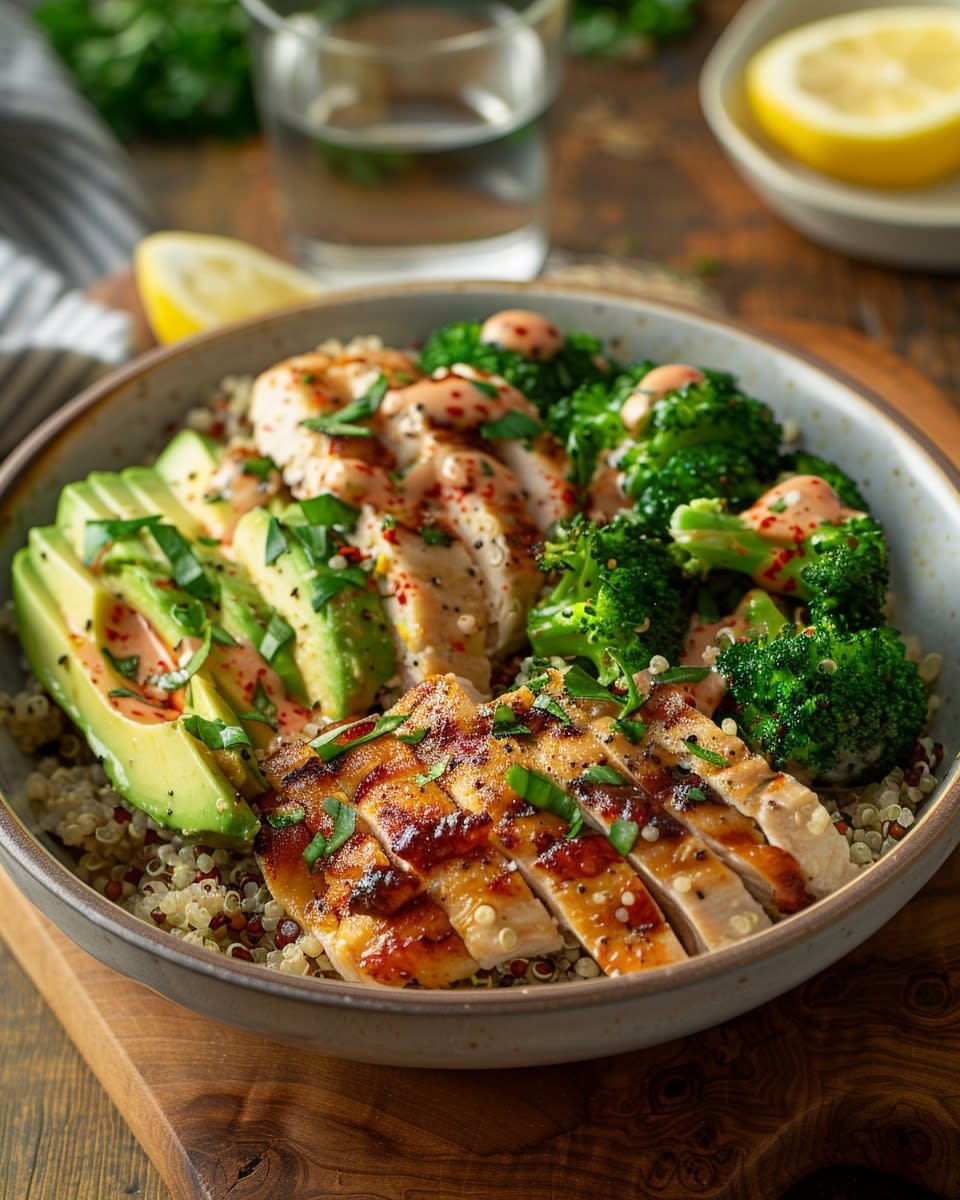
Assembly is where it gets fun because you’re basically creating an edible work of art. I start with about one cup of cooked quinoa as the base. Then I arrange the sliced chicken on one side, grouping each type of vegetable in its own section around the bowl. This is more than just Instagram-worthy—it lets you control how much of each ingredient you get in every bite.
Add your avocado slices, sprinkle on any extras like chickpeas or seeds, and finish with fresh herbs and a squeeze of lemon. If you’re making this for immediate eating, you can toss everything together. For meal prep, keep components separate until you’re ready to eat so nothing gets soggy. Similar to how I approach my banana peanut butter breakfast smoothie bowl, keeping ingredients separate until serving makes a huge difference in texture.
The dressing situation is personal preference. I often eat this bowl as-is because the lemon juice, natural chicken juices, and creamy avocado provide enough moisture. But a simple vinaigrette made from olive oil, balsamic vinegar, Dijon mustard, and a touch of honey works beautifully. Sometimes I’ll use a spoonful of that amazing avocado spread I make for toast, thinned with a bit of lemon juice.
These easy quinoa recipes really shine when you treat them as templates rather than strict formulas. Once you master the basic technique, you can swap proteins (try salmon or tofu), change up the grain base (brown rice or farro work great), or completely reimagine the vegetable combination based on seasons. That’s exactly the approach I take with my protein banana oat muffins—master the base, then customize freely.
One last practical tip: if you’re reheating this bowl, add the greens and avocado after heating. Heat just the quinoa and chicken for about ninety seconds in the microwave, then top with your cold, fresh components. This keeps everything at the right temperature and texture. Way better than the sad, wilted version you get from heating everything together. Trust me on this—learned it the disappointing way during my first week of meal prep, right around the time I was experimenting with breakfast bakes and other make-ahead meals.


Creative Ways to Serve and Customize Your High Protein Power Bowl
Here’s where things get really fun. Once you’ve mastered the basic formula, this bowl becomes whatever you want it to be. I’ve served it probably fifty different ways over the past year, and honestly, I’m still discovering new combinations that make me excited about lunch.
The classic bowl presentation is beautiful, but let’s talk about other serving methods that keep things interesting. I’ve stuffed this exact mixture into whole wheat tortillas to make protein-packed wraps for days when I’m eating on the go. Just warm the tortilla slightly, pile everything in the center, fold up the bottom, then roll from one side. Way easier to eat while driving than a fork-and-bowl situation, trust me.
Another approach I love is serving everything over a massive bed of mixed greens instead of using quinoa as the base. This cuts the carbs significantly if that’s your goal, and you end up with more of a hearty entrée salad. I’ll use the quinoa as one component among many rather than the foundation. Arugula works amazingly well here because its peppery bite complements the mild chicken and creamy avocado.
Homemade dressings completely transform the flavor profile without much effort. My current obsession is a cilantro-lime dressing that takes two minutes to blend: fresh cilantro, lime juice, Greek yogurt, garlic, a touch of honey, salt, and a splash of water to thin it out. Drizzle that over your bowl and suddenly you’re eating something that tastes restaurant-quality. The yogurt adds even more protein too, which is a nice bonus.
A tahini-lemon dressing brings Middle Eastern vibes—just whisk together tahini, lemon juice, minced garlic, and water until it’s pourable. The nutty richness pairs incredibly well with the vegetables and quinoa. Sometimes I’ll add a pinch of cumin or za’atar to really lean into those flavors.
For Asian-inspired versions, I swap the seasonings completely and use a ginger-miso dressing. Marinate the chicken in soy sauce, ginger, and garlic, then dress the finished bowl with a mixture of miso paste, rice vinegar, sesame oil, and a tiny bit of maple syrup. Add edamame, shredded carrots, and cucumber, and you’ve got something totally different from the Mediterranean version.
Speaking of customization based on dietary preferences, this bowl adapts beautifully to different needs. For vegan protein options, swap the chicken for baked tofu, tempeh, or even roasted chickpeas. I’ve done crispy baked tofu by pressing it, cutting it into cubes, tossing with cornstarch and spices, then baking at 425°F until golden. The texture gets surprisingly close to that satisfying bite you want from protein.
Tempeh is another fantastic choice if you’re looking for plant-based protein that’s got some heft to it. It’s fermented soybeans pressed into a dense cake, and one serving brings about 15-20 grams of protein. I slice it thin, marinate it for at least thirty minutes, then pan-fry until crispy. The slightly nutty, earthy flavor actually works better than tofu in some applications.
The beauty of quinoa is that these are already gluten-free power bowls without any modifications needed. Quinoa, chicken, vegetables—all naturally gluten-free. Just double-check your seasonings and broth to make sure they don’t contain hidden gluten, which sometimes sneaks into spice blends and bouillon cubes. I’ve caught this before when I grabbed a random seasoning mix without reading the label carefully.
For dairy-free needs, which is how I typically make mine anyway, just skip any cheese and use avocado or tahini for creaminess. Nutritional yeast is another option that adds a cheesy, umami flavor without actual dairy. I sprinkle it on sometimes when I want that savory depth.
Seasonal variations keep things exciting and often save money since you’re buying what’s abundant. In summer, I load up on fresh corn cut straight off the cob, ripe tomatoes that actually taste like something, zucchini, and tons of fresh basil. Grilled peaches sound weird but are absolutely incredible in a summer power bowl—the sweetness plays against savory chicken beautifully.
Fall calls for roasted butternut squash, which brings natural sweetness and a hefty dose of vitamin A. I’ll cube it, toss with olive oil and cinnamon, and roast until caramelized. Dried cranberries, pepitas, and a maple-Dijon dressing complete the autumn vibe. This version feels cozy and substantial when the weather turns cold.
Winter means heartier greens like kale or Swiss chard, roasted Brussels sprouts, and beets. I know beets divide people, but roasted until slightly crispy on the edges, they’re phenomenal. Winter citrus like blood oranges or grapefruit segments add brightness when fresh summer produce isn’t available. By the way, using seasonal produce not only tastes better but typically costs less and supports local farmers if you’re shopping at markets.
Spring brings asparagus, snap peas, radishes, and fresh herbs growing like crazy. I’ll blanch asparagus for just two minutes to keep it crisp-tender, shock it in ice water, and add it cold to the bowl. Snap peas stay raw for maximum crunch. Radishes add a peppery bite and beautiful color—I slice them super thin so they’re not overwhelming.
Grain substitutions work great if you want variety or have specific nutritional goals. Brown rice is the obvious swap and brings a slightly chewier texture. Farro has a wonderful nutty flavor and more protein than regular grains, though it contains gluten. Bulgur wheat cooks crazy fast—like ten minutes—which is perfect for rushed evenings. For lower-carb versions, cauliflower rice keeps the bowl concept while cutting way back on carbohydrates.
Here’s something I stumbled onto accidentally: adding a fried or soft-boiled egg on top takes everything to another level. The runny yolk becomes a built-in creamy dressing that coats everything. Plus, you’re adding another 6-7 grams of protein and making the meal even more satisfying. I go through phases where I add an egg to basically every bowl I make.
Crunchy toppings deserve their own mention because texture contrast matters more than people realize. Toasted nuts or seeds—almonds, sunflower seeds, pepitas, sesame seeds—add that satisfying crunch that makes eating more enjoyable. I keep a jar of mixed toasted seeds in my pantry specifically for sprinkling on bowls and salads. Just a tablespoon adds healthy fats, extra protein, and sensory interest.
Pickled vegetables bring acidity that cuts through rich flavors. Quick-pickled red onions, carrots, or jalapeños take maybe five minutes to make and last for weeks in the fridge. The tangy brightness wakes up your palate and makes each bite more dynamic. I went through a phase where I pickled everything I could get my hands on, which my family found both amusing and slightly concerning.
If you’re feeding kids or picky eaters, the bowl format actually works in your favor. They can pick and choose what they want or have ingredients served separately so nothing’s touching. My nephew won’t eat “mixed up food,” but give him the same components in sections and suddenly he’s on board. Sometimes presentation really is everything.
For meal prep efficiency beyond what I’ve already mentioned, invest in good storage containers with separate compartments. Those bento-style boxes keep wet ingredients away from dry ones, which prevents sogginess. I learned this after too many sad, mushy lunches in my early meal prep days. The USDA has solid guidance on freezer storage for cooked chicken, which stays good for up to four months frozen, meaning you can prep protein way in advance.
Batch-cooking proteins in different flavors gives you variety without much extra work. One Sunday, I’ll season chicken breasts three different ways—Mexican spices, Italian herbs, and Asian-inspired—then grill them all at once. Throughout the week, I’m essentially eating different meals even though the base prep was identical.
The same approach works for roasting vegetables. Fill a couple of sheet pans with different vegetable combinations, season them differently, roast everything together, and you’ve got multiple flavor profiles ready to go. This strategy has completely changed how I approach weeknight dinners and packed lunches.
If you’re looking for more inspiration on building balanced, nutritious meals that don’t feel like diet food, exploring other healthy recipes can spark ideas about flavor combinations and preparation techniques that translate across different dishes.
One final thought on making these bowls work for your life: don’t let perfect be the enemy of good. Some weeks I have time to prep everything beautifully and my bowls look magazine-worthy. Other weeks I’m throwing rotisserie chicken, pre-washed greens, and microwaved quinoa into a container and calling it done. Both versions nourish you. Both versions are infinitely better than skipping meals or grabbing fast food. Give yourself grace and flexibility—that’s what makes healthy eating sustainable long-term.
Final Thoughts on Your High Protein Power Bowl Journey
Building the habit of making these power bowls has genuinely changed how I approach food and energy throughout my day. You’re not just eating for the next hour—you’re fueling everything you want to accomplish. Start with the basic version I’ve outlined, get comfortable with the techniques, then branch out into the endless variations that keep things interesting. Your future self, especially that 3 PM version fighting through the afternoon slump, will thank you for the effort you put in today.
Frequently Asked Questions About High Protein Chicken Quinoa Power Bowls
What are the main benefits of eating a high protein chicken quinoa power bowl regularly?
The combination of lean protein, complete plant-based protein, and fiber keeps you full for four to six hours while stabilizing blood sugar levels. You’re getting sustained energy without crashes, supporting muscle maintenance or growth, and consuming a wide range of vitamins and minerals in one convenient meal. Regular consumption helps with weight management since high-protein meals boost metabolism slightly and prevent overeating later. The nutrient density means you’re actually nourishing your body rather than just filling your stomach with empty calories.
Can I make this power bowl ahead of time for meal prep, and how long does it stay fresh?
Absolutely—meal prepping these bowls is one of their biggest advantages. Store cooked chicken and quinoa separately from fresh vegetables and avocado for best results. The cooked components last four days in the refrigerator in airtight containers. I recommend adding avocado, dressing, and delicate greens right before eating to maintain optimal texture. If you want to prep complete bowls, they’ll stay good for two to three days, though the avocado might brown slightly despite lemon juice. For longer storage, freeze cooked chicken and quinoa for up to three months, then thaw and add fresh components.
Are there any good substitutes for quinoa if I have an allergy or sensitivity?
Brown rice, white rice, farro, bulgur wheat, or even cauliflower rice all work wonderfully as quinoa replacements. Brown rice brings similar fiber content though it lacks the complete protein profile. Farro has a nutty flavor and chewy texture that many people prefer over quinoa. For lower-carb needs, cauliflower rice keeps the bowl concept while dramatically reducing carbohydrates. Millet is another less common option that’s naturally gluten-free and cooks similarly to quinoa. Each grain brings slightly different nutrients, so rotating through various bases actually gives you more nutritional diversity.
How can I add more flavor to my power bowl without adding too many calories?
Fresh herbs, citrus juice, and vinegars add tremendous flavor with essentially zero calories. A squeeze of lime or lemon, fresh cilantro, parsley, or basil, and a splash of balsamic or rice vinegar transform the taste profile. Spices like smoked paprika, cumin, curry powder, or za’atar bring complexity without calories. Pickled vegetables add tangy brightness and only minimal calories. If you want creaminess, Greek yogurt mixed with herbs and lemon creates a protein-rich dressing that’s far lower in calories than oil-based versions. Hot sauce or red pepper flakes add kick without impacting calorie count meaningfully.
Is this power bowl suitable for people with specific dietary restrictions?
The basic recipe is naturally gluten-free and can easily accommodate most dietary needs with simple swaps. For vegan diets, replace chicken with tofu, tempeh, or legumes like chickpeas. Dairy-free is simple since the base recipe doesn’t require dairy—just skip cheese if you add it. For low-carb or keto diets, replace quinoa with cauliflower rice and increase healthy fats from avocado and nuts. People with egg allergies have no concerns since eggs aren’t in the standard recipe. Those watching sodium can control salt levels and use low-sodium broth. The ingredient flexibility makes this bowl work for almost any eating plan.
How does this power bowl support muscle recovery and growth after workouts?
The 40-45 grams of complete protein from chicken and quinoa provide all essential amino acids needed for muscle protein synthesis. Eating protein within a few hours after training helps repair muscle tissue damaged during exercise, leading to strength gains over time. The complex carbohydrates from quinoa replenish glycogen stores depleted during workouts, which is crucial for recovery. The anti-inflammatory compounds from colorful vegetables help reduce exercise-induced inflammation. The magnesium in quinoa and greens supports muscle function and prevents cramping. This nutrient combination makes the bowl ideal post-workout nutrition that tastes good and actually works.
What’s the best way to keep avocado from turning brown in meal-prepped bowls?
Coating sliced avocado with lemon or lime juice helps slow oxidation that causes browning. Store avocado separately from other ingredients if possible and add it right before eating for best color and texture. Another trick is pressing plastic wrap directly onto the avocado surface to minimize air exposure. Some people store avocado with a slice of onion in the container, which releases sulfur compounds that slow browning, though this can affect flavor slightly. Honestly, even browned avocado tastes fine—it’s purely an aesthetic issue. If appearance matters, add avocado fresh each day.
Can I use rotisserie chicken to save time, and does it change the nutritional profile?
Rotisserie chicken is a fantastic time-saver and works perfectly in these bowls. The main difference is typically higher sodium content since store-bought rotisserie chickens are heavily seasoned. The protein content remains similar—you’re still getting about 25-30 grams per serving. Some rotisserie chickens have slightly more fat depending on whether you’re eating white or dark meat. I use rotisserie chicken constantly when time is tight, and honestly, sometimes the extra flavor is welcome. Just remove the skin to keep it lean, and you’re good to go. This shortcuts the recipe from thirty-five minutes down to maybe ten minutes total.
How do I prevent quinoa from getting mushy or sticky?
The key is using the right liquid ratio—two parts liquid to one part quinoa—and not overcooking. Always rinse quinoa thoroughly before cooking to remove the bitter saponin coating. Once it’s cooked for fifteen minutes, remove it from heat and let it steam with the lid on for five more minutes, then fluff with a fork. Don’t stir it during cooking, which releases excess starch and creates gummy texture. If your quinoa consistently turns out mushy, you might be using too much liquid or cooking it too long. Each grain should be distinct and slightly fluffy when done properly.
What are some kid-friendly modifications to make this bowl more appealing to picky eaters?
Serve components separately so kids can assemble their own bowls and control what they’re eating. Cut vegetables into fun shapes or keep them in simple forms like cherry tomatoes they can pop whole. Let them choose a dressing they like—even ranch works if it gets them eating vegetables. Mild seasonings on the chicken work better than bold spices for sensitive palates. You can call it a “build-your-own bowl bar,” which makes it feel more like a game than dinner. Adding familiar elements like shredded cheese or corn makes it less intimidating. Sometimes just changing the presentation from “mixed salad” to “power bowl” improves their reception. Kids are weird about food psychology.
Ingredients
Equipment
Method
- Lavez 1 tasse de quinoa sous l'eau froide dans un tamis à mailles fines pendant environ 30 secondes.
- Combinez le quinoa et 2 tasses de bouillon de poulet dans une casserole moyenne et portez à ébullition.
- Réduisez le feu à doux, couvrez avec un couvercle et laissez mijoter pendant 15 minutes.
- Retirez du feu et laissez reposer avec le couvercle pendant 5 minutes supplémentaires.
- Tapissez les poitrines de poulet pour les sécher et les aplatir à une épaisseur uniforme.
- Mélangez la poudre d'ail, le paprika fumé, le cumin, le sel et le poivre dans un bol.
- Frottez le mélange d'épices sur les deux côtés des poitrines de poulet.
- Préchauffez le gril ou le four à feu moyen-élevé (grillage) ou à 425°F (cuisson).
- Grillez le poulet pendant 6-7 minutes de chaque côté ou faites cuire au four pendant 20-25 minutes jusqu'à ce que la température interne atteigne 165°F.
- Laissez reposer le poulet pendant 5 minutes, puis tranchez contre le grain.
- Pendant que le poulet cuit, coupez les légumes en morceaux de taille bouchée.
- Assemblez les bols avec du quinoa comme base, garni de poulet tranché et de légumes disposés.
- Ajoutez l'avocat, tout ajout facultatif, des herbes et un filet de jus de citron.
- Si vous préparez pour plus tard, conservez les composants séparément pour éviter l'humidité.