The Magic of Crispy Onion Ring Chips
I still remember the first time I accidentally left a batch of onion rings in the oven a few minutes too long. Instead of the usual thick, battered rings, I pulled out something completely different. They were thin, golden, and shattered into a million crispy pieces when I bit down. My kitchen mistake turned into my favorite snack, and I’ve been making crispy onion ring chips on purpose ever since.
If you’ve ever craved that perfect crunch with sweet onion flavor, you’re in the right place. This article will show you everything about making these addictive snacks at home. You’ll learn the best techniques for getting them extra crispy, which onions work best, and how to season them like a pro. I’ll share my tried-and-true methods that took years to perfect.
Making these chips changed my snack game forever. I used to buy expensive bags from specialty stores or order them as appetizers at restaurants. Now I make them whenever the craving hits. The smell of caramelizing onions fills my kitchen, and within an hour, I have a bowl of crunchy, golden perfection. Friends always ask for the recipe when they try them.
The best part? You probably have everything you need already sitting in your pantry. No fancy equipment or hard-to-find ingredients required. Just simple items that come together to create something truly special.
Why You Should Try Making Crispy Onion Ring Chips
These chips hit differently than regular potato chips or standard onion rings. They combine the best of both worlds. You get the satisfying crunch of a chip with the rich, sweet flavor of caramelized onions. Each bite delivers layers of texture and taste that keep you reaching for more.
I’ve served them at parties, game nights, and casual dinners. They disappear faster than any other snack I put out. People who claim they don’t like onions suddenly become fans. The cooking process transforms raw onions into something mild and sweet with none of that sharp bite.
Store-bought versions can’t compete with homemade ones. When you make them fresh, they taste better and cost way less. Plus, you control exactly what goes into them. No mysterious ingredients or preservatives. Just real food that you can feel good about eating.
The Benefits of Making Them at Home
Freshness makes all the difference. When you pull a tray from your oven, the chips are still warm and at peak crispiness. Store-bought bags sit on shelves for weeks or months. They can taste stale or lose that satisfying crunch. Your homemade version will be so much better.
You can customize everything about these chips. Want them spicier? Add cayenne or paprika. Prefer a smoky flavor? Toss in some smoked salt. I’ve made garlic parmesan versions, ranch-flavored batches, and even sweet cinnamon sugar ones for dessert. The possibilities are endless.
Making snacks from scratch is actually fun. I know that sounds cheesy, but it’s true. There’s something satisfying about starting with a simple onion and ending up with crispy, delicious chips. Kids love helping with this recipe too. They can separate the onion rings and season them before baking.
Here are the main reasons I make these at home:
- They cost about one-third the price of store-bought gourmet onion chips
- I know exactly what ingredients go into each batch
- The flavor and texture are superior when fresh
- I can adjust the seasonings to match my mood or dietary needs
- Making them is easier than most people think
- They impress guests without requiring advanced cooking skills
The Story Behind America’s Love for Onion Rings and Chips
Onion rings became popular in the United States during the early 1900s. They started appearing in cookbooks and restaurant menus across the country. By the 1960s, fast food chains had made them a staple side dish. Americans fell in love with the combination of crispy coating and tender onion inside.
The chip version came later. Creative cooks and food companies realized that thinner, crispier onion pieces could work as a standalone snack. They weren’t just a side dish anymore. These chips became toppings for casseroles, salad additions, and party snacks.
French fried onions in a can became a Thanksgiving tradition for green bean casserole. That crispy onion topping is probably one of the most recognized uses of this type of snack. But the homemade chip version takes that concept and elevates it to something special.
Today, you can find onion chips in various forms across America. Food trucks serve them as appetizers. Upscale restaurants use them as garnishes. Grocery stores stock multiple brands in the snack aisle. The market keeps growing because people love that crunch and flavor combination.
I grew up eating onion rings at diners and burger joints. They were always a treat. But these chips are different. They’re lighter and crunchier. You can eat them by the handful without feeling too full. They work as a snack, side dish, or topping. That versatility makes them perfect for any occasion.
The cooking method matters too. While traditional onion rings are deep fried, these chips can be baked or air fried. That makes them a bit healthier without sacrificing taste. I appreciate having options that don’t require a pot of hot oil on my stove.
Making crispy onion ring chips at home connects you to this long tradition of American comfort food. You’re taking something familiar and making it your own. Every batch teaches you something new about timing, temperature, and seasoning. The learning process is part of the fun.


Everything You Need to Get Started with Crispy Onion Ring Chips
Now that you know why these chips are worth making, let’s talk about what you actually need in your kitchen. The good news is you won’t be hunting down weird ingredients or buying expensive equipment. Most of what you need is probably in your cabinets right now.
I’m the type of person who gets excited about a recipe and then realizes halfway through that I’m missing something crucial. Not fun. So I always double-check my supplies before starting. This recipe is forgiving, but having everything ready makes the process smooth and enjoyable.
The Simple Ingredient List
Let’s start with the star of the show. You’ll need three to four large onions. Yellow onions work best because they have the perfect balance of sweetness and flavor. When cooked, they develop this amazing caramelized taste that makes the chips irresistible. I’ve tried red onions too, and they’re good but a bit milder. White onions work in a pinch, though they can be sharper.
For the coating, you want all-purpose flour as your base. About two cups should do it. Some people ask me if they can use other types of flour. Sure, you can experiment with rice flour for extra crispiness or even gluten-free blends if needed. I’ve done both, and they work fine.
Cornstarch is your secret weapon here. Mix about half a cup with your flour. This ingredient creates that shatteringly crisp texture that makes these chips so addictive. Without it, they’re just okay. With it, they’re spectacular. Trust me on this one.
You’ll need cold sparkling water or beer for the batter. I know that sounds fancy, but the carbonation makes the coating lighter and crispier. Regular water works too, but the results won’t be quite as good. I usually keep a bottle of club soda in my fridge just for this recipe. A light beer also adds a subtle flavor that I really like.
Seasoning is where you make these chips your own. At minimum, grab salt and black pepper. But here’s where it gets fun. I usually add garlic powder, onion powder (yes, more onion flavor), and a pinch of cayenne pepper. Paprika gives a nice color and subtle smokiness. Sometimes I throw in a bit of dried herbs like thyme or oregano.
For frying, you need a neutral oil with a high smoke point. Vegetable oil, canola oil, or peanut oil all work great. You’ll need enough to fill your pan or fryer about three inches deep. I buy the big bottles because I make these chips often enough to use it all.
By the way, if you’re planning a snack spread, these pair amazingly with loaded nacho cheese fries for a comfort food feast everyone will love.
Kitchen Equipment That Makes Life Easier
You don’t need a professional kitchen to pull this off. A couple of large mixing bowls are essential. One for the dry ingredients, one for the wet batter. I like using bowls that are wider than they are deep because they make dipping easier.
A sharp knife and cutting board are obvious needs. Slicing onions evenly matters more than you might think. Inconsistent slices cook unevenly, and you end up with some burnt pieces and some undercooked ones. Not ideal.
Here’s the thing about frying equipment. A heavy-bottomed pot or Dutch oven works perfectly if you don’t have a deep fryer. I actually prefer using my Dutch oven because it holds heat better and I have more control. Make sure it’s at least four to five inches deep to prevent oil splatters.
A cooking thermometer changed my frying game completely. Before I had one, I was guessing at oil temperature and getting inconsistent results. Now I know exactly when the oil hits that sweet spot. They cost about ten dollars and are worth every penny.
You’ll want long tongs or a slotted spoon for safely adding and removing chips from hot oil. I burned my fingers enough times to learn this lesson. Keep them handy and never reach into hot oil with your hands, even if you’re being careful.
Set up a cooling station with a baking sheet lined with paper towels or a wire rack. The paper towels absorb excess oil, while a wire rack lets air circulate and keeps chips crispier. I usually use both. Paper towels underneath with a rack on top.
Funny enough, I also keep a splatter screen nearby. It’s a mesh lid that lets steam escape while containing oil splatters. Not necessary, but it keeps my stovetop cleaner and prevents those painful oil pops.
Picking the Perfect Onions
Not all onions are created equal for this recipe. When I’m at the grocery store, I look for firm, heavy onions with dry, papery skins. Avoid any with soft spots, sprouting green shoots, or strong odors before cutting. Those are signs they’re past their prime.
Size matters too. I go for large onions because they give you bigger rings that are easier to work with. Small onions mean tiny rings that are fiddly to coat and fry. Plus, bigger rings have more surface area for that crispy coating.
Yellow onions are my go-to, but sweet onions like Vidalia or Walla Walla are fantastic if you can find them. They have less bite and more natural sweetness. Perfect for people who are on the fence about onions. My mom, who claims she hates raw onions, devours these when I use sweet varieties.
Making Perfect Crispy Onion Ring Chips Step by Step
Alright, let’s actually make these things. I’ll walk you through each step the way I do it in my own kitchen. No fancy chef talk, just straightforward instructions that work.
Getting Those Onions Ready
First thing, peel your onions and cut off both ends. Then slice them into rings about a quarter to a third of an inch thick. Not paper-thin like you’re making onion chips, but not super thick like traditional onion rings either. You want them thin enough to get really crispy but thick enough to handle without falling apart.
Here’s a trick I learned the hard way. Separate all the rings carefully and toss any tiny center pieces. Those little guys burn way too fast. Save them for another recipe, maybe soup or stir-fry.
Now comes the soaking step. Put your onion rings in a bowl of cold water mixed with a tablespoon of salt. Let them sit for about twenty to thirty minutes. This does two things. It removes some of the harsh onion bite, and it helps the batter stick better later. I usually prep my other ingredients during this time.
Some recipes skip the soaking, but I think it makes a real difference. The onions become milder and sweeter. Plus, if you’re serving these alongside something like deviled eggs with candied bacon, you don’t want the onion flavor overpowering everything else.
After soaking, drain the rings and pat them completely dry with paper towels or a clean kitchen towel. This step is crucial. Wet onions won’t hold the batter properly. I spread mine out on a towel and gently press another towel on top to get them really dry.
Creating the Perfect Batter
In your first bowl, whisk together two cups of flour, half a cup of cornstarch, and your seasonings. I typically use two teaspoons of salt, one teaspoon each of garlic powder and paprika, half a teaspoon of black pepper, and a quarter teaspoon of cayenne. Adjust these amounts based on your taste preferences.
Take out about half a cup of this dry mixture and set it aside. You’ll use this for the first dusting. The rest stays in the bowl for the wet batter.
Now add your cold sparkling water or beer gradually to the flour mixture still in the bowl. Whisk as you pour. You’re aiming for a consistency that’s thicker than pancake batter but thinner than muffin batter. It should coat a spoon but still drip off slowly. I usually use about one and a half cups of liquid, but you might need a bit more or less.
Here’s the thing about batter temperature. Keep everything cold. Cold batter on hot oil creates steam, which makes the coating puff up and get extra crispy. If my kitchen is warm, I even stick the batter bowl in the fridge between batches.
The Coating Process That Changes Everything
This is where the magic happens. Set up a coating station with three containers. First, your reserved dry flour mixture. Second, your wet batter. Third, another bowl with some extra dry coating if you want double-coated chips that are even crispier.
Take a handful of dried onion rings and toss them in the dry flour first. This initial coating helps the wet batter grip onto the onion surface. Shake off excess flour. You want a light dusting, not clumps.
Next, dip each floured ring into the wet batter. Make sure it’s completely coated. Let excess batter drip back into the bowl. I hold each ring above the bowl for a couple seconds to let the extra drip off.
If you want them extra crispy, do a final dip in the dry flour mixture again. This creates a thicker, crunchier crust. I don’t always do this step, depends on my mood. Both ways are delicious.
Place your coated rings on a plate or tray while you heat the oil. Don’t stack them or they’ll stick together. Keep them in a single layer.
Frying to Golden Perfection
Pour oil into your pot until it’s about three inches deep. Heat it over medium-high heat until your thermometer reads 350 to 375 degrees Fahrenheit. This temperature range is the sweet spot. Too cool and your chips absorb oil and get soggy. Too hot and they burn on the outside while staying raw inside.
Don’t have a thermometer? Drop a tiny bit of batter into the oil. If it sizzles immediately and floats to the top, you’re ready. If it just sinks, the oil isn’t hot enough yet.
Carefully lower a few onion rings into the hot oil using your tongs or slotted spoon. Don’t overcrowd the pot. I usually do four to six rings at a time depending on their size. Too many at once drops the oil temperature, and they won’t crisp up properly.
Fry for about two to three minutes, flipping once halfway through. You’re looking for a deep golden brown color. They’ll continue darkening slightly even after you remove them, so don’t wait until they look perfect in the oil.
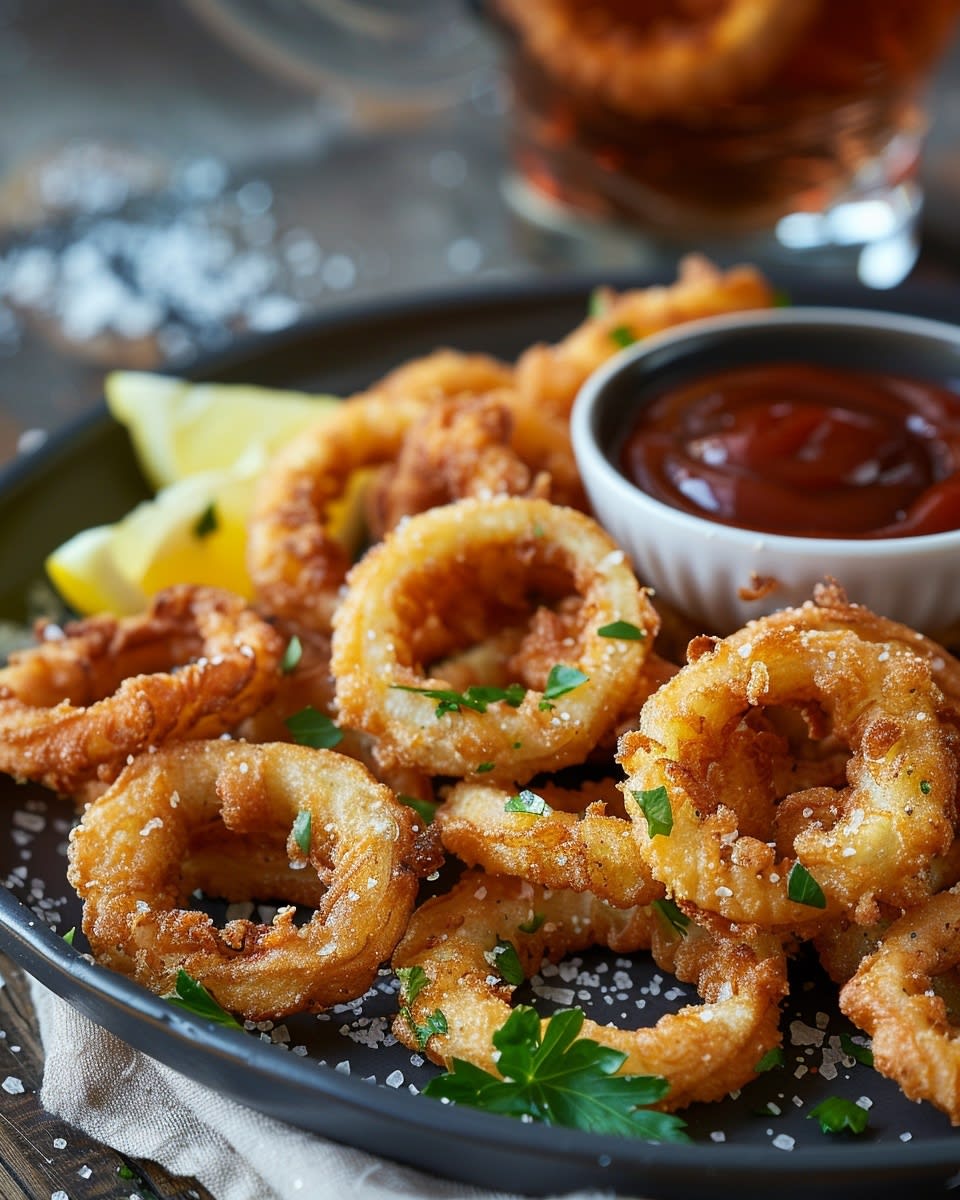
Transfer fried chips to your prepared cooling station. Sprinkle with a little extra salt while they’re still hot. The salt sticks better to warm, oily surfaces. These chips pair wonderfully with mozzarella cheese sticks when you’re putting together an appetizer platter.
Maintain your oil temperature between batches. If it gets too hot, lower the heat a bit. If it drops below 350, let it come back up before adding more rings. Consistent temperature equals consistent results.
Keep going until you’ve fried all your onion rings. The whole process takes about thirty to forty-five minutes depending on how many batches you need to do. I usually make multiple onions worth because they disappear so fast.
One last tip. These chips are best eaten within a few hours of making them. They stay crispiest when fresh. If you’re making them for a party, you can fry them earlier and reheat in a hot oven for a few minutes. Not quite as perfect as fresh, but still way better than anything from a bag. They’d also complement spinach artichoke dip bites beautifully at your next gathering.
The satisfaction of pulling off a batch of perfect crispy onion ring chips is hard to beat. That first crunch, the sweet onion flavor, the golden color. All of it comes together when you follow these steps carefully. Take your time, enjoy the process, and get ready for everyone to ask you to make them again.


Serving and Enjoying Your Crispy Onion Ring Chips
You’ve made a beautiful batch of golden, crunchy chips. Now comes the fun part—actually eating them. I mean, you could just grab them by the handful straight from the cooling rack (I definitely do this), but there are so many creative ways to serve and enjoy these crispy little treasures.
Dipping Sauces That Take These Chips to the Next Level
Let’s be honest, crispy onion ring chips are amazing on their own. But pair them with the right sauce? That’s when they become truly unforgettable. I keep several dipping options on hand whenever I make a batch because everyone has their own favorite.
Ranch dressing is the classic choice for a reason. The cool, tangy creaminess balances the rich, savory crunch perfectly. I make a homemade version with buttermilk, sour cream, mayo, and lots of fresh dill and garlic. Takes five minutes and tastes way better than store-bought.
Here’s the thing though—spicy mayo might be even better. Mix regular mayonnaise with sriracha or your favorite hot sauce, add a squeeze of lime juice, and maybe some garlic powder. The heat cuts through the richness of the fried coating in the best way possible.
I discovered honey mustard as a pairing by accident when I ran out of ranch at a party. Game changer. The sweetness complements the caramelized onion flavor while the mustard adds a sharp kick. You can buy it or make it yourself by mixing equal parts honey and dijon mustard with a splash of mayo.
For something different, try chipotle aioli. Blend mayo with chipotles in adobo sauce, garlic, and lime juice. It’s smoky, creamy, and has just enough heat to keep things interesting. My brother requests this sauce specifically every time I make these chips.
Don’t sleep on barbecue sauce either. Especially if you’re serving these at a cookout or casual gathering. The tangy sweetness works surprisingly well. I like using a vinegar-based Carolina-style sauce rather than thick, molasses-heavy ones.
Sometimes I go completely off script and serve them with tzatziki. That Greek yogurt-cucumber sauce adds a refreshing element that makes the chips feel almost light. Sounds weird, tastes amazing. Add extra garlic and fresh dill for the best results.
By the way, understanding the nutritional aspects of what we cook helps us make informed choices. The USDA offers helpful food facts about various ingredients including onions, which are actually packed with vitamins and antioxidants despite what people might assume about fried foods.
Creative Serving Ideas That Will Impress Everyone
Presentation matters more than people think. I’ve served these chips in different ways, and the response changes based on how you put them out. A pile on a regular plate is fine, but you can do better.
Try arranging them in a large shallow basket lined with parchment paper. It gives off casual, restaurant vibes. Tuck small bowls of various dipping sauces around the edges. People love having options, and the visual appeal makes everyone want to grab some immediately.
For parties, I use individual serving cups or small paper cones. Fill each one with chips and pair with a tiny container of sauce. Guests can walk around with their own portion, and there’s something fun about personal servings. Plus, no double-dipping drama.
These chips work as a salad topper better than croutons ever did. I’m talking about adding them to Caesar salads, wedge salads, or even simple green salads. They add that crunch factor while bringing way more flavor. Crumble them up or leave them whole for people to break apart themselves.
Funny enough, I started using them as a burger topping and now I can barely eat burgers without them. Layer them on top of the patty for an extra crunch element that makes every bite better. Works on chicken sandwiches too.
They’re also fantastic sprinkled over mac and cheese or any creamy casserole. The crispy texture contrasts beautifully with soft, cheesy dishes. My kids request them specifically for this purpose now. Turns regular weeknight dinners into something special.
Want to get really fancy? Use them as part of a charcuterie or snack board. Arrange the chips alongside cheeses, cured meats, pickles, olives, and crackers. They fit right in and often disappear faster than everything else on the board.
Keeping Your Chips Crispy: Storage and Reheating Tips
Let me be real with you. These chips are absolutely best within the first couple hours after making them. That’s when they’re at peak crispiness. But life happens, and sometimes you need to store leftovers or make them ahead of time.
If you have leftovers (which honestly doesn’t happen often at my house), let them cool completely first. Warm chips trapped in a container create condensation, which equals sogginess. Nobody wants soggy chips. Wait until they’re room temperature before storing.
Store them in an airtight container lined with paper towels. The paper towels absorb any residual oil or moisture. Don’t refrigerate them—that actually makes them lose crispiness faster. Just keep them at room temperature. They’ll stay reasonably crispy for about 24 hours this way.
When you’re ready to eat stored chips, reheat them in the oven or air fryer. Never use the microwave unless you want sad, limp chips. Spread them on a baking sheet and pop them in a 375-degree oven for about five to seven minutes. They won’t be quite as perfect as fresh, but they’ll crisp back up nicely.
Air fryers work even better for reheating. Set it to 350 degrees and heat for three to four minutes. Check them frequently because they can go from perfect to burnt pretty quickly. The circulating air revives that crunch better than a regular oven.
Here’s a trick I learned for making these ahead for parties: fry them until they’re just barely golden, then let them cool completely. Store in the fridge overnight if needed. Right before serving, finish them in a hot oven until they reach that deep golden color. This way you do most of the work ahead but still serve them crispy and fresh.
You can also freeze the coated but unfried rings. Arrange them in a single layer on a baking sheet and freeze solid, then transfer to a freezer bag. They’ll keep for about two months. Fry them straight from frozen, just add an extra minute or two to the cooking time. This method is perfect for always having a batch ready to go.
Pairing These Chips with Other Dishes
While these chips shine on their own as a snack, they’re versatile enough to work alongside all kinds of meals. I’ve found they complement hearty, comfort food dishes particularly well.
Serve them next to sandwiches or burgers instead of regular fries. They’re lighter and crunchier, which prevents that overly-full feeling you get from heavy sides. Plus, the onion flavor doesn’t compete with burger toppings the way regular onion rings might.
They work beautifully with grilled meats at cookouts. The crispy texture contrasts nicely with tender steaks, chicken, or ribs. I put out a big bowl at every barbecue now. People expect them and get disappointed when they’re not there.
Pair them with soup or chili for a satisfying meal. Crumble a handful on top or eat them on the side for dipping. The crunch adds texture to otherwise smooth or soft dishes. I especially love them with tomato soup or creamy potato soup.
These chips also belong at game day parties and casual gatherings. Set them out with other finger foods and watch them disappear. They fit right in with wings, sliders, and all the classic party snacks. If you’re looking for more inspiration, check out other crowd-pleasing options in our collection of appetizers and snacks that work perfectly alongside these crispy treats.
Frequently Asked Questions About Crispy Onion Ring Chips
How do I make my onion ring chips extra crispy?
The secret to maximum crispiness comes down to a few key factors. First, make sure your batter includes cornstarch, which creates a lighter, crunchier coating. Keep your batter cold and your oil hot at 350-375 degrees. Pat your onions completely dry before coating them, as any moisture will prevent proper crisping. Finally, don’t overcrowd the pan when frying, which drops the oil temperature and leads to soggy chips instead of crispy ones.
Can I bake instead of fry the onion ring chips?
Yes, you can definitely bake them for a lighter version, though they won’t be quite as crispy as fried ones. Preheat your oven to 425 degrees and arrange coated rings on a baking sheet lined with parchment paper. Spray them lightly with cooking oil. Bake for about 15 minutes, flip them, spray again, and bake another 10-15 minutes until golden brown. Air fryers work even better than ovens for baked versions, giving you results closer to deep-fried texture.
What are some alternative seasonings for onion ring chips?
The seasoning possibilities are endless once you master the basic recipe. Try adding smoked paprika and cumin for a smoky, southwestern flavor. Parmesan cheese and Italian herbs create a savory Italian version. For something sweet and spicy, mix brown sugar with chili powder and a pinch of cinnamon. Ranch seasoning mix added to the flour creates an instant flavor boost. I’ve even made curry-spiced versions that were surprisingly delicious.
Are there any health benefits to eating onion ring chips?
While these are definitely a treat rather than health food, onions themselves offer real nutritional benefits. They’re rich in vitamin C, B vitamins, and potassium. Onions contain powerful antioxidants and compounds that may support heart health and reduce inflammation. They’re also relatively low in calories before coating and frying. Baking instead of frying reduces the fat content significantly if you’re looking for a slightly healthier option.
How can I make a gluten-free version of onion ring chips?
Gluten-free onion ring chips are totally doable with a few simple swaps. Replace regular flour with a gluten-free all-purpose flour blend. Rice flour mixed with cornstarch works especially well and actually creates an even crispier texture. Make sure your beer or other liquids are gluten-free if that’s a concern. I’ve made these for friends with celiac disease several times, and they couldn’t tell the difference. Just be careful about cross-contamination if serving to someone with serious gluten sensitivity.
What are some common mistakes to avoid when making onion ring chips?
The biggest mistake is not drying the onions thoroughly after soaking them, which prevents the batter from adhering properly. Another common error is overcrowding the pan, which drops oil temperature and creates soggy chips. Using oil that’s too cool produces greasy, heavy chips, while oil that’s too hot burns them before they cook through. Skipping the cornstarch in the batter will leave you with a less crispy result. Finally, trying to store them while still warm creates steam that destroys crispiness.
Can I use different types of onions for onion ring chips?
Absolutely, different onions create different flavor profiles. Yellow onions are the standard choice with balanced flavor that sweetens when cooked. Sweet onions like Vidalia or Walla Walla are milder and perfect for people who find regular onions too strong. Red onions work fine and add a slightly milder, sweeter taste with pretty purple edges. White onions are sharper and more pungent, which some people prefer. I’ve tried shallots too, though they’re pricier and the rings are smaller.
How long do homemade onion ring chips last?
Freshly made chips stay crispy for about 2-4 hours at room temperature, which is why they’re best eaten soon after frying. Stored in an airtight container with paper towels, they’ll keep at room temperature for about 24 hours, though they’ll gradually lose crispiness. You can refresh them in a hot oven or air fryer to restore some crunch. I don’t recommend refrigerating them as it speeds up sogginess. Frozen uncooked coated rings last about two months and can be fried directly from frozen.
What’s the best oil temperature for frying onion ring chips?
The ideal temperature range is 350-375 degrees Fahrenheit. This range is hot enough to create immediate sizzle and crispy coating without burning the exterior before cooking the onion through. Below 350 degrees, the chips absorb too much oil and become greasy. Above 375, they brown too quickly on the outside while staying undercooked inside. Invest in a simple cooking thermometer to maintain consistent temperature. The oil will drop when you add chips, so let it recover between batches.
Can I prepare the batter ahead of time?
You can prepare the dry mixture several days ahead and store it in an airtight container. However, I don’t recommend mixing the wet batter more than an hour before using it. The batter loses its effectiveness as it sits, and the cornstarch begins breaking down. The carbonation in sparkling water or beer also dissipates over time, which reduces crispiness. For best results, mix your wet batter right before you’re ready to coat and fry. The whole mixing process takes less than five minutes anyway.
Making crispy onion ring chips at home is one of those kitchen wins that makes you feel like a genius. Sure, the first batch might not be perfect, but that’s part of the fun. Each time you make them, you’ll learn something new and get better results. The smile on people’s faces when they taste them makes every bit of effort worthwhile. So grab some onions, heat up that oil, and start crunching.
Ingredients
Equipment
Method
- Pelez les oignons et coupez-les en rondelles d'environ 1/4 à 1/3 de pouce d'épaisseur.
- Séparez tous les anneaux et jetez les petits morceaux du centre.
- Faire tremper les rondelles d'oignon dans un bol d'eau froide mélangée à une cuillère à soupe de sel pendant 20-30 minutes.
- Égouttez les anneaux et séchez-les complètement avec des serviettes en papier.
- Dans un bol, fouettez ensemble 2 tasses de farine, 1/2 tasse de fécule de maïs et les assaisonnements.
- Réservez 1/2 tasse de ce mélange sec pour l'enrobage initial.
- Ajoutez progressivement de l'eau gazeuse froide ou de la bière au mélange de farine restant, en fouettant jusqu'à obtenir une consistance de pâte.
- Préparez une station de panure avec de la farine sèche réservée, de la pâte humide et éventuellement un enrobage supplémentaire.
- Enrobez les rondelles d'oignon sèches dans la farine sèche réservée, puis plongez-les dans la pâte humide, en laissant l'excès de pâte s'égoutter.
- Pour plus de croustillant, plongez les rondelles enrobées dans le mélange de farine sec à nouveau.
- Chauffez de l'huile dans une casserole à fond épais à 350-375°F.
- Abaissez soigneusement quelques rondelles d'oignon dans l'huile chaude, en les faisant frire par petites quantités pour éviter de surcharger.
- Faites frire pendant 2-3 minutes jusqu'à ce qu'elles soient dorées, en les retournant à mi-cuisson.
- Transférez les chips frites dans un endroit pour refroidir et saupoudrez de sel supplémentaire.
- Maintenez la température de l'huile entre les lots pour une friture cohérente.
- Dégustez-les frais pour le meilleur croustillant.