Last Tuesday, I came home after a long day at work, starving and exhausted. My kids were asking “What’s for dinner?” and I had maybe 20 minutes before meltdowns would begin. I opened my pantry, grabbed a few simple ingredients, and threw together this One-Pot Tomato Basil Pasta. Thirty minutes later, everyone was happy, fed, and I only had one pot to clean. That’s when I knew this recipe was a keeper.
Welcome to my kitchen! Today, I’m excited to share with you a recipe that’s become a staple in my home: One-Pot Tomato Basil Pasta. This dish is not just about the convenience of using one pot. It’s also about creating a flavorful, comforting meal that everyone will love. The pasta cooks right in the sauce, soaking up all those amazing flavors. You don’t need to boil water in a separate pot or dirty multiple dishes.
Why I love this recipe: It’s quick, easy, and perfect for busy weeknights. Plus, it’s packed with fresh flavors that make it feel like a special treat. My kids actually ask for this meal by name now. My husband loves that he can make it himself without calling me three times for help. And I love that cleanup takes about two minutes.
The best part? You probably already have most of these ingredients in your kitchen right now. I’ve made this recipe on those nights when I thought there was “nothing to eat” in the house. A can of tomatoes, some pasta, and a few herbs can create something magical. It’s comfort food that doesn’t weigh you down or take hours to prepare.
I learned to make one-pot pasta during college when I lived in a tiny apartment with a kitchen the size of a closet. Back then, I didn’t want to wash a million dishes. Now, with a family and a full-time job, that same principle applies. Less cleanup means more time with the people I love. This recipe has followed me through different stages of life, and it never gets old.
Ingredients You’ll Need for One-Pot Tomato Basil Pasta
Let me walk you through what you’ll need for this simple tomato basil pasta recipe. I’m going to be honest about what really matters and where you can take shortcuts. Not every ingredient needs to be fancy or expensive to make this dish shine.
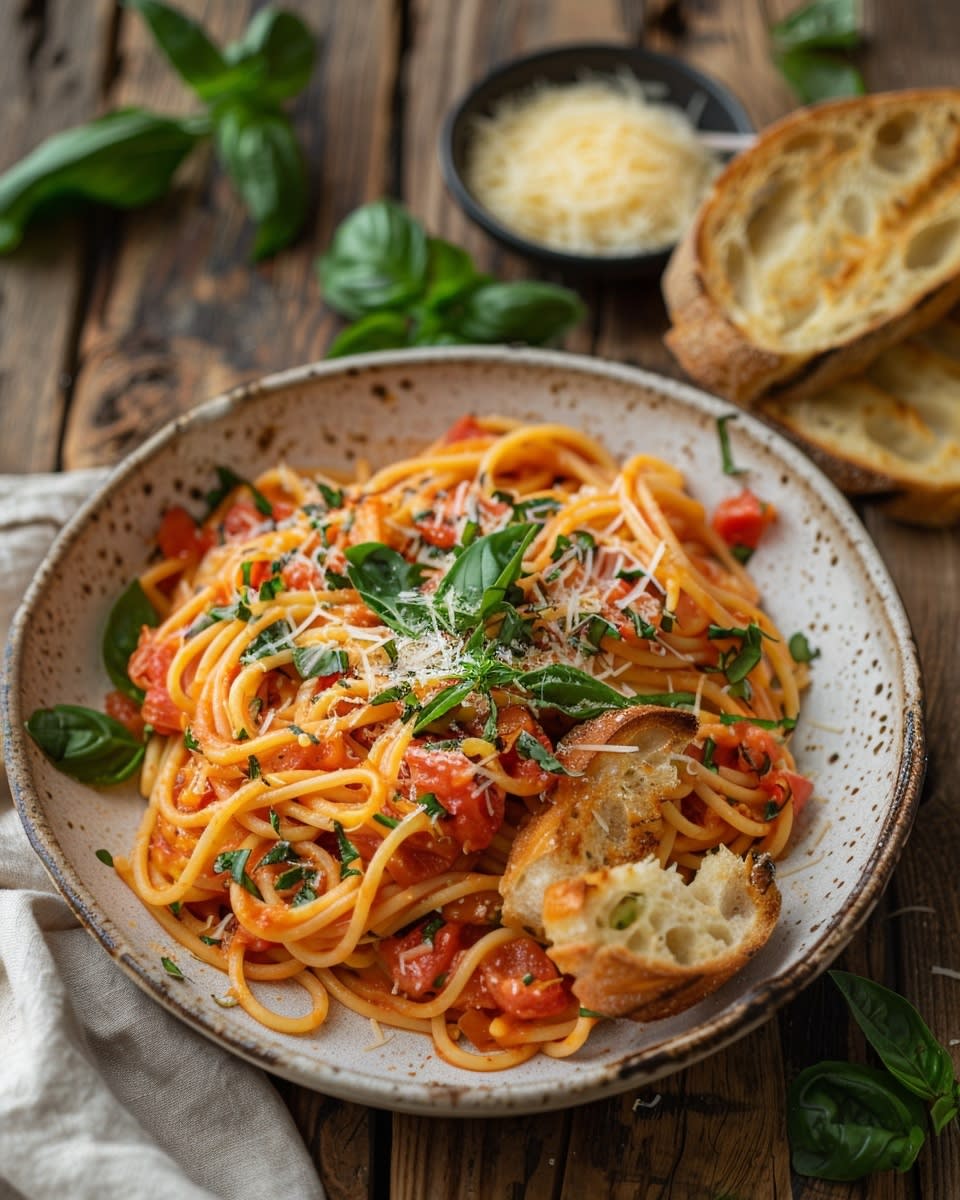
Fresh tomatoes or canned diced tomatoes form the base of your sauce. I use whichever I have on hand. Fresh tomatoes are wonderful in summer when they’re ripe and sweet. But canned tomatoes work beautifully year-round. I actually prefer canned tomatoes in winter because fresh ones can be bland and pricey. A 28-ounce can of good quality diced tomatoes will serve four people easily.
Fresh basil is where I refuse to compromise. It really makes a difference! Dried basil just doesn’t give you that bright, aromatic flavor. I keep a basil plant on my windowsill year-round. If you don’t have fresh basil, hit the grocery store and grab a bunch. You’ll use about a cup of torn leaves for this recipe. The smell alone is worth it.
Olive oil adds richness and authentic Italian taste. You don’t need the most expensive bottle in the store. But skip the bottom-shelf stuff too. A mid-range extra virgin olive oil works great. I use about three tablespoons for a full pot of pasta. It helps the flavors blend together and keeps the pasta from sticking.
Garlic is essential for adding a bit of zing to your dish. I use four or five cloves, minced. Yes, that might seem like a lot. But remember, this is a one-pot meal feeding several people. The garlic mellows as it cooks and adds depth to the sauce. I’ve made this with as few as two cloves when I’ve run low. It still tastes good, just not as robust.
Spaghetti or any pasta of your choice is the star of the show. I typically use 12 ounces of dried pasta. Spaghetti is traditional, but I’ve used penne, rigatoni, and even farfalle with great results. My kids prefer rotini because it’s fun to eat. Use what you have or what your family likes. The cooking method works with any shape.
Salt and pepper might seem basic, but they’re crucial for enhancing the flavors. I add salt at different stages of cooking. A pinch when I start the garlic, more when I add the tomatoes, and a final taste-test before serving. Don’t skip the salt thinking it’s healthier. Under-seasoned pasta is sad pasta. Just use it wisely.
Optional: Parmesan cheese adds a creamy, salty finish that takes this dish to the next level. I grate fresh Parmesan right over the top before serving. The pre-grated stuff from a can works too if that’s what you have. My middle child won’t eat it without a mountain of cheese on top. That’s fine by me. It adds protein and calcium.
Quick tip: If you’re short on time, use canned tomatoes. They work just as well and save you the hassle of peeling and chopping. I’ve served this dish to guests who assumed I’d used fresh tomatoes. Canned tomatoes are already peeled, diced, and ready to go. Many are packed at peak ripeness, so they actually taste better than off-season fresh tomatoes.
Here’s what I keep stocked in my pantry for this recipe:
- Two or three cans of diced tomatoes (so I always have backups)
- A few boxes of pasta in different shapes
- Olive oil (I buy medium-sized bottles so it doesn’t go rancid)
- Garlic bulbs stored in a cool, dark spot
- Salt and pepper in my everyday shakers
The only thing I buy fresh each week is basil. I tried growing it from those grocery store packages. Sometimes it survives, sometimes it doesn’t. Either way, a dollar or two for fresh basil is worth every penny for the flavor it brings to this dish.
I also keep a block of Parmesan in my fridge. It lasts for weeks and tastes so much better than pre-grated cheese. I bought a simple handheld grater for about five dollars. My kids fight over who gets to grate the cheese. It’s become part of our cooking routine. These small touches make cooking feel less like a chore and more like something we do together.


Step-by-Step Instructions to Make One-Pot Tomato Basil Pasta
Now that you’ve got your ingredients ready, let’s actually make this thing. I’m going to walk you through this exactly how I do it on a Tuesday night when I’m tired and just want to eat.
Start by pulling out your largest pot. I mean the big one you’d use for soup or boiling corn on the cob. You need room for the pasta to move around. Place it on the stove and pour in about three tablespoons of olive oil. Turn the heat to medium and let the oil warm up for maybe thirty seconds. You’ll know it’s ready when it starts to shimmer a bit. Don’t crank the heat too high or you’ll burn the garlic in the next step. Trust me on this. I’ve made that mistake more times than I want to admit.
Toss your minced garlic into that warm oil. Here’s the thing: garlic goes from perfect to burned in about fifteen seconds if you’re not paying attention. Stir it around with a wooden spoon and just let it get fragrant. You want it to smell amazing and turn just barely golden. This takes about a minute, maybe less. My whole house smells like an Italian restaurant at this point, and my kids come running to the kitchen asking when dinner will be ready.
Next, add your tomatoes. If you’re using canned, just pour the whole thing in, juice and all. That liquid is gold for your sauce. If you’re using fresh tomatoes that you’ve chopped up, dump those in too. The tomatoes will start bubbling almost immediately. Let them simmer for about five minutes, stirring every now and then so nothing sticks to the bottom. The tomatoes will break down a bit and release their juices. This is when the magic starts happening. You’re building the foundation of your sauce right here.
Now comes the part that makes this a one-pot wonder. Pour in about three cups of water. Some people use broth here, and that’s fine if you want extra flavor. I usually just use water because I’m trying to keep things simple. Bring everything to a good rolling boil. This takes maybe three to five minutes depending on your stove.
Once you’ve got a nice boil going, add your pasta. Yes, you’re putting dried pasta right into the tomato mixture. It feels weird the first time you do it. You might think it won’t work. But it absolutely does. The pasta will absorb the tomato flavor as it cooks, which is so much better than boiling it separately in plain water. Stir the pasta so it doesn’t clump together or stick to the bottom of the pot.
Check your pasta package for cooking time. If it says ten minutes, set a timer for eight. You want to stir this every couple of minutes. I know that sounds like babysitting, but it’s important. The pasta releases starch as it cooks, which thickens the sauce naturally. But it can also stick if you’re not paying attention. I usually stand there and stir while scrolling through my phone or chatting with whoever’s in the kitchen with me.
Here’s something I learned the hard way: the pot will look too watery at first. Don’t panic and don’t drain anything. As the pasta cooks, it absorbs a ton of liquid. By the time your pasta is al dente, the sauce will have thickened to just the right consistency. If it looks too dry, add a splash more water. If it seems too soupy, let it cook uncovered for an extra minute or two.
When the pasta is tender but still has a little bite to it, turn the heat down to low. Tear up your fresh basil leaves and stir them in. Don’t chop them with a knife if you can avoid it. Tearing them with your hands releases more flavor and keeps them from turning dark as quickly. Let everything simmer together for another minute or two. The basil will wilt and perfume the whole dish. This is my favorite moment in the cooking process.
Taste your pasta now. Does it need salt? Probably yes. Add it a little at a time until it tastes right to you. Crack in some black pepper too. I’m generous with pepper because I love that little kick it gives. My kids prefer less, so I usually add more to my own bowl at the table.
If you’re using Parmesan cheese, you can stir some right into the pot or just sprinkle it on top when you serve. I do both because cheese makes everything better. The heat from the pasta will melt the cheese slightly, creating these little creamy pockets throughout the dish.
Serve this hot, straight from the pot. I usually put the whole pot on a trivet in the middle of the table and let everyone help themselves. It stays warm that way, and there’s something cozy about family-style serving. Plus, one less dish to wash if I’m not transferring it to a serving bowl.
By the way, if you love creamy pasta dishes, you might also enjoy my Creamy Garlic Chicken Pasta which uses a similar one-pot method but with a richer sauce. The technique carries over really well.
Variations and Substitutions for One-Pot Tomato Basil Pasta
One of the best things about this recipe is how flexible it is. I’ve made probably fifty different versions depending on what I had in the fridge or what my family was in the mood for.
For a vegetarian boost, throw in some vegetables. I add spinach all the time because my kids don’t really notice it once it wilts into the sauce. Just toss in a few handfuls during the last two minutes of cooking. Mushrooms are another great addition. Slice them up and sauté them with the garlic at the beginning. They add this earthy, meaty flavor that makes the dish more substantial. Zucchini works too if you dice it small. My neighbor adds cherry tomatoes on top of the canned ones, and they burst while cooking, adding little pockets of sweetness.
If you want something heartier, protein is the way to go. Cooked chicken is my go-to when I have leftovers from roasting a chicken earlier in the week. I dice it up and stir it in right at the end, just to warm it through. Shrimp is fantastic if you want to make this feel a bit more special. Add raw shrimp during the last three minutes of cooking. They’ll turn pink and cook perfectly in that time. My husband loves when I add Italian sausage. I brown it first in the pot, remove it, then build the sauce in those flavorful drippings. Then I add the sausage back at the end.
For anyone eating gluten-free, this recipe works beautifully with gluten-free pasta. Just watch the cooking time because different brands vary a lot. Some gluten-free pastas get mushy really fast. Others take longer than regular pasta. Check the package and maybe start tasting a minute or two before the recommended time. I’ve also made this with chickpea pasta for extra protein, and it turned out great. Similar to how Easy Mac and Cheese with Breadcrumbs can be adapted for different dietary needs, this dish is incredibly forgiving.
Funny enough, my pickiest eater loves when I add a spoonful of cream at the end. It turns the sauce slightly pink and makes it taste richer. If you want to try this creamier version, check out my Creamy Tomato Basil Pasta recipe for the full treatment with cream and extra Parmesan. It’s basically this recipe’s fancier cousin.
You can also change up the herbs. I’ve used oregano instead of basil when I’ve run out. It gives the dish a more pizza-like flavor that my kids actually request sometimes. Fresh parsley at the end adds brightness. A pinch of red pepper flakes gives it a nice heat if you’re into that.
Some nights I’ll add olives and capers for a Mediterranean twist. Other times I keep it super simple with just the basic ingredients. The recipe adapts to whatever mood I’m in or whatever I need to use up from the fridge.
If you’re feeding a crowd and want to make this more filling, you could serve it alongside Baked Ziti with Ground Beef or just add ground beef directly to this recipe. Brown the meat with the garlic, then proceed with the rest of the steps. It becomes a complete meal that way.
The beauty of one-pot pasta is that it’s a template. Once you master the basic technique, you can riff on it endlessly. I’ve never made it exactly the same way twice, and that’s part of what keeps it interesting even though I make it all the time.


Tips for Perfecting Your One-Pot Tomato Basil Pasta
After making this recipe dozens of times, I’ve picked up a few tricks that really elevate the final dish. These aren’t complicated techniques or anything you need culinary school for. Just little things I’ve learned through trial and error that make a noticeable difference.
Quality ingredients actually matter here. I’m not someone who insists on fancy ingredients for everything. Sometimes the store brand works just fine. But for this particular dish, especially the olive oil and tomatoes, it’s worth spending a couple extra dollars. The thing is, this is a simple recipe without a lot of ingredients to hide behind. What you put in really shows up in the taste.
When it comes to olive oil, look for something labeled “extra virgin.” It doesn’t have to be imported from a specific hillside in Tuscany or anything like that. But avoid the super cheap stuff that tastes more like vegetable oil. I learned this when my mother-in-law visited and made this recipe with her favorite olive oil. It was like eating a completely different dish. The flavor was brighter, fruitier, more vibrant. Ever since then, I buy mid-range olive oil for cooking and keep a nicer bottle for finishing dishes. By the way, olive oil contains unsaturated fats that are actually good for you, unlike the saturated fats in butter, so you’re making a healthier choice too.
For tomatoes, I swear by San Marzano or fire-roasted varieties when I’m buying canned. San Marzano tomatoes are sweeter and less acidic. They’re grown in volcanic soil near Mount Vesuvius in Italy, and there’s something special about them. Fire-roasted tomatoes add this subtle smoky flavor that makes people ask what your secret ingredient is. The difference between these and the cheapest can on the shelf is maybe a dollar. That dollar is worth it.
Here’s something nobody tells you: the pasta cooking time on the box is just a suggestion. Different stove temperatures, pot sizes, and even humidity levels can affect how fast your pasta cooks. I’ve made this recipe where the pasta was done in seven minutes. Other times it took twelve. You have to taste as you go. Start checking about two minutes before the package says it should be done.
Al dente is what you’re aiming for. That’s Italian for “to the tooth,” which basically means the pasta should have a slight firmness when you bite it. It shouldn’t crunch, but it shouldn’t be soft and mushy either. My grandmother always said if your pasta sticks to the wall when you throw it, it’s done. That’s kind of a myth, though. It sticks when it’s overcooked too. Just taste it. Your mouth is a better judge than your wall.
Overcooked pasta is honestly one of the saddest food mistakes. It gets gummy and loses its texture completely. With one-pot pasta, there’s no draining, so overcooked pasta will continue to absorb liquid and get mushier. If you think it’s almost done, it probably is. Take it off the heat. The residual heat will finish the cooking while you’re adding the basil and cheese.
Seasoning is where you make this recipe yours. I’ve given you measurements and suggestions, but your taste buds are different from mine. Maybe you grew up in a household where everything had tons of garlic. Or maybe garlic gives you heartburn and you need to use less. That’s completely fine. Cooking isn’t like baking where you need exact measurements. It’s more like jazz. You follow the basic melody and then improvise.
I taste the dish at least three times while cooking. Once after the tomatoes have simmered for a bit. Again when the pasta is almost done. And a final time right before serving. Each time, I’m asking myself: Does this need more salt? More pepper? Is the garlic coming through enough? Would a pinch of sugar balance the acidity? Some canned tomatoes are more acidic than others. A half teaspoon of sugar can round that out without making the sauce taste sweet.
Here’s a weird tip that changed everything for me: save some of the pasta cooking liquid before you serve. Even though you’re not draining this pasta, the liquid in the pot gets pretty thick and starchy. If I’m not serving immediately or if I know there will be leftovers, I’ll scoop out about a cup of that liquid into a mug and set it aside. When I reheat the pasta later, I add a splash of that liquid back in. It loosens everything up and brings back the creamy texture. Without it, reheated pasta can be dry and clumpy.
Another thing I’ve learned is to use a wooden spoon instead of a metal one. Metal can scratch your pot if it’s non-stick, and it also conducts heat, so you might burn your hand if you set it down. Wood is gentler and just feels more traditional. My wooden spoon has been with me for ten years. It’s stained red from tomato sauce and probably has absorbed the flavors of a hundred meals. I’m weirdly attached to it.
If you’re doubling this recipe to feed a crowd or meal prep for the week, don’t just double the water. You need more liquid than usual, but not twice as much. Pasta absorbs a fairly consistent amount of water per ounce. Start with maybe one and a half times the water and add more if needed. It’s easier to add liquid than to take it away.
Timing is everything with fresh basil. Add it too early and it turns dark and loses its brightness. Add it at the very end and it stays vibrant green and aromatic. I tear the leaves right over the pot and give everything a quick stir. The heat wilts the basil just enough to release its oils without cooking it to death. My kids call it “the green stuff,” and they’ve learned to expect that fresh smell right before dinner is ready.
One more thing: let the pasta rest for a minute or two before serving. I know everyone’s hungry, including me. But if you let it sit off the heat for just a moment, the sauce thickens up a little more and clings to the pasta better. It also gives you time to grate cheese, set the table, or pour drinks. That minute of patience pays off when you take your first bite and everything’s the perfect consistency.
I’ve also found that the type of pot matters more than I thought. A wide, shallow pot works better than a tall, narrow one. The pasta has more room to spread out and cook evenly. I use a Dutch oven most of the time. It’s heavy, distributes heat well, and holds temperature beautifully. If you don’t have one, any large pot will work. Just make sure it’s big enough that you’re not cramming the pasta in there.
Finally, don’t skip the finishing touches. A drizzle of good olive oil right before serving adds shine and richness. A crack of fresh black pepper on top looks pretty and adds a little kick. Fresh basil leaves as garnish make it look like something from a restaurant. These little things take five seconds and make people think you spent way more effort than you actually did.
If you’re looking for more one-pot inspiration or want to explore other easy pasta and noodle dishes, there’s a whole world of simple, delicious recipes out there that follow this same philosophy of maximum flavor with minimal cleanup.
Frequently Asked Questions About One-Pot Tomato Basil Pasta
Can I use other types of pasta for this recipe?
Absolutely! I’ve made this with penne, rigatoni, farfalle, rotini, and even orecchiette. The cooking method works with pretty much any pasta shape. Just keep an eye on the cooking time since different shapes cook at different rates. Smaller shapes like ditalini might be done in six or seven minutes, while larger tubes like rigatoni might take twelve. The key is to stir frequently and taste as you go, regardless of what shape you choose.
How do I store leftover one-pot tomato basil pasta?
Put it in an airtight container and stick it in the fridge. It’ll keep for three to four days easily. I’ve even eaten it on day five and been fine, but I wouldn’t push it much further than that. When you reheat it, add a splash of water or olive oil to loosen it up since the pasta absorbs liquid as it sits. I usually reheat it in a pan on the stove over medium-low heat, stirring frequently. Microwave works too, just stir it halfway through and add a little liquid.
Is this dish suitable for vegans?
Yes, as long as you skip the Parmesan cheese or use a vegan alternative. The base recipe with tomatoes, basil, garlic, olive oil, and pasta is completely plant-based. There are some really good vegan Parmesan options available now made from cashews or nutritional yeast. My friend who’s vegan uses nutritional yeast and says it gives a nice cheesy, nutty flavor. You won’t even miss the dairy version if you find a brand you like.
Can I make this dish ahead of time?
The sauce can definitely be made ahead. I’ll sometimes make a big batch of the tomato-garlic-basil sauce on Sunday and keep it in the fridge. Then during the week, I just heat it up, add water, and cook the pasta in it. The whole dish doesn’t hold up as well if you make it completely ahead because the pasta continues to absorb liquid and can get mushy. But making components ahead and assembling them fresh works great and still saves time.
What can I substitute for fresh basil?
Dried basil will work in a pinch, but use less since dried herbs are more concentrated. I’d start with maybe a tablespoon of dried basil instead of a cup of fresh. Add it earlier in the cooking process so it has time to rehydrate and release its flavor. Other fresh herbs like parsley or oregano can work too. They’ll change the flavor profile, but it’ll still be delicious. I’ve also used a combination of dried Italian seasoning when I had absolutely nothing else, and it turned out fine.
Why is my sauce too watery?
This usually happens if you added too much water at the beginning or if you didn’t let it cook long enough. The pasta needs time to absorb the liquid and release its starches, which naturally thickens the sauce. If your sauce is too thin, just let it simmer uncovered for a few extra minutes. The liquid will evaporate and concentrate. You can also add a bit more pasta if you have it, since pasta absorbs a lot of liquid as it cooks.
Can I freeze one-pot tomato basil pasta?
You can, but I’ll be honest, it’s not my favorite way to preserve it. Pasta changes texture when frozen and reheated. It tends to get a bit mushy. If you do want to freeze it, slightly undercook the pasta before freezing. Let it cool completely, then freeze in portion-sized containers for up to two months. Thaw overnight in the fridge and reheat gently with added liquid. The sauce freezes beautifully on its own, though, so I’d recommend freezing just the sauce and making fresh pasta when you’re ready to eat.
What if I don’t have a large enough pot?
You can make a smaller batch or cook in two pots if needed. The recipe scales down easily. Use 6 ounces of pasta, one can of tomatoes, and adjust the other ingredients proportionally. Cooking in a pot that’s too small will make the pasta cook unevenly because it’s too crowded. If you’re serious about one-pot cooking, investing in a good Dutch oven is worth it. I use mine for everything from pasta to soup to no-knead bread.
How do I keep the pasta from sticking together?
Stirring is your friend here. I stir mine every two minutes or so while it’s cooking. The pasta releases starch as it cooks, which can make it stick. Stirring redistributes that starch throughout the liquid instead of letting it clump the pasta together. Also, make sure you have enough liquid in the pot. If the pasta is too crowded or there’s not enough water, it’s more likely to stick. Some people add a little extra olive oil too, which helps.
Can I add protein to this pasta dish?
Definitely! Grilled chicken, sautéed shrimp, Italian sausage, or even white beans all work beautifully. I usually cook the protein separately and add it at the end, but ground meat can be browned right in the pot before you start the sauce. Shrimp can be added raw during the last three minutes of cooking and they’ll cook perfectly in the sauce. Canned white beans are my favorite quick addition since they don’t need any prep. Just drain, rinse, and stir them in during the last couple minutes.
This recipe has honestly become one of those meals I can make with my eyes closed at this point. It’s carried me through busy weeknights, last-minute dinner guests, and those days when I just needed something comforting and easy. I hope it becomes that kind of recipe for you too, the one you turn to when you need a reliable win on the dinner table.
Ingredients
Equipment
Method
- Faites chauffer 3 cuillères à soupe d'huile d'olive dans votre plus grand pot à feu moyen pendant environ 30 secondes jusqu'à ce qu'elle scintille.
- Ajoutez l'ail haché au pot et faites-le revenir jusqu'à ce qu'il soit parfumé et à peine doré, environ 1 minute.
- Ajoutez les tomates en conserve ou fraîches (avec leurs jus) au pot et laissez mijoter pendant environ 5 minutes, en remuant de temps en temps.
- Ajoutez environ 3 tasses d'eau et portez le mélange à ébullition.
- Une fois à ébullition, ajoutez les pâtes sèches dans le pot, en remuant pour éviter qu'elles ne collent.
- Faites cuire les pâtes selon les instructions sur l'emballage, en remuant toutes les quelques minutes et en vérifiant la cuisson une ou deux minutes avant la fin.
- Une fois que les pâtes sont al dente, baissez le feu et incorporez les feuilles de basilic déchirées.
- Goûtez et ajustez l'assaisonnement avec du sel et du poivre selon vos préférences.
- Si vous utilisez du fromage parmesan, incorporez-le ou saupoudrez-le sur le dessus avant de servir.
- Servez chaud depuis le pot, avec la possibilité pour chacun de se servir.