Welcome to My Favorite Easy Mac and Cheese with Breadcrumbs
Last Tuesday night, my daughter walked through the door after soccer practice, dropped her bag, and said those familiar words every parent knows: “Mom, I’m starving!” I opened the fridge and realized I hadn’t planned anything for dinner. That’s when I pulled out my secret weapon—this easy mac and cheese with breadcrumbs recipe. Twenty-five minutes later, we were all sitting around the table with full plates and happy faces.
You know that feeling when you need something quick but don’t want to sacrifice taste? That’s exactly why I created this recipe. It’s not fancy or complicated. There are no hard-to-find ingredients or tricky techniques. Just simple, honest comfort food that works every single time.
I’ve made this dish at least fifty times over the past year. It started as a desperate weeknight solution and turned into something my family requests by name. My youngest calls it “the crunchy cheese pasta,” and honestly, that’s a pretty perfect description.
The best part? You don’t need to be a trained chef to pull this off. If you can boil water and stir, you can make this mac and cheese. I’ve taught my teenage son to make it, and he’s the kid who once burned microwave popcorn. If he can do it, anyone can.
Why This Easy Mac and Cheese Recipe Works Every Time
Let me tell you what makes this recipe different from all the others floating around online. I’ve tried dozens of mac and cheese variations. Some were too runny. Others turned into a solid brick after five minutes. This one hits the sweet spot every time.
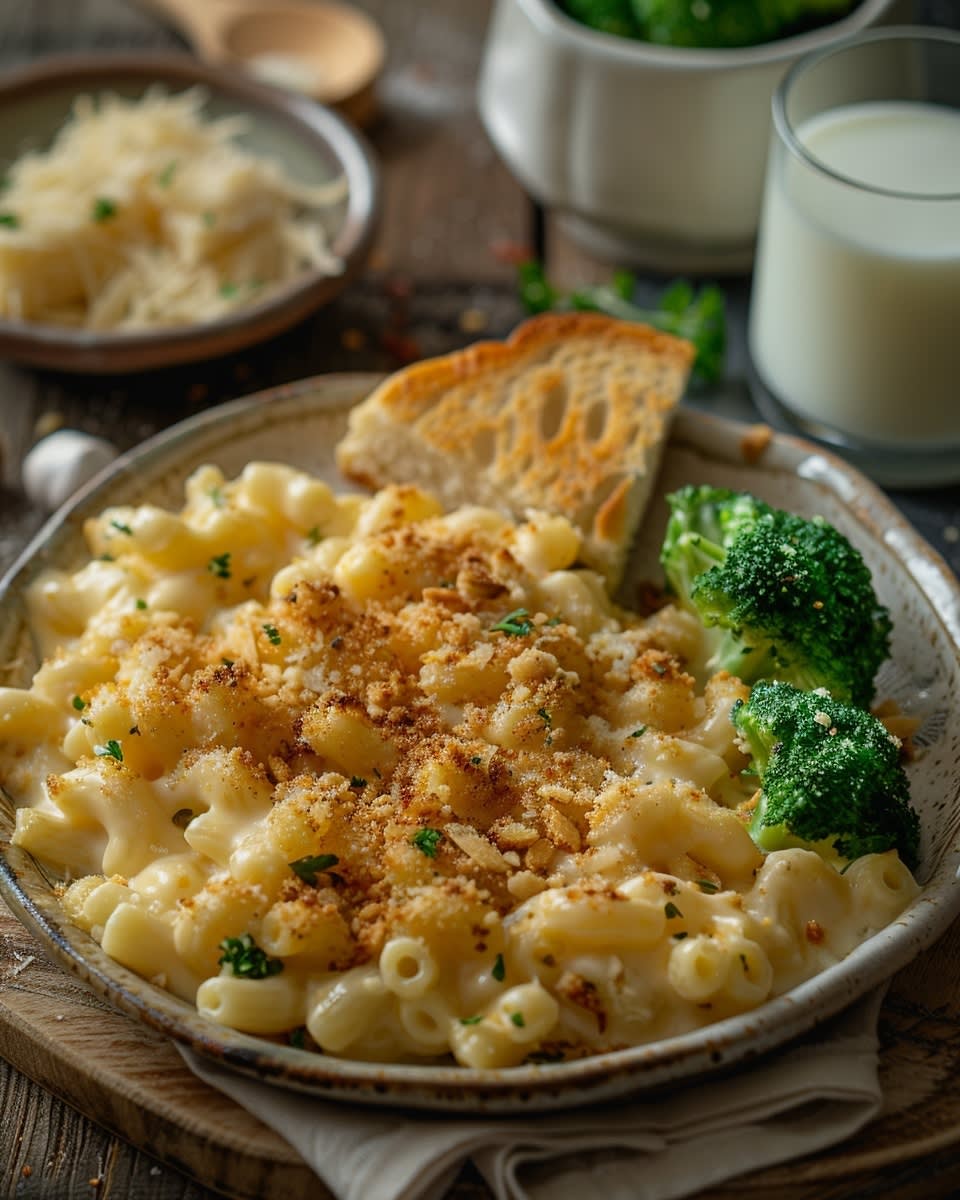
The secret is in the breadcrumbs. That golden, crispy layer on top changes everything. It adds texture and makes this simple pasta dish feel special. When you take that first bite and hear the crunch before hitting the creamy cheese underneath, you’ll understand what I mean.
This recipe uses ingredients you probably already have in your pantry. No specialty cheeses that cost fifteen dollars. No obscure spices from the fancy grocery store. Just regular pasta, butter, milk, cheese, and breadcrumbs. That’s it.
I love that I can start this recipe with zero planning. There have been days when I completely forgot about dinner until 5:30 PM. This recipe has saved me more times than I can count. The total cooking time is about 25 minutes from start to finish.
Another reason this works so well is that kids actually eat it. My nephew is the pickiest eater I know. He won’t touch vegetables and turns his nose up at most dinners. But he eats two bowls of this mac and cheese every time I make it. That’s a win in my book.
The Magic of Adding Breadcrumbs to Mac and Cheese
Before I discovered the breadcrumb trick, my mac and cheese was just okay. It tasted fine but looked boring. Then one night I had leftover bread and decided to toast some crumbs on top. Everything changed.
The crispy breadcrumb topping does three important things. First, it adds that satisfying crunch. Second, it soaks up butter and gets golden brown in the oven. Third, it makes the dish look restaurant-quality without any extra effort.
You can use any type of breadcrumbs you have on hand. I’ve tried regular store-bought breadcrumbs, panko, and even crushed crackers. They all work great. Panko gives you the crunchiest result, but plain breadcrumbs are perfect too.
Some people skip the breadcrumb step because they think it’s extra work. Trust me, it takes two minutes and makes a huge difference. You just mix the crumbs with melted butter, sprinkle them on top, and pop the dish in the oven. That’s all.
The contrast between the crunchy top and creamy middle is what makes this dish memorable. It’s the difference between eating plain pasta and eating something that feels like a treat.
Perfect for Busy Weeknights and Special Occasions
I make this easy mac and cheese for regular Tuesday dinners, but I also bring it to potlucks. Last month I took it to a neighborhood gathering, and three different people asked for the recipe. One woman said it was better than her grandmother’s version. That’s high praise.
This dish works for so many different situations. Need a quick lunch? Make a small batch. Feeding a crowd? Double the recipe and use a bigger pan. Want comfort food on a rainy day? This is your answer.
I’ve served this to toddlers and grandparents. Everyone loves it. There’s something universal about creamy, cheesy pasta with a crunchy top. It doesn’t matter if you’re seven or seventy.
The recipe is also forgiving. If you add a little too much milk, it’s fine. If you use slightly less cheese, it still works. You don’t need to measure everything with scientific precision. That’s what makes it perfect for relaxed, stress-free cooking.
On busy school nights when everyone has different schedules, I can make this and keep it warm in the oven. People can grab a serving whenever they get home. It holds up well and doesn’t get dry or weird.
What You’ll Love About This Recipe
Here’s what makes this mac and cheese with breadcrumbs stand out from other recipes:
- Ready in 25 minutes: From opening the pantry to serving dinner, this takes less than half an hour
- Simple ingredient list: No hunting for unusual items at specialty stores
- Kid-approved: Even picky eaters clean their plates
- Easily doubled: Perfect for feeding large groups or meal prepping
- Budget-friendly: Costs less than takeout and tastes better
- Customizable: Add your favorite extras like bacon or vegetables
- Impressive presentation: That golden breadcrumb topping looks beautiful
I’ve tweaked this recipe over many months of making it. I’ve figured out the exact cheese ratio that gives you creamy sauce without being too heavy. I know the right oven temperature that browns the breadcrumbs without burning them.
You’re getting a tested, proven recipe that actually works. Not something I threw together once and hoped for the best. This is the version I make for my own family at least twice a month.
The other thing I love is how this recipe makes your house smell amazing. When those breadcrumbs start toasting in the oven, the whole kitchen fills with this warm, buttery, cheesy smell. It’s the kind of aroma that makes everyone suddenly appear in the kitchen asking when dinner will be ready.
If you’re tired of complicated recipes with twenty ingredients and three hours of work, this is for you. If you want something reliable that your family will actually eat, this is for you. If you just need a warm, comforting meal without the stress, this is definitely for you.


Gathering Your Ingredients for Homemade Mac and Cheese
Alright, now that you know why this recipe is worth making, let’s talk about what you actually need to have in your kitchen. I’m going to walk you through each ingredient like we’re standing in my kitchen together, and I’ll explain why each one matters.
First up is the pasta. I usually grab elbow macaroni because that’s traditional and it holds the cheese sauce perfectly. But here’s the thing—I’ve also used shells, cavatappi, and even rotini when that’s what I had in the cupboard. The world doesn’t end if you use a different shape. Just pick something with ridges or curves that can catch all that creamy sauce. You’ll need about one pound of pasta, which is a standard box.
For the cheese, I use sharp cheddar most of the time. It melts beautifully and has enough flavor that you don’t need to add a million other things. I buy the block cheese and shred it myself because pre-shredded cheese has that coating stuff that makes it not melt as smoothly. It takes an extra three minutes to grate it, but it’s worth it. You’ll want about three cups of shredded cheese. Sometimes I throw in half a cup of mozzarella if I’m feeling fancy, but that’s totally optional.
Next comes butter. Real butter, not margarine. I learned that lesson the hard way when I tried to save money and used the cheap spread. The sauce tasted weird and oily. You need about four tablespoons of butter—some for the sauce and some for those gorgeous breadcrumbs on top.
Milk is another key player here. I use whole milk because it makes the sauce richer and creamier. My sister always asks if she can use skim milk, and I tell her she can, but it won’t be quite as good. It’s like the difference between regular ice cream and the low-fat version. Both work, but one is definitely better. You’ll need about two and a half cups.
For thickening the sauce, I use all-purpose flour. Just a quarter cup is enough to give the sauce that perfect consistency. Not too thick, not too runny. Some recipes use heavy cream or evaporated milk, but I like keeping things simple with ingredients I always have around.
Now for the star of the show—those crunchy breadcrumbs. You can use regular breadcrumbs or panko. I keep both in my pantry because I’m indecisive like that. Panko gives you bigger, crunchier pieces. Regular breadcrumbs create a more even, golden crust. Either way, you’ll need about one cup. Mix them with two tablespoons of melted butter before sprinkling them on top.
Don’t forget salt and pepper. I add salt to the pasta water, and then season the cheese sauce to taste. A little black pepper gives it a tiny kick without making it spicy. My mother-in-law likes to add a pinch of garlic powder and a dash of paprika to her breadcrumbs, which I’ve started doing too. It adds this subtle warmth that people can’t quite identify but definitely notice.
By the way, if you’re looking to expand your pasta repertoire beyond mac and cheese, you might want to try creamy tomato basil pasta for another comforting weeknight option.
Making the Best Mac and Cheese Step by Step
Let me walk you through exactly how I make this every single time. I’ve got the process down to a rhythm now, and once you do it once or twice, you’ll have it memorized too.
Start by preheating your oven to 350 degrees Fahrenheit. I always forget this step and then have to wait around awkwardly with my assembled dish, so learn from my mistakes. Get that oven going first thing.
Fill a large pot with water—I’m talking really fill it, about three-quarters full. Add a generous amount of salt. My grandmother used to say the water should taste like the ocean, and she wasn’t wrong. That salt flavors the pasta from the inside out. Bring it to a rolling boil over high heat.
Once the water is boiling like crazy, add your pasta. Give it a good stir so nothing sticks to the bottom. Cook it according to the package directions, but here’s my trick—I always take it off one minute early. The pasta will keep cooking in the oven later, and you don’t want it to turn mushy. Nobody likes mushy mac and cheese.
While the pasta is doing its thing, I start on the cheese sauce. This is where the magic happens. In a medium saucepan over medium heat, melt your butter. Once it’s melted and getting a little foamy, sprinkle in the flour. Whisk it together constantly for about two minutes. This is called making a roux, which sounds fancy but really just means you’re cooking the flour so it doesn’t taste raw.
The mixture will look like wet sand. That’s exactly what you want. Keep whisking it so it doesn’t burn on the bottom. My arm gets tired during this part, but it’s only two minutes. You can handle it.
Now comes the moment that always makes me a little nervous—adding the milk. Pour it in slowly while whisking continuously. If you dump it all in at once, you’ll get lumps. Trust me, I’ve done it. Pour a little, whisk like your life depends on it, pour a little more, keep whisking. The sauce will start thin and then gradually thicken up as it heats.
Keep cooking and stirring for about five minutes until the sauce coats the back of your spoon. You’ll know it’s ready when you can draw a line through it with your finger and the line stays there for a second. That’s the perfect thickness for homemade mac and cheese.
Turn the heat down to low and start adding your shredded cheese. I do it in handfuls, stirring each batch in completely before adding more. This helps everything melt evenly. The sauce will turn into this glossy, smooth, gorgeous golden mixture. This is when I usually taste it and add salt and pepper. Start with half a teaspoon of salt and a quarter teaspoon of pepper, then adjust from there.
Funny enough, my husband always walks into the kitchen right at this moment because the smell is irresistible. I have to swat his hand away from stealing spoonfuls of sauce before it even makes it to the pasta.
By now your pasta should be done. Drain it well in a colander, but don’t rinse it. That starchy coating helps the sauce stick to every piece. Pour the drained pasta into a large bowl or straight back into the pot if you have room. Pour that beautiful cheese sauce over the pasta and stir everything together until every single noodle is coated.
Here’s where I need to tell you about something I learned after making this dish about ten times. Don’t skip the butter for the breadcrumbs. I thought I could just sprinkle dry breadcrumbs on top and save some calories. They came out pale and sad and basically flavorless. The butter makes them toast up golden brown and adds so much flavor. So melt those two tablespoons of butter, toss your breadcrumbs in it until they’re all coated, and then you’re ready for the final assembly.
Grab a 9×13 inch baking dish and give it a quick spray with cooking spray. Pour your mac and cheese into the dish and spread it out evenly. Then sprinkle those buttered breadcrumbs all over the top. I like to make sure I cover the entire surface so every bite has some crunch.
Pop the dish into your preheated oven and bake for about 20 minutes. You’re looking for the breadcrumbs to turn golden brown and the edges to start bubbling. If you want extra crispy breadcrumbs, turn on the broiler for the last two minutes, but watch it carefully because the line between golden and burnt is about thirty seconds under the broiler.
When it comes out of the oven, let it sit for about five minutes before serving. I know that’s torture when it smells so good, but it gives the sauce time to settle and thicken up a bit more. If you dig in immediately, it’ll be really loose and runny.
The whole process from start to finish takes about 25 minutes of active work, then 20 minutes in the oven. That’s less time than it takes to order delivery and wait for it to arrive, and you end up with something so much better.
If you’re in the mood for other satisfying pasta dishes, baked ziti with ground beef is another crowd-pleaser that uses similar techniques. Or if you want something a little more elegant, try spinach ricotta stuffed shells for your next dinner party.
Sometimes I like to jazz things up by adding crispy bacon pieces to the cheese sauce or stirring in some cooked broccoli. Last week I even mixed in some leftover rotisserie chicken and it became a complete meal. The base recipe is so solid that it can handle all kinds of additions without falling apart. That’s what makes it perfect for using up whatever you have in the fridge.
One more thing—this recipe is actually easier than the boxed stuff once you get the hang of it. And it tastes about a thousand times better. My kids won’t even eat the blue box anymore because they say it tastes “weird and fake” compared to this version. I call that a parenting win.
For those nights when you want something lighter but still pasta-related, garlic butter shrimp linguine is a nice change of pace from all the cheese and comfort food.


Tips for Perfecting Your Easy Mac and Cheese with Breadcrumbs
After making this dish more times than I can count, I’ve picked up some tricks that really make a difference. These aren’t things you’ll find in every cookbook, but they’re the little details that separate good mac and cheese from absolutely amazing mac and cheese.
First thing I need to talk about is cheese temperature. This might sound weird, but let your shredded cheese sit out for about fifteen minutes before you start cooking. Cold cheese straight from the fridge doesn’t melt as smoothly into the sauce. I learned this when I was rushing one night and threw ice-cold cheese into my hot sauce. It clumped up and took forever to melt properly. Room temperature cheese melts like a dream and creates that silky texture everyone loves.
Here’s something else about cheese—mixing different types changes everything. I know I said sharp cheddar works great on its own, and it does. But when I want to impress people, I do a combination. My favorite mix is two cups sharp cheddar, half a cup of gruyere, and half a cup of white cheddar. The gruyere adds this nutty, sophisticated flavor that makes people think you went to culinary school. My neighbor tried this version at a potluck last month and literally texted me at 10 PM asking for the exact cheese ratio.
The pasta cooking water is more important than most people realize. Besides salting it properly, save about a cup of that starchy water before you drain the pasta. If your cheese sauce seems too thick or your assembled dish looks dry, stir in a few tablespoons of that pasta water. The starch helps bind everything together and loosens the sauce without making it watery like regular water would. I keep a measuring cup right next to the stove so I remember to do this step.
Now let’s talk about those breadcrumbs because getting them perfect is an art form. If you want the absolute crunchiest topping, toast your breadcrumbs in a skillet before adding them to the dish. Takes about three minutes over medium heat, stirring constantly until they’re golden. Then toss them with the melted butter. Yes, this adds an extra step, but the texture is incredible. They stay crunchy even the next day, which doesn’t happen with untoasted crumbs.
Another breadcrumb trick I discovered by accident—add a tablespoon of grated parmesan to the breadcrumb mixture. I ran out of regular breadcrumbs one night and stretched what I had by mixing in some parmesan. The cheese creates these crispy, savory bits that add so much flavor. Now I do it every time, even when I have plenty of breadcrumbs.
If you’re curious about other ways to use breadcrumbs effectively or want more ideas for pasta and noodles dishes, there’s a whole world of recipes that benefit from this technique. Breadcrumbs are basically the secret weapon of home cooks everywhere.
When it comes to baking dishes, position matters more than you’d think. I always put my mac and cheese on the middle rack of the oven. Too close to the top and the breadcrumbs burn before the dish heats through. Too low and the top stays pale while the bottom gets overdone. Middle rack gives you even heating and perfect browning.
One mistake I made for way too long was using a baking dish that was too small. If you cram all the mac and cheese into a tiny dish, the middle stays gummy while the edges dry out. A 9×13 inch pan is perfect for the standard recipe. The mac and cheese should be about two inches deep—deep enough to stay creamy but shallow enough for the heat to penetrate evenly.
Here’s a game-changing tip for meal prep people. You can freeze this mac and cheese, but there’s a specific way to do it right. Assemble everything except the breadcrumbs. Cover it tightly with plastic wrap and then foil. Freeze for up to two months. When you’re ready to eat it, thaw it overnight in the fridge, add fresh breadcrumbs on top, and bake. The texture is almost as good as fresh. I make two pans now—one for dinner and one for the freezer. Future me is always grateful.
The sauce consistency is something people struggle with, so let me give you my foolproof method. When you’re making the cheese sauce and it looks too thick, add milk a tablespoon at a time. When it looks too thin, let it simmer for another minute or two to reduce. The perfect consistency coats the back of a spoon but still drips off slowly. Think somewhere between gravy and soup.
Seasoning is where most people play it too safe. Don’t be afraid to really taste your cheese sauce before mixing it with the pasta. It should taste slightly over-seasoned on its own because the pasta will dilute the flavor. I usually end up using about a full teaspoon of salt total and half a teaspoon of black pepper. Some days I add a tiny pinch of cayenne pepper—not enough to make it spicy, just enough to make people say “wow, what’s in this?”
Speaking of seasonings, mustard powder is my secret ingredient that nobody ever guesses. Just a quarter teaspoon stirred into the cheese sauce adds depth without making it taste like mustard. It enhances the cheese flavor the same way salt enhances everything else. My sister refused to believe me until I made two batches side by side. The one with mustard powder won unanimously.
If you’re watching ingredients and want to be more informed about what goes into your food, checking nutrition labeling guidelines can help you make better choices about cheese and dairy products. I started paying more attention to this stuff after my doctor visit last year, and it’s actually pretty interesting once you understand what you’re looking at.
Here’s something nobody tells you about homemade mac and cheese—it actually tastes better the next day. Something magical happens overnight where all the flavors blend together. The only downside is the breadcrumbs soften up. My solution is to scrape off the old breadcrumbs, add fresh ones with melted butter, and pop it back in the oven for ten minutes. Tastes like you just made it.
For serving, I learned this trick from my aunt who used to run a catering business. Let the dish rest for five minutes after it comes out of the oven, then run a knife around the edges before serving. This keeps the mac and cheese from sticking to the pan and makes serving so much easier. Also, use a wide spatula instead of a spoon. You get better portions with the crispy top intact.
If you’re making this for a crowd, keep it warm by tenting foil loosely over the top. Don’t seal it completely or the breadcrumbs will steam and get soggy. Just a loose tent keeps everything at the right temperature while people get their drinks and settle in.
Last thing I want to mention is experimenting with add-ins. The base recipe is fantastic, but once you master it, try different combinations. Roasted vegetables like cauliflower or butternut squash work surprisingly well. Caramelized onions add sweetness. Cooked ground sausage makes it hearty enough for a main course. Just don’t add too much stuff or you’ll lose that creamy, cheesy quality that makes mac and cheese what it is.
The beauty of this recipe is that it’s forgiving enough for beginners but has enough room for creativity that advanced cooks won’t get bored. Whether you follow it exactly or use it as a jumping-off point for your own variations, you’re going to end up with something delicious.
Frequently Asked Questions About Easy Mac and Cheese with Breadcrumbs
Can I use different types of cheese for this mac and cheese with breadcrumbs?
Absolutely, and I actually encourage it! Sharp cheddar is my go-to, but I’ve had great success mixing in gruyere, fontina, gouda, or even pepper jack for a spicy kick. The key is using at least half of a good melting cheese like cheddar or monterey jack to keep the sauce smooth. Avoid using all parmesan or romano because they don’t melt as well and can make the sauce grainy. I like doing a combination where about 70% is a melting cheese and 30% is a flavoring cheese for the best results.
How do I store leftover mac and cheese?
Let the mac and cheese cool down to room temperature first, which takes about thirty minutes. Transfer it to an airtight container and stick it in the fridge where it’ll keep for three to four days. I usually divide large batches into individual portions so I can grab exactly what I need for lunch without reheating the whole thing. If you leave it in the baking dish, just cover it tightly with plastic wrap or aluminum foil. The breadcrumbs will soften in the fridge, but you can crisp them back up when reheating.
Is there a way to make this mac and cheese healthier?
Sure thing, and I’ve done this when I’m trying to lighten things up a bit. Use whole wheat pasta for extra fiber, though the texture is slightly different. Switch to reduced-fat cheese and use 2% milk instead of whole milk—the sauce won’t be quite as creamy but it’s still good. You can also bulk it up with vegetables like steamed broccoli or roasted cauliflower to add nutrients and volume without too many calories. Some people use Greek yogurt in place of some of the milk for extra protein. Just remember that healthier versions will taste different from the original, so adjust your expectations accordingly.
Can I add other toppings besides breadcrumbs?
Oh definitely, the topping possibilities are endless! Crushed cornflakes or potato chips add great crunch and interesting flavor. Crispy bacon bits are always a hit with my family. Fried onions like the kind you put on green bean casserole work amazingly well. I’ve also tried crushed crackers, particularly Ritz, which add a buttery richness. Fresh herbs like chopped parsley or chives sprinkled on after baking add color and freshness. My adventurous nephew even put crushed hot Cheetos on top once, and honestly, it wasn’t terrible.
What’s the best way to reheat mac and cheese?
The oven is hands-down the best method for keeping that creamy texture. Preheat to 350 degrees, add a few tablespoons of milk to the mac and cheese, stir it gently, cover with foil, and heat for about 20 minutes. For smaller portions, the microwave works in a pinch—use 50% power, stir every 30 seconds, and add a splash of milk to keep it from drying out. The stovetop also works well if you add milk and stir constantly over low heat. Whatever method you choose, adding moisture is the key to preventing it from becoming dry and clumpy.
Can I make this mac and cheese ahead of time?
Yes, this is perfect for make-ahead meals! Prepare everything through mixing the pasta with the cheese sauce, then transfer to your baking dish, cover tightly, and refrigerate for up to 24 hours. When you’re ready to bake, let it sit at room temperature for about 20 minutes, then add the breadcrumb topping and bake as directed, adding an extra 5-10 minutes to the baking time since it’s starting cold. I do this all the time for holiday dinners when I’m juggling multiple dishes. The flavors actually develop more overnight, making it taste even better.
How do I make the breadcrumb topping extra crispy?
My best trick is toasting the breadcrumbs in a dry skillet before mixing them with melted butter. Cook them over medium heat for about three minutes, stirring constantly until golden and fragrant. Then toss with the melted butter and sprinkle over your mac and cheese. Using panko instead of regular breadcrumbs gives you bigger, crunchier pieces too. Another method is finishing the dish under the broiler for the last two minutes of baking, but watch it carefully because the line between perfectly crispy and burnt is about 30 seconds. Adding a tablespoon of grated parmesan to the breadcrumbs also enhances crispiness.
Can I use gluten-free pasta for this recipe?
Absolutely! I’ve made this several times with gluten-free pasta for friends with celiac disease. The key is choosing a quality gluten-free pasta—brands like Barilla or Banza work really well and hold their shape nicely. Cook it exactly according to the package directions because gluten-free pasta can turn mushy faster than regular pasta. Also, make sure your breadcrumbs are gluten-free too, or use crushed gluten-free crackers instead. The rest of the recipe stays exactly the same, and honestly, most people can’t tell the difference in the final dish.
Why did my cheese sauce turn out grainy or separated?
This usually happens when the heat is too high or the cheese is added too quickly. Make sure you’re cooking the sauce over medium to medium-low heat and adding the cheese gradually while stirring constantly. Using pre-shredded cheese can cause this problem too because of the anti-caking agents they add. Always shred your own cheese from a block for the smoothest sauce. If your sauce does separate, try whisking in a teaspoon of cornstarch mixed with a tablespoon of cold milk, which can sometimes bring it back together. Temperature is really the biggest culprit though, so keep that heat gentle.
Can I double this recipe for a large gathering?
Yes, and I do this regularly for potlucks and family gatherings! Simply double all the ingredients and use either two 9×13 inch pans or one really large roasting pan. The cooking time stays about the same, though you might need an extra 5 minutes for everything to heat through completely. Just make sure your baking dish isn’t overcrowded—the mac and cheese should be no more than 2-3 inches deep for even cooking and proper texture. I’ve successfully made triple batches using my largest roasting pan, and it always disappears within minutes.
There you have it—everything I’ve learned from countless attempts, happy accidents, and family feedback sessions around the dinner table. The most important thing is to jump in and try it yourself. Don’t stress about making it perfect the first time. Even my less-than-perfect batches still got eaten and enjoyed. Start with the basic recipe, get comfortable with the process, and then experiment with your own touches. Before you know it, this will become your go-to comfort food that you can make without even thinking about it.
Ingredients
Equipment
Method
- Préchauffez votre four à 350°F (175°C).
- Remplissez une grande casserole d'eau, ajoutez du sel et portez à ébullition.
- Ajoutez les pâtes et faites cuire selon les instructions du paquet, mais retirez-les une minute plus tôt.
- Dans une casserole moyenne, faites fondre 4 cuil. à soupe de beurre à feu moyen.
- Incorporez la farine et fouettez pendant 2 minutes pour former un roux.
- Ajoutez progressivement le lait en fouettant continuellement pour éviter les grumeaux.
- Cuisine jusqu'à ce que la sauce épaississe et enrobe le dos d'une cuillère, environ 5 minutes.
- Réduisez le feu et ajoutez le fromage râpé en petites quantités, en remuant jusqu'à ce qu'il soit fondu.
- Égouttez les pâtes cuites et mélangez-les avec la sauce au fromage.
- Dans un bol séparé, mélangez les miettes de pain avec 2 cuil. à soupe de beurre fondu.
- Versez le mac and cheese dans un plat de cuisson de 9x13 pouces et étalez-le uniformément.
- Parsemez les miettes de pain beurrées sur le dessus.
- Enfournez pendant 20 minutes jusqu'à ce que les miettes de pain soient dorées et que les bords bouillonnent.
- Laissez reposer pendant 5 minutes avant de servir.