Korean Chicken Bao: The Juicy, Crispy, Sweet & Spicy Dream Dinner
You know that feeling when you take a bite of something and it just makes everyone at the table go quiet? That’s what these Korean Chicken Buns do in my house. It’s the perfect storm of crispy, juicy chicken, a sticky sweet-spicy sauce, and the softest, cloud-like bao bun. My niece begged for the recipe after her first bite, and now it’s my go-to for impressing guests without breaking a sweat.
From Street Food to Your Kitchen Table
These buns are like a delicious passport stamp. The idea of fluffy bao comes from Chinese cuisine, while that incredible sauce is all about Korean gochujang—a fermented chili paste with deep, complex flavor. I first fell in love with a version at a food truck, and I’ve spent years tweaking this recipe to be just right for home cooks. We’re taking the best of both worlds and making it totally doable on a weeknight. It’s a modern mash-up that celebrates bold flavors.
Why You’ll Fall Head Over Heels for This Recipe
Honestly, the list is long. First, the textures are a party in your mouth: crunchy chicken, soft bun, cool cucumber. The sauce is magical—it’s sweet, tangy, savory, and has a gentle kick that builds. While the bao need a little patience to rise, the active work is simple and even therapeutic. Most importantly, it’s a complete, hands-on meal that feels special. You’re not just making dinner; you’re creating an experience. Plus, leftovers (if you have any!) reheat like a dream.
When to Whip Up These Flavor Bombs
This is your secret weapon for so many occasions! It’s perfect for a fun and interactive Friday family movie night. It’s a total crowd-pleaser for game day gatherings—just set up a DIY bao bar. I also love making it for a unique date night in; cooking together is half the fun. Even a potluck becomes easy when you bring a tray of these ready-to-assemble buns. They turn any regular meal into a mini celebration.
What You’ll Need for Your Korean Chicken Buns
Gather these ingredients to create your masterpiece. I promise, it’s worth it!
Bao Buns
- 450 g (3 3/4 cups) plain all-purpose flour
- 2 tbsp caster sugar
- 1 tsp salt
- 2 tsp instant dried yeast
- 3 tbsp whole milk
- 210 ml (3/4 cup + 2 tbsp) warm water
- 3 tbsp unsalted butter, very soft
- 1 tbsp olive oil (for brushing)
Chicken and Marinade
- 4 chicken breasts, sliced into bite-sized chunks
- 240 ml (1 cup) buttermilk
- 1 tsp salt
- 1 tsp white pepper
- 1 tsp garlic salt
Crispy Coating
- 180 g (1 1/2 cups) plain all-purpose flour
- 1 tsp salt
- 1 tsp ground black pepper
- 1 tsp garlic salt
- 1 tsp celery salt
- 1 tsp dried thyme
- 1 tsp paprika
- 1 tsp baking powder
- 1 tsp chili flakes
- Vegetable oil for deep frying (at least 1 litre/4 cups)
Korean Sauce
- 2 tbsp gochujang paste
- 2 tbsp honey
- 4 tbsp brown sugar
- 4 tbsp soy sauce
- 2 cloves garlic, peeled and minced
- 2 tsp minced ginger
- 1 tbsp vegetable oil
- 1 tbsp sesame oil
To Serve
- 1 small red onion, thinly sliced
- 1 cucumber, chopped into small pieces
- Small bunch of fresh coriander (cilantro), roughly chopped
- 2 tsp black and white sesame seeds
No-Problem Ingredient Swaps
Don’t panic if you’re missing something! Here are easy fixes:
- Buttermilk: Make your own by adding 1 tbsp lemon juice or vinegar to 1 cup of regular milk. Let it sit for 5 minutes.
- Gochujang: This is key for flavor, but in a pinch, mix 1 tbsp Sriracha with 1 tbsp miso paste and a pinch of sugar.
- Chicken Breasts: Boneless, skinless chicken thighs work wonderfully and stay extra juicy.
- Fresh Herbs: Not a cilantro fan? Try fresh mint or chopped green onions instead.
- Steaming Buns: No steamer basket? Use a colander set over a pot of simmering water, covered with a lid.
Let’s Get Cooking: Your Step-by-Step Guide
Follow these steps, take your time, and enjoy the process. Your kitchen is about to smell amazing!
Step 1: Make the Bao Buns Dough
In a large, cozy-looking bowl, whisk together the flour, sugar, salt, and instant yeast. The yeast will love the warm welcome. In a separate jug, combine the warm water, milk, and very soft butter. The warmth will melt the butter into a lovely, smooth liquid. Pour this liquid into the dry ingredients and mix until a shaggy dough forms. Pro tip: The water should feel warm to your wrist, not hot, to protect the yeast. Now, get your hands in there! Knead on a floured surface for a good 10 minutes until the dough is smooth and elastic. Place it in an oiled bowl, cover it with a damp cloth, and let it rise in a warm spot. You’ll watch it double in size, full of promise.
Step 2: Shape and Steam Your Buns
After about 90 minutes, gently punch down that puffy dough. Divide it into 20 equal pieces—a kitchen scale helps, but eyeballing is fine. Roll each piece into a smooth ball, then flatten and roll into a little oval shape, about 4 inches long. Brush the top lightly with olive oil and fold it over. Slide a chopstick into the center of the fold to create a defined pocket, then pull it out. Place each little bun on a square of parchment paper. Let them rise again for an hour—they’ll get nice and puffy. Steam them in batches over boiling water for 10 minutes. They’ll emerge soft, shiny, and perfectly steamed. Keep them wrapped in a clean towel to stay warm and soft.
Step 3: Marinate and Coat the Chicken
While the buns rise, give your chicken some love. Slice the breasts into hearty, bite-sized chunks. In a bowl, combine the buttermilk, salt, white pepper, and garlic salt. The buttermilk works its tenderizing magic and helps the coating stick. Submerge the chicken, cover it, and let it hang out in the fridge. An hour is great, but even 30 minutes helps. For the coating, whisk together all the dry ingredients in another bowl. That’s your flavor-packed, crispy armor. When you’re ready to fry, take a piece of chicken straight from the buttermilk, let the excess drip off, and dredge it heavily in the flour mix. Press the coating on to ensure it sticks well.
Step 4: Fry to Golden, Crispy Perfection
Pour your vegetable oil into a heavy-bottomed pot or deep fryer. You want it to be about 2-3 inches deep. Heat it to 350°F (175°C). A cube of bread should sizzle and turn golden in 30 seconds. Carefully lower a few pieces of coated chicken in, making sure not to crowd the pot. They’ll sizzle and bubble joyfully. Fry for 3-5 minutes until deeply golden brown and cooked through. Chef’s tip: Use a thermometer for the oil! Too cool, and the chicken gets greasy. Too hot, and it burns before cooking through. Drain the chicken on a wire rack over a baking sheet—this keeps it crispy on all sides. Keep the finished batches warm in a low oven.
Step 5: Whip Up That Magical Korean Sauce
This sauce is the heart of the dish. In a small saucepan, combine the gochujang, honey, brown sugar, soy sauce, minced garlic, and ginger. The deep red paste will slowly melt into the golden sweetness. Add the vegetable and sesame oils. Place it over medium heat and let it simmer gently for about 5 minutes. It will bubble, thicken slightly, and become gloriously glossy. The smell of garlic, ginger, and fermented chili will fill your kitchen. Once it’s thickened enough to coat the back of a spoon, take it off the heat. You can let it cool a bit—it will thicken more as it sits.
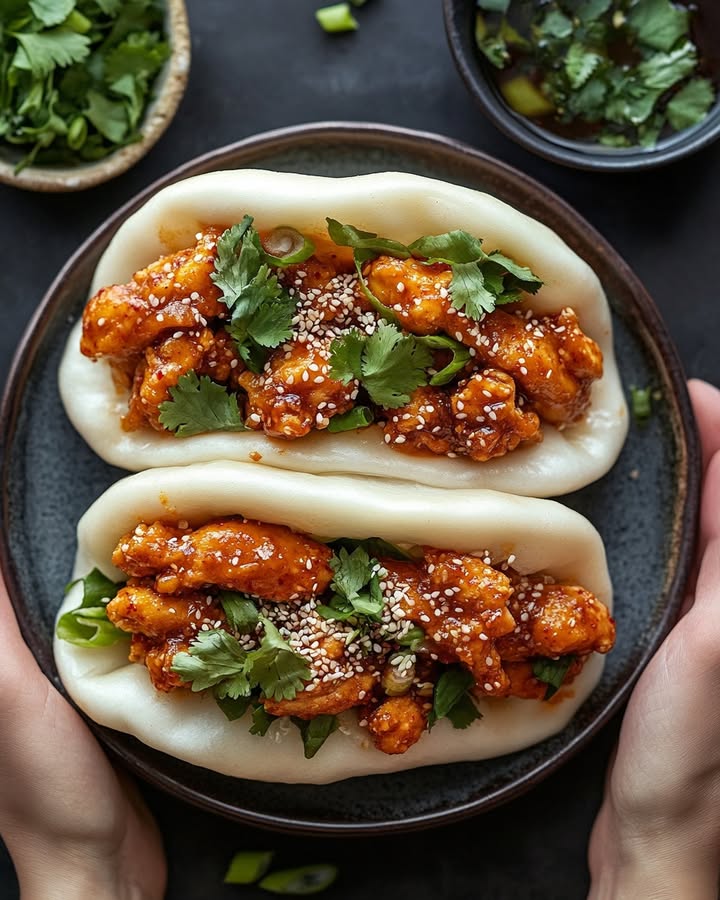
Step 6: The Grand Finale – Assemble Your Bao!
This is the fun part! Place your warm, fluffy bao buns on a big platter. Take your bowl of crispy, hot chicken and pour that gorgeous, sticky Korean sauce right over the top. Toss everything gently until each piece is completely coated in that shiny, red glaze. Open a bao bun, stuff it with a few saucy chicken pieces, and top with the cool, crisp red onion and cucumber. A sprinkle of fresh coriander and a pinch of sesame seeds adds the final touch. Serve immediately and get ready for the happy silence.
Timing is Everything
Let’s plan your time so nothing is stressful:
- Prep Time: 1 hour (includes shaping buns, marinating chicken)
- Rising/Resting Time: 2.5 hours (for buns and chicken marinade)
- Cooking Time: 45 minutes (steaming and frying in batches)
- Total Time: About 4 hours 15 minutes (mostly hands-off rising)
My Chef’s Secret: The Double-Dip for Extra Crisp
For an unbelievably crunchy, craggy coating that holds sauce like a dream, try the double-dip method. After your initial dredge in the flour mixture, dip the chicken back into the buttermilk marinade for just a second. Then, give it one more quick roll in the flour. This creates extra layers that puff up and create little nooks for the sauce to cling to. It’s the difference between good fried chicken and legendary fried chicken.
A Little Food for Thought
Did you know gochujang is a fermented ingredient? That means it’s packed with umami, that famous savory “fifth taste.” The fermentation process, which can take years, gives it a complexity you just can’t get from regular chili sauce. It’s what makes this Korean Chicken Bao recipe taste so deep and interesting, not just spicy. Whenever possible, opting for high-quality local ingredients, like honey or fresh herbs, can really make the flavors in a dish like this shine even brighter.
Your Kitchen Toolbox
- Large mixing bowls
- Stand mixer with dough hook (optional, but helpful)
- Rolling pin
- Bamboo steamer or metal steamer basket
- Large, heavy Dutch oven or deep fryer for frying
- Cooking thermometer (crucial for perfect frying!)
- Wire cooling rack
- Parchment paper
Storing Your Korean Chicken Buns Like a Pro
For the components: Store leftover bao buns, chicken, and sauce separately for the best results. The plain, steamed buns can be kept in an airtight container or zip-top bag in the fridge for 2-3 days. They also freeze beautifully for up to a month. Place parchment between them so they don’t stick. The crispy fried chicken stores best before saucing. Keep it in an airtight container in the fridge for up to 3 days. The sauce can be refrigerated in a jar for over a week.
Reheating for maximum happiness: To bring everything back to life, re-steam the buns for 3-4 minutes until soft and warm. Reheat the unsauced chicken on a baking sheet in a 375°F (190°C) oven for 8-10 minutes until hot and re-crisped. Warm the sauce gently in a saucepan or the microwave. Toss the hot chicken in the warm sauce just before serving. This method prevents soggy chicken!
Assembled buns? I don’t recommend storing them assembled. The bun will get soggy from the sauce and toppings. The beauty of this dish is in the fresh, contrasting textures. Taking a few minutes to reheat and assemble from stored components is totally worth it for that just-made taste.
Tips & Advice for Foolproof Buns
- Be patient with the dough rise. A warm, draft-free spot (like an oven with just the light on) is perfect.
- When frying, let the oil temperature recover between batches. This ensures every piece is equally crispy.
- Have all your topping ingredients chopped and ready before you fry the chicken. Assembly goes fast!
- If you want less heat, start with 1 tbsp of gochujang and add more to taste.
- For a fun twist, try adding a quick pickled carrot slaw or a drizzle of spicy mayo on top.
Presentation Ideas to Wow Your Guests
- The DIY Bao Bar: Set out the warm buns, a big bowl of saucy chicken, and all the toppings in separate bowls. Let everyone build their own perfect bao. It’s interactive and fun!
- Family-Style Platter: Pre-assemble the buns on a large wooden board or platter, lining them up neatly. Drizzle a little extra sauce over the top and scatter extra herbs and seeds for a restaurant-worthy look.
- Individual Baskets: For a casual party, serve each person a small bamboo steamer basket with two bao buns inside, topped and ready to go.
6 Delicious Ways to Mix It Up
Love this recipe? Try these tasty spins!
- Korean BBQ Jackfruit Bao (Vegan): Swap chicken for canned young jackfruit. Shred and simmer it in the Korean sauce until tender. The texture is amazingly meaty and perfect for plant-based friends.
- Spicy Korean Chicken Sliders: Skip the steaming and use small, soft potato rolls or Hawaiian rolls instead. It’s a quicker fix with all the same incredible flavors, perfect for a big game day spread.
- Baked “Healthier” Version: For a lighter take, toss the buttermilk-coated chicken in panko breadcrumbs mixed with the spices. Bake on a rack at 400°F until crispy, then toss in the sauce. It’s less messy, too!
- Korean Chicken Rice Bowl: Forget the buns! Serve the saucy chicken over a bowl of steamed rice with the classic toppings, a fried egg, and some kimchi on the side. A complete, satisfying meal in a bowl.
- Sweet Chili Lime Variation: Change the sauce profile by using sweet chili sauce as a base, adding lime juice and zest. It creates a brighter, tangier flavor that’s equally addictive.
- Firecracker Chicken Bao: Amp up the heat by adding extra gochujang or a spoonful of Korean chili flakes (gochugaru) to the coating and the sauce. Perfect for spice lovers!
If you’re looking for more fantastic chicken dinners, you have to check out our collection of easy main dish recipes. You’ll find everything from cozy one-skillet wonders to vibrant grain bowls.
Common Mistakes to Avoid for Perfect Bao
Mistake 1: Killing the Yeast with Hot Liquid
This is the #1 reason bao dough doesn’t rise. If your water or milk is too hot, it will kill the yeast, leaving you with a dense, sad dough. The liquid should feel warm and comfortable on your wrist, like baby bath water, not hot. A good rule is between 105°F and 115°F (40°C-46°C). If you don’t have a thermometer, mix 2 parts cool water with 1 part boiling water—it’s usually just right. Taking this extra care means your buns will be light and fluffy.
Mistake 2: Overcrowding the Fryer
It’s tempting to fry all the chicken at once, but don’t! Adding too much chicken to the oil causes the temperature to plummet. The chicken will absorb oil instead of sealing quickly, becoming greasy and soggy. Fry in small, manageable batches. This lets the oil stay hot enough to create an instant, crispy seal. The chicken will be golden and crunchy on the outside, perfectly juicy inside. Patience here pays off in texture.
Mistake 3: Saucing the Chicken Too Early
Resist the urge to pour that gorgeous sauce over the chicken while it’s sitting in the fryer basket or piled in a bowl. If you sauce it too far in advance, the steam from the hot chicken will get trapped and turn your crispy coating soggy. Always sauce the chicken at the very last minute, right before you assemble the buns. Toss it just until coated and then immediately fill your buns. This keeps that perfect crunch intact with every bite.
Mistake 4: Skipping the Second Rise for the Buns
After you shape your little buns, they need a second rest (proof) before steaming. This final rise lets the gluten relax and the yeast produce gas one more time. If you steam them right after shaping, they’ll be dense and tough, not soft and pillowy. Cover them and let them puff up for that full hour. You’ll see them get noticeably bigger and airier. It’s the key to that classic, cloud-like bao texture.
Your Korean Chicken Bao Questions, Answered
Can I make the bao buns ahead of time?
Absolutely! This is a great time-saver. You can steam the buns completely, let them cool, and store them in an airtight container in the fridge for 2-3 days or freeze them for a month. To reheat, simply re-steam them for 3-4 minutes until soft and warm. You can also microwave them for 20-30 seconds with a damp paper towel, but steaming is best for restoring that fresh, soft texture. The dough can also be made a day ahead—after the first rise, punch it down, cover tightly, and refrigerate overnight. Let it come to room temperature for 30 minutes before shaping.
What can I use if I don’t have a steamer?
No special equipment needed! You can create a simple steamer with a large pot, a heatproof bowl or round rack that fits inside, and a lid. Place the rack or inverted bowl in the pot, add enough water so it doesn’t touch the buns, and bring to a simmer. Place your parchment-lined buns on a plate or directly on the rack, cover the pot with a lid, and steam as directed. Just make sure the lid is on tight to trap the steam. A metal colander set over a pot of water also works in a pinch.
Is there a way to make this recipe less spicy?
Yes, you can easily control the heat level. Start by using only 1 tablespoon of gochujang paste in the sauce instead of two. Taste it and add more if you want. You can also omit the chili flakes from the crispy coating entirely. The dish will still have amazing sweet, savory, and garlicky flavors from the other ingredients like soy sauce, ginger, and brown sugar. For the toppings, the cool cucumber and fresh herbs help balance any remaining spice beautifully.
Can I use chicken thighs instead of breasts?
You sure can! Boneless, skinless chicken thighs are a fantastic choice for this recipe. They are more forgiving and stay incredibly juicy and flavorful, even if you accidentally overcook them a little. Just slice them into similar bite-sized chunks. The marinade and cooking process are exactly the same. Many people actually prefer thighs in fried chicken recipes because of their richer flavor and tenderness. It’s a great swap.
How do I know when my oil is hot enough for frying?
The best tool is a simple deep-fry or candy thermometer. You’re aiming for 350°F (175°C). Without a thermometer, do the “bread cube test.” Drop a 1-inch cube of white bread into the oil. If it turns golden brown in about 30-35 seconds, the oil is ready. If it browns too fast, the oil is too hot. If it takes much longer, it’s not hot enough. Maintaining this temperature is crucial for crispy, non-greasy chicken.
Can I bake the chicken instead of frying it?
You can bake it for a lighter version, but the texture will be different—more like a baked nugget than a deep-fried crunchy piece. To try it, coat the marinated chicken as usual. Place the pieces on a wire rack set over a baking sheet (this helps air circulate). Spray them lightly with cooking oil and bake at 400°F (200°C) for 15-20 minutes, flipping halfway, until cooked through and crispy. Toss them in the sauce right after baking.
Where can I find gochujang paste?
Gochujang is becoming very common! Look for it in the international aisle of most large supermarkets, usually near other Asian ingredients. You can also find it at any Korean grocery store or Asian market. It comes in a red plastic tub or a squeezy bottle. Once opened, it keeps for a long time in the fridge. It’s worth seeking out for its unique fermented flavor, but see the substitution tips above if you’re truly stuck.
What should I serve with Korean chicken bao?
These buns are a full meal on their own! But if you’re feeding a big crowd or want more sides, keep it simple. A light Asian-inspired cucumber salad, some store-bought kimchi for a tangy punch, or a bowl of miso soup are perfect companions. For a heartier spread, a simple fried rice or a big green salad with a ginger-sesame dressing works well. You don’t need much—the buns are the star.
My sauce is too thick/thin. How can I fix it?
Sauces can vary based on your stove’s heat and ingredient brands. If your sauce is too thick and sticky, simply whisk in a tablespoon of warm water at a time until it reaches a nice, glossy coating consistency. If it’s too thin, let it simmer for a few more minutes to reduce and thicken. Remember, it will also thicken a bit as it cools off the heat. Aim for a consistency similar to warm honey.
Can I use store-bought bao buns or slider buns?
Yes, you can absolutely use a shortcut! Many Asian grocery stores sell frozen, pre-made bao buns (often labeled as “gua bao” or “steamed buns”) that you just need to re-steam. They work perfectly. In a real pinch, very soft potato rolls or Hawaiian rolls can stand in for a more slider-style experience. The homemade bao are a joy to make, but the delicious chicken and sauce will shine no matter what vessel you use!
There you have it! Your guide to making incredible Korean Chicken Bao at home. It might look like a long recipe, but each step is simple, and the result is so rewarding. The combination of soft bun, crunchy chicken, and that addictive sauce is truly unbeatable. Don’t forget to check out our other family favorites like these zesty Spicy Honey Lime Chicken Thighs or this easy, comforting One Pot Lemon Herb Chicken and Orzo. Now, gather your ingredients, put on some music, and get ready to make a meal everyone will remember. Happy cooking!
Korean Chicken Buns
Ingredients
Equipment
Method
- In a bowl, whisk together flour, sugar, salt, and yeast.
- In a jug, combine warm water, milk, and soft butter, then pour into dry ingredients and mix to form dough.
- Knead dough on a floured surface for 10 minutes until smooth, then let rise until doubled in size, about 90 minutes.
- Punch down the dough, divide into 20 pieces, shape into ovals, brush with olive oil, and let rise again for an hour.
- Steam buns in batches over boiling water for 10 minutes until soft.
- In a bowl, combine chicken chunks with buttermilk, salt, white pepper, and garlic salt, and marinate for at least 30 minutes.
- Prepare the crispy coating by mixing flour and seasonings in another bowl.
- Heat oil to 350°F (175°C), dredge marinated chicken in the flour mixture, then fry in batches for 3-5 minutes until golden brown.
- Combine the sauce ingredients in a saucepan and simmer for 5 minutes until thickened.
- Assemble the bao by placing chicken in the buns, drizzling with sauce, and topping with onion, cucumber, and cilantro.