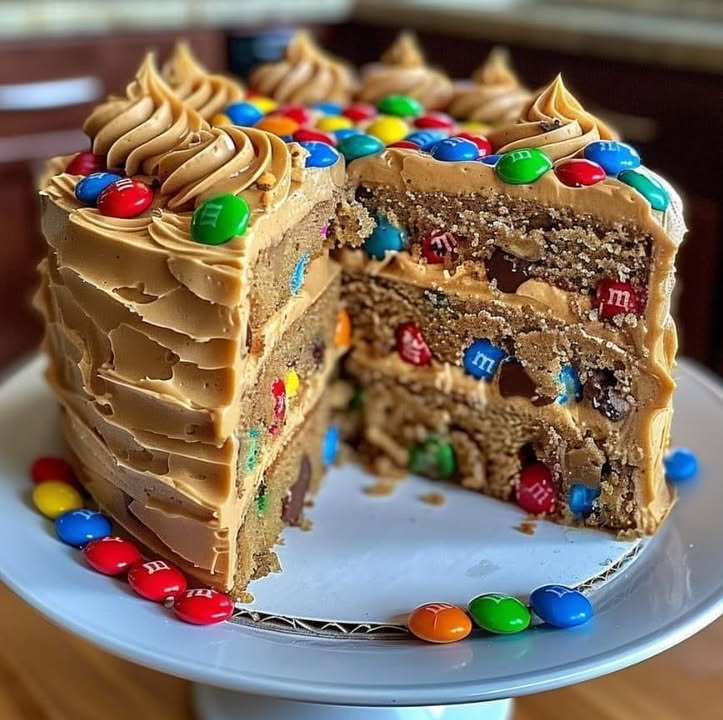
A M&Ms Peanut Butter Cake So Good, It Might Start a Family Debate
Okay, let’s be real for a second. Have you ever stood in front of a party dessert table and felt your heart sink a little? Maybe it’s a pretty but bland vanilla cake. Or a fruit tart that looks better than it tastes. I swore I’d never be that host. My mission is pure joy on a plate. That’s exactly why I created this M&Ms Peanut Butter Cake. It’s my ultimate crowd-pleaser, the one my friends and family *actually* beg me to make again. Imagine the most tender, moist peanut butter cake, speckled with chocolate candy pieces, all wrapped in a cloud of whipped peanut butter frosting. It’s a fun, flavor-packed masterpiece that guarantees smiles. And spoiler alert: the leftover frosting makes an amazing fruit dip!
From Simple Treat to Celebratory Masterpiece
This cake is a love letter to my favorite childhood snack mix. I remember mixing plain M&Ms into my peanut butter sandwiches for a sweet, crunchy twist. This cake takes that simple combo and turns it into a proper celebration dessert. While peanut butter cakes have a classic, comforting place in American baking, adding M&Ms is a modern, playful twist. It bridges the gap between a nostalgic, homemade cake and the colorful fun of a candy store. This recipe proves that the best dishes often come from happy memories and a little kitchen bravery. It’s not a traditional recipe passed down for generations—it’s a new tradition waiting to start in your home.
Why You’ll Fall Head Over Heels for This Peanut Butter Cake
If you’re a peanut butter fan, this cake is your dream come true. First, the texture is everything. The buttermilk makes the crumb incredibly soft and moist, while the chopped M&Ms add little pockets of chocolate and a satisfying crunch. The peanut butter frosting is so light and creamy, you’ll want to eat it by the spoonful (no judgment here!). Secondly, it’s honestly simpler to make than it looks. You don’t need any fancy techniques. It’s a straightforward, one-bowl wonder for the cake batter. Finally, it’s pure, customizable fun. You can use any color M&Ms to match a holiday, birthday, or sports team. It’s a dessert that looks like you spent all day on it, but secretly, you got to relax and enjoy the baking process.
When to Whip Up This Showstopping Cake
This cake is the life of any party. It’s a birthday superstar, especially for kids (and grown-up kids at heart!). It’s perfect for potlucks because it travels well and serves a crowd. I love making it for game day gatherings—you can use team-colored candies. It’s also a fabulous “just because” treat. Had a tough week? This cake is edible therapy. Celebrating a small win? This cake makes it feel huge. Basically, any occasion that calls for a big, happy, shareable dessert is the right occasion for this M&Ms Peanut Butter Cake.
What You’ll Need for Your Peanut Butter Cake
Gather these simple ingredients. Having everything at room temperature is the secret to a smooth batter and frosting!
For the Cake:
- 1 cup all-purpose flour
- 1 teaspoon baking powder
- 1/2 teaspoon baking soda
- 1/2 teaspoon salt
- 1/2 cup unsalted butter, room temperature
- 1/2 cup creamy peanut butter
- 1 cup granulated sugar
- 2 large eggs
- 1 teaspoon vanilla extract
- 1/2 cup buttermilk
- 1 cup M&Ms, roughly chopped
For the Frosting:
- 1/2 cup unsalted butter, room temperature
- 1 cup creamy peanut butter
- 2 cups powdered sugar
- 1/4 cup heavy cream
- 1 teaspoon vanilla extract
Easy Ingredient Swaps (No Stress Allowed!)
Out of something? Don’t panic! Here are my tried-and-true swaps.
- Buttermilk: Make your own! Mix 1/2 cup milk with 1 1/2 teaspoons of white vinegar or lemon juice. Let it sit for 5 minutes until it curdles slightly.
- Heavy Cream: Whole milk works in the frosting, but the texture will be less fluffy. For dairy-free, use canned coconut cream.
- Peanut Butter: You can use natural peanut butter, but be sure it’s well-stirred. The oil separation can make the frosting greasy. Crunchy peanut butter adds wonderful texture to the frosting.
- M&Ms: Use any variety you love! Peanut M&Ms, mini M&Ms, or even Reese’s Pieces work beautifully.
How to Make Your M&Ms Peanut Butter Cake
Follow these simple steps for a perfect cake every single time.
Step 1: Prep and Mix the Dry Goods
First, get your oven humming at 350°F (175°C). Grease and flour two 9-inch round cake pans. I like to add a parchment paper circle at the bottom for foolproof removal. In a medium bowl, take your whisk and blend together the flour, baking powder, baking soda, and salt. You’ll see the powders become one uniform, pale mixture. This step ensures your leavening agents are evenly distributed, so your cake rises perfectly. Set this bowl aside for its grand entrance later.
Step 2: Create the Dreamy Peanut Butter Base
Now for the fun part! In a large mixing bowl, beat the softened butter and peanut butter together. Use an electric mixer on medium speed. Watch them combine into a smooth, creamy, and fragrant paste. The smell is already amazing! Gradually add the sugar while beating. Keep mixing until the whole thing is light and fluffy. This incorporates air, which is key for a tender cake. Add the eggs one at a time, beating well after each one. Finally, stir in the vanilla extract. Your batter should look gloriously smooth and pale.
Step 3: Bring It All Together
Time to unite the teams! With your mixer on low speed, add about one-third of your flour mixture to the peanut butter base. Mix just until combined. Now, pour in half of the buttermilk. Mix again. Repeat with another third of flour, the rest of the buttermilk, and finish with the last of the flour. Pro tip: Start and end with the dry ingredients. This prevents the gluten from over-developing, which keeps your cake soft, not tough. Your batter will be thick and luxurious.
Step 4: Add the Candy Confetti
Grab your roughly chopped M&Ms. Pour them into the batter. Now, put down the electric mixer. Use a sturdy spatula to gently fold the candies in. You want to mix just enough to distribute them evenly without over-mixing. See those colorful flecks peeking through the tan batter? That’s the magic! You’ll hear a soft crunch as you fold. Divide this gorgeous batter evenly between your two prepared pans.
Step 5: Bake to Golden Perfection
Slide your cake pans into the preheated oven. Bake for 22-25 minutes. You’ll know they’re done when the edges pull away from the pan slightly and a toothpick poked into the center comes out clean or with just a few moist crumbs. Your kitchen will smell like a bakery dream. Let the cakes cool in their pans for 15 minutes. This lets them set so they don’t fall apart. Then, run a knife around the edge and flip them onto a wire rack to cool completely. Patience is key here! Frosting a warm cake is a messy disaster.
Step 6: Whip Up the Fluffy Peanut Butter Frosting
While the cakes cool, make the frosting. In a clean bowl, beat the softened butter and peanut butter together until perfectly smooth and combined. Gradually add the powdered sugar with the mixer on low at first. Once it’s incorporated, turn the speed to medium-high and beat for a full 2 minutes. It will look a bit dry. Now, pour in the heavy cream and vanilla. Beat for another 2-3 minutes. Watch it transform into a light, airy, spreadable cloud. Taste it. Go ahead, you deserve it!
Step 7: Assemble Your Masterpiece
Place the first cake layer on your serving plate. Spread a generous, even layer of frosting on top, all the way to the edges. Carefully place the second layer on top. Now, frost the top and sides of the cake. Use an offset spatula for smooth sides, or a butter knife for a more rustic, homemade look. Once frosted, press whole M&Ms onto the sides or create a pattern on top. Let your creativity shine!
How Long Does This Peanut Butter Cake Take?
- Prep Time: 30 minutes
- Cook Time: 25 minutes
- Cooling Time: 1 hour (very important!)
- Total Time: About 1 hour 55 minutes
- Servings: 12 happy people
My Secret for the Best Peanut Butter Frosting
Here’s my chef’s secret: if your frosting ever feels too thick or stiff, don’t add more liquid right away. Just keep beating! The extra time whipping incorporates more air, which naturally lightens and fluffs it up. Only add more cream a teaspoon at a time if it’s truly unspreadable after 4-5 minutes of beating.
A Sweet Little Fact About M&Ms
Did you know the “M” in M&Ms stands for Mars and Murrie? They were named after the founders, Forrest Mars and Bruce Murrie. They were first made in 1941 and were originally sold exclusively to the military! This cake gives those iconic candy-coated chocolates a deliciously civilian purpose.
Tools You’ll Need for Baking Success
- Two 9-inch round cake pans
- Electric hand mixer or stand mixer
- Mixing bowls (large and medium)
- Whisk and spatula
- Measuring cups and spoons
- Wire cooling rack
- Offset spatula (helpful for smoothing frosting)
How to Store Your Leftover Cake (If There Is Any!)
To keep your cake fresh and delicious, store it in an airtight container at room temperature. A cake carrier is perfect. It will stay moist and tasty for up to 3 days. The frosting may soften a bit, but the flavor will be fantastic.
If you need to store it longer, you can refrigerate it for up to 5 days. Let it sit out for about 30 minutes before serving to take the chill off. The cold fridge can make the cake a bit firmer.
You can also freeze this cake! Wrap unfrosted cake layers tightly in plastic wrap and then aluminum foil. Freeze for up to 3 months. Thaw overnight in the fridge and frost the next day. Frosted cakes can be frozen, but the frosting texture may change slightly upon thawing.
My Best Tips for a Perfect Cake Every Time
- Room Temperature is Key: This is the #1 rule! Butter, eggs, and buttermilk must be at room temperature. This allows them to emulsify properly, creating a smooth, even batter that bakes up light.
- Don’t Overmix: Once you add the flour, mix only until you no longer see dry streaks. Overmixing develops gluten and leads to a dense, tough cake.
- Chill for Easy Frosting: If your cake layers are domed, level them with a serrated knife. Then, pop the layers in the freezer for 15-20 minutes before frosting. This firms up the crumbs and makes frosting much cleaner.
- Customize Your Colors: Use holiday-themed M&Ms for an instant festive cake. Think red and green for Christmas, pastels for Easter, or school colors for a graduation party.
Make It Look Like It Came From a Bakery
- Crush some extra M&Ms and press them onto the frosting around the bottom edge of the cake for a fun border.
- Pipe little swirls of leftover frosting on top of the cake and place a single M&M on each swirl.
- For a kid’s party, write their name on top of the cake with whole M&Ms.
- Serve each slice with a small scoop of vanilla ice cream on the side. The combination is heavenly!
Try These Yummy Variations
Love the base recipe? Here are six fun ways to change it up.
- Chocolate Peanut Butter Bliss: Add 1/4 cup of unsweetened cocoa powder to the dry ingredients for a chocolate-peanut butter cake. Use peanut butter M&Ms for a double peanut punch.
- Cookies & Cream Cake: Replace the M&Ms in the batter with roughly chopped Oreo cookies. Use the same peanut butter frosting or try a vanilla buttercream.
- Peanut Butter Cup Delight: Fold chopped peanut butter cups into the batter instead of M&Ms. Garnish the frosted cake with mini peanut butter cups.
- Jelly Swirl Cake: After frosting the middle layer, add a thin swirl of your favorite jam or jelly (grape is classic!). Then add the top cake layer and frost as usual.
- Mini Cake Party: Bake the batter in a 9×13 inch pan for a sheet cake. Frost and decorate as one large cake. This is great for big gatherings.
- Gluten-Free Peanut Butter Cake: Use a 1-to-1 gluten-free flour blend in place of the all-purpose flour. Ensure your baking powder and other ingredients are gluten-free certified.
Common Mistakes to Avoid
Mistake 1: Using Cold Ingredients
This is the most common error. Cold butter and eggs don’t blend smoothly into the batter. This can cause the mixture to look curdled and result in a dense, uneven cake. Always plan ahead. Take your butter, eggs, and buttermilk out of the fridge at least an hour before you start baking. Your batter will be silky smooth, and your cake will bake up with a perfect texture.
Mistake 2: Overmixing the Batter
Once you add the flour to the wet ingredients, a timer starts in your head. Mix just until you no longer see dry patches of flour. Overmixing develops the gluten in the flour. This makes the cake tough and chewy instead of soft and tender. Use a spatula for the final folds, especially when adding the M&Ms. A few small lumps are far better than an overworked batter.
Mistake 3: Frosting a Warm Cake
I know it’s tempting! The cake smells incredible, and you want to finish it. But frosting a warm cake is a recipe for a melted, sliding mess. The heat from the cake will melt the frosting, making it thin and greasy. The cake layers might even crumble apart. Let the cakes cool completely in the pans for 15 minutes. Then transfer them to a wire rack and let them cool all the way to room temperature. Patience makes for a picture-perfect cake.
Mistake 4: Not Greasing the Pans Properly
You’ve done all the hard work, and then the cake sticks to the pan. The heartbreak! A simple grease-and-flour method is your best friend. Use softened butter or non-stick spray to coat the entire inside of the pan. Then, add a spoonful of flour. Tap and rotate the pan until the flour coats every greased surface. Dump out any excess flour. For extra insurance, add a round of parchment paper to the bottom.
Frequently Asked Questions
Can I use natural peanut butter in this cake?
You can, but you have to be careful. Natural peanut butter often separates, with oil on top and solids on bottom. For this recipe, you need to stir it very, very well until it’s completely homogenous. Even then, the texture of your cake and frosting might be slightly different, sometimes a bit more oily or less stable. For the most reliable results, I recommend using a standard creamy peanut butter like Jif or Skippy. They have a consistent texture and sweetness that works perfectly every time.
What can I use if I don’t have buttermilk?
No buttermilk? No problem! It’s very easy to make a substitute. For this recipe, measure 1/2 cup of regular milk (whole or 2% works best). Add 1 and 1/2 teaspoons of white vinegar or fresh lemon juice to it. Stir and let it sit for about 5-10 minutes. You’ll see it start to look curdled and slightly thickened. This homemade “soured milk” works almost exactly like real buttermilk. It reacts with the baking soda to give your cake a wonderful rise and tender crumb.
Why did my cake layers turn out dry?
A dry cake usually comes from a couple of missteps. First, check your oven temperature with an oven thermometer. An oven that runs too hot will over-bake the cake quickly. Second, make sure you’re measuring your flour correctly. The best way is to spoon flour into your measuring cup and level it off with a knife. Scooping directly from the bag packs in too much flour. Lastly, don’t over-bake! Set a timer for the minimum time (22 minutes) and check with a toothpick. It should come out with a few moist crumbs, not completely clean.
Can I make this cake ahead of time?
Absolutely! This cake is great for making ahead. You can bake the cake layers, let them cool completely, and then wrap them tightly in plastic wrap. Store them at room temperature overnight, or freeze them for up to 3 months. Make the frosting the day before too. Keep it in an airtight container in the fridge. When you’re ready to assemble, let the frosting soften at room temperature and re-whip it briefly with your mixer to make it fluffy again. Then frost your thawed cake layers. This makes party day so much easier.
How do I get my frosting so smooth and fluffy?
The secret is in the beating time and ingredient temperature. Make sure your butter and peanut butter are soft but not melted. Beat them together really well first. When you add the powdered sugar, start on low speed so it doesn’t fly everywhere. Then, once it’s mixed in, crank the speed to medium-high. Beat for a full 2-3 minutes after adding the cream. This whips air into the frosting, transforming it from dense and gritty to light and cloud-like. Don’t rush this step!
Can I use crunchy peanut butter?
Yes, you can! Using crunchy peanut butter in the frosting is a fantastic idea. It adds little bits of peanut texture that are really enjoyable. I wouldn’t recommend it for the cake batter itself, as the peanut pieces can sink. But for the frosting, go for it. Just note that it might make piping detailed designs a little more difficult because the pieces can clog the piping tip.
My frosting seems too thin/runny. How can I fix it?
If your frosting is too thin, it’s likely because the butter was too soft or you added a bit too much cream. Don’t worry, it’s fixable! Pop the whole bowl of frosting into the refrigerator for 15-20 minutes to chill and firm up the fats. Then, beat it again with your mixer. You can also add a little more powdered sugar, a quarter cup at a time, until it reaches a spreadable consistency.
Can I make this into cupcakes?
Definitely! This batter makes wonderful cupcakes. Line a muffin tin with cupcake liners. Fill each liner about 2/3 full with batter. Bake at the same temperature (350°F) for about 18-20 minutes, or until a toothpick tests clean. Let them cool completely before frosting. You should get about 18-24 cupcakes, depending on size.
Do I have to chop the M&Ms?
You don’t *have* to, but I highly recommend it. Chopping the M&Ms breaks them into smaller pieces that distribute more evenly throughout the cake batter. This means you get a bit of chocolate and candy shell in every single bite. If you leave them whole, they tend to just sink to the bottom of the batter during baking. A quick chop with a knife is all it takes for a much better texture.
How can I make sure my cake layers are even?
For perfectly even layers, I use a kitchen scale. Weigh your empty mixing bowl, then weigh it again with the finished batter. Divide the batter weight by two. Then, spoon batter into each prepared cake pan while on the scale until you reach half the weight. No scale? Use a large cookie scoop or measuring cup to add equal amounts of batter to each pan. You can also gently tap the filled pans on the counter to level the batter out before baking.
Go Bake Some Happy Memories
And there you have it! My go-to recipe for a cake that never fails to bring pure, unadulterated joy to the table. It’s more than just a dessert; it’s a centerpiece for celebrations, a comfort on a quiet day, and a surefire way to impress. The combination of rich peanut butter, soft cake, and crunchy, colorful M&Ms is truly magic. So, preheat that oven, grab your favorite mixing bowl, and get ready to bake something spectacular. I promise, the moment you see that first slice served and the smiles that follow, you’ll know it was worth every minute. Happy baking!
Coconut Egg Custard
Ingredients
Equipment
Method
- Preheat the oven to 350°F (175°C) and grease two 9-inch round cake pans.
- In a medium bowl, whisk together flour, baking powder, baking soda, and salt; set aside.
- In a large mixing bowl, beat together softened butter and peanut butter until smooth.
- Gradually add sugar and beat until light and fluffy.
- Add eggs one at a time, mixing well after each addition, then stir in vanilla extract.
- Gradually mix in the flour mixture, alternating with buttermilk, starting and ending with dry ingredients.
- Gently fold in chopped M&Ms.
- Divide the batter evenly between the two prepared pans.
- Bake for 22-25 minutes until edges pull away and toothpick comes out clean.
- Cool cakes in pans for 15 minutes, then transfer to a wire rack to cool completely.
- For the frosting, beat softened butter and peanut butter until smooth; add powdered sugar gradually.
- Pour in heavy cream and vanilla, and beat until light and fluffy.
- Assemble the cake: place one layer on serving plate, frost the top, and add the second layer.
- Frost the top and sides of the cake, decorating with additional M&Ms if desired.