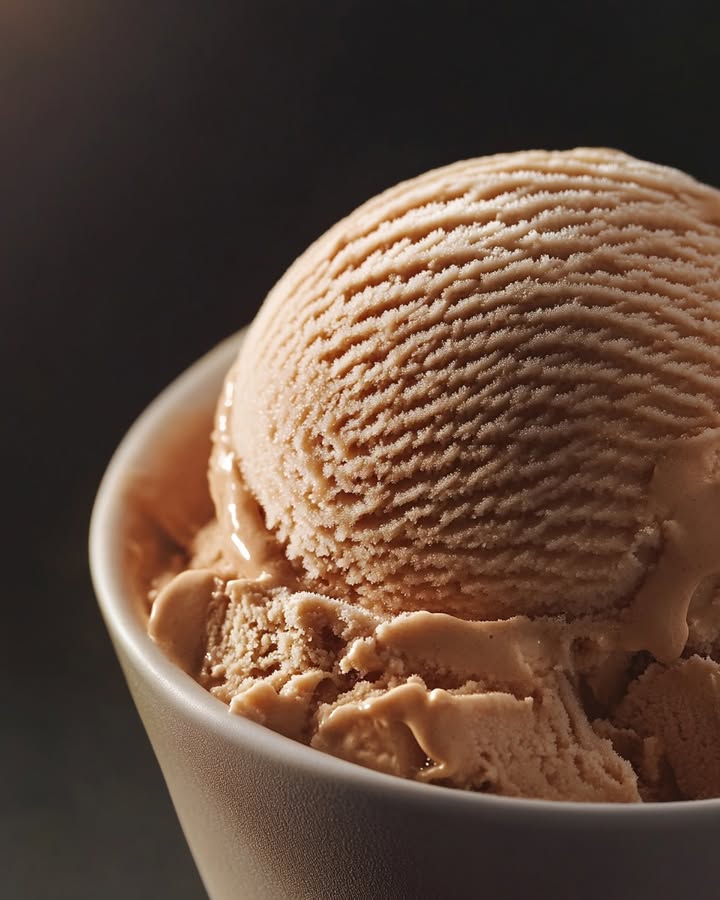
The Ultimate Homemade Coffee Ice Cream Recipe
You know that feeling when you need a little pick-me-up and a sweet treat all at once? That’s exactly why I keep a batch of this homemade coffee ice cream in my freezer. Honestly, it’s become my happy hour! Last summer, I served this at a family BBQ. My uncle, who claims store-bought is king, asked for seconds before I’d even finished my first scoop. That’s the magic of making it yourself.
A Scoop of History
Coffee and ice cream are a match made in dessert heaven. While no one knows exactly who first had the brilliant idea, coffee-flavored ice cream became a staple in American parlors by the late 1800s. My version takes a cue from classic custard-style (or French) ice cream. This method uses egg yolks for an unbelievably rich and silky texture. It’s the traditional way, but with the simple twist of using instant coffee for deep, roasty flavor without any fuss. It’s old-school elegance meets modern convenience.
Why You’ll Fall in Love With This Recipe
This isn’t just any ice cream. It’s a creamy, dreamy coffee escape in a bowl. You’ll love it because it’s incredibly smooth and packs a real coffee punch. It’s far superior to anything from the grocery store freezer aisle. Plus, making it is half the fun! Your kitchen will smell amazing. The process is surprisingly simple and feels like a little bit of kitchen magic when that liquid cream turns into frozen bliss.
Perfect Occasions for a Coffee Ice Cream Treat
This ice cream is your secret weapon for so many moments. It’s a lifesaver for dinner parties—just scoop and serve with store-bought biscotti. I love making it for a cozy movie night at home. It’s also the perfect, thoughtful homemade gift. Pour it into a nice container for a new neighbor or a friend who needs cheering up. Honestly, a Wednesday night is a perfect occasion too. No event required!
Gathering Your Coffee Ice Cream Ingredients
Simple, high-quality ingredients make the best dessert. Here’s what you’ll need:
- 1 cup heavy whipping cream
- 1 cup whole milk
- ¾ cup granulated sugar (adjust to taste)
- 4 large egg yolks
- 1 tablespoon instant coffee or espresso powder
- 1 tablespoon vanilla extract
- A pinch of salt (trust me, it makes flavors pop!)
Handy Substitution Options
Don’t have everything on hand? No worries! Cooking is about improvisation.
- Dairy: For a lighter version, use half-and-half instead of the cream and milk mix. For a richer one, use all cream.
- Sugar: You can use an equal amount of coconut sugar or a sugar substitute made for baking, but the color will be darker.
- Instant Coffee: If you only have brewed espresso, use ¼ cup of strong, cooled espresso and reduce the milk by ¼ cup.
- Egg-free: Skip the egg yolks for a Philadelphia-style ice cream. You’ll miss the custardy richness, but it will still be delicious and faster to make.
Let’s Make Some Magic: Step-by-Step Instructions
Step 1: Prepping Your Ice Cream Maker
This is the most important step! Make sure your ice cream maker’s bowl is completely frozen solid. I always keep mine in the back of the freezer for at least 24 hours. There’s nothing sadder than a warm bowl and a soup that won’t churn. While you’re getting your other ingredients out, give the bowl a quick shake. If you don’t hear any liquid sloshing around, you’re good to go. Pro tip: Mark the bowl with tape so no one “helpfully” puts it away in the cabinet.
Step 2: Cooking the Luxurious Custard Base
In a medium saucepan, whisk together the cream, milk, sugar, egg yolks, instant coffee, and that pinch of salt. Keep whisking until it’s completely smooth and the coffee granules have dissolved. Now, turn the heat to medium. Cook this mixture, whisking constantly and scraping the bottom. You’ll see it slowly transform from a thin liquid to a beautifully thickened custard that coats the back of a spoon. It should be like a light sauce, not like pudding. Once thickened, take it off the heat and stir in the vanilla. That vanilla aroma mixed with coffee is divine.
Step 3: The Patience Game – Chilling the Base
Pour the warm custard through a fine-mesh strainer into a clean bowl. This catches any tiny cooked egg bits for the smoothest texture. Press plastic wrap directly onto the surface of the custard. This prevents a rubbery skin from forming. Now, let it chill in the fridge for at least 4 hours, or better yet, overnight. Chef’s tip: If you’re in a hurry, put the bowl in the freezer. Stir it every 10-15 minutes until it’s ice-cold. A cold base churns faster and makes fluffier ice cream.
Step 4: The Best Part – Churning Time!
Pour your thoroughly chilled coffee mixture into your frozen ice cream maker bowl. Turn it on and let the machine work its magic for 20-30 minutes. Watch as it goes from a liquid to a soft, billowy, frozen cloud. It will look like the most amazing soft-serve you’ve ever seen. The sound will change as it thickens—that’s your cue it’s just about done.
Step 5: Freezing to Perfection
Gently scoop your freshly churned ice cream into a freezer-safe container. A loaf pan lined with parchment paper works great. Smooth the top, press a piece of parchment on the surface, and seal it tightly with a lid or more plastic wrap. Freeze it for at least 4-6 hours to firm up. This “ripening” time lets the flavors meld and the texture become perfectly scoopable.
Timing is Everything
Here’s a quick look at your time investment:
- Prep Time: 20 minutes
- Chill Time: 4 hours (or overnight)
- Churn Time: 25 minutes
- Freeze Time: 6 hours
- Total Time: About 10 hours 45 minutes (mostly hands-off!)
My Secret Chef’s Tip
Add a tablespoon of a coffee liqueur or vodka to the base before churning. The alcohol won’t freeze, which helps prevent large ice crystals from forming. This gives you an incredibly smooth, professional-quality scoop straight from the freezer. Just a little bit does the trick!
A Fun Coffee Ice Cream Fact
Did you know the first known recipe for coffee ice cream was published in a book from 1887? The author, Mrs. A.B. Marshall, was a famous London cookery teacher. She used actual coffee essence. We’ve come a long way with instant espresso powder, making it so much easier for us home cooks to capture that deep flavor.
Necessary Equipment
You don’t need fancy gear, just a few basics:
- A medium saucepan
- Whisk
- Fine-mesh strainer
- Large glass measuring cup or mixing bowl
- Ice cream maker (I use a simple countertop model)
- Freezer-safe container with a lid (a loaf pan works perfectly)
Storing Your Homemade Masterpiece
Store your coffee ice cream in the coldest part of your freezer, usually in the back. Keep it in an airtight container with parchment pressed on the surface. This double layer of protection is key to blocking out freezer odors and preventing frost.
Properly stored, your homemade ice cream will keep its best texture for about 2-3 months. After that, it might start to form larger ice crystals or taste a bit off from the freezer air. But let’s be honest—it never lasts that long in my house!
If you see a little frost or crystals on top, just scrape them off before serving. It’s still perfectly good to eat. The flavor deepens wonderfully over the first week in the freezer.
My Best Tips and Advice
- Use the freshest, highest-quality instant coffee or espresso powder you can find. It is the star flavor.
- Let the ice cream sit on the counter for 5-10 minutes before scooping. This softens it just enough for perfect, creamy rounds.
- For extra decadence, fold in ½ cup of chopped dark chocolate or chocolate-covered coffee beans during the last minute of churning.
Picture-Perfect Presentation Ideas
- Serve in classic glass dessert cups with a dusting of cocoa powder and a pirouette cookie.
- Make an epic affogato by pouring a shot of hot espresso over a scoop or two in a mug.
- Create a sundae bar with toppings like warm fudge sauce, salted caramel, whipped cream, and toasted nuts.
- For a dinner party, pre-scoop balls onto a parchment-lined baking sheet, freeze solid, and then plate just before serving.
Healthier & Fun Flavor Twists
Love the recipe but want to mix it up? Try these six delicious variations:
- Mocha Chip: Add ⅓ cup of unsweetened cocoa powder to the hot custard base. Churn as directed, folding in ¾ cup of mini chocolate chips at the end.
- Dairy-Free Delight: Swap the cream and milk for full-fat canned coconut milk. The result is lush, with a subtle tropical note that pairs wonderfully with coffee.
- Sugar-Conscious Sip: Replace the granulated sugar with a monk fruit or erythritol blend made for baking. The texture will be slightly less creamy but still fantastic.
- Coffee Toffee Crunch: Churn the base, then layer it in your container with homemade or store-bought almond toffee bits. Every bite has a sweet, buttery crunch.
- Spiced Café: Infuse the warming custard with a cinnamon stick and a few star anise pods while it cooks. Strain them out before chilling for a complex, cozy flavor.
- Tiramisu Ice Cream: After freezing, layer the ice cream with sweetened mascarpone cheese and ladyfinger pieces soaked in a little coffee liqueur.
Common Mistakes to Avoid
Mistake 1: Not Freezing Your Ice Cream Maker Bowl
This is the number one reason for soupy, failed ice cream. Your bowl needs to be rock-solid. If it’s not cold enough, the mixture can’t freeze as it churns. Always freeze the bowl for the full time recommended by the manufacturer, usually 18-24 hours. I keep mine in the freezer permanently so it’s always ready for an ice cream craving.
Mistake 2: Cooking the Custard Too Fast or Too Hot
If you crank the heat to hurry things along, you risk scrambling the egg yolks. This gives you sweet, coffee-flavored scrambled eggs—not a smooth custard. Cook over medium heat and whisk constantly. The custard is ready when it thickly coats the back of a spoon and you can draw a clean line through it with your finger.
Mistake 3: Skipping the Chill Time for the Base
Pouring a warm or room-temperature base into your ice cream maker is a disaster. It will partially melt the frozen bowl, leading to poor churning and a grainy texture. A fully chilled base ensures the fastest freeze and the creamiest results. Patience here pays off in every scoop.
Mistake 4: Over-Churning the Ice Cream
Once your ice cream looks like soft-serve, it’s done. If you let the machine keep running, it can start to separate and become buttery. It will also be harder to scoop once frozen solid. When it reaches a thick, creamy consistency that holds its shape, stop the machine and transfer it to your storage container.
Your Coffee Ice Cream Questions, Answered
Can I make this without an ice cream maker?
Yes, you can! It’s called the “still-freeze” method. After chilling your custard base, pour it into a shallow metal baking pan and freeze. After 45 minutes, take it out and stir it vigorously with a fork, breaking up all the ice crystals. Do this every 30 minutes for about 3-4 hours until it’s fully frozen. It will be a bit denser than churned ice cream, but still delicious.
Why is my ice cream too hard to scoop?
Homemade ice cream doesn’t have the stabilizers commercial brands use. It freezes very solid. The simple fix is to let it warm up on the counter for 5-10 minutes before you try to scoop. Using the alcohol tip in the custard base also helps keep it scoopable. Make sure you’re storing it in an airtight container to prevent ice crystals that add extra hardness.
Can I use brewed coffee instead of instant?
Absolutely, but it changes the recipe a bit. Use ¼ cup of very strong, cooled brewed espresso or coffee. Then, reduce the amount of milk in the recipe by ¼ cup to balance the liquid. The flavor might be a touch more subtle, so you could also add an extra teaspoon of instant powder along with the brewed coffee for a double hit.
How do I prevent ice crystals from forming?
Ice crystals form from temperature fluctuations and air exposure. To fight them: 1) Make sure your custard base is completely cold before churning. 2) Store the ice cream with parchment paper pressed directly on the surface before sealing the lid. 3) Add a tablespoon of a spirit like vodka, which lowers the freezing point. 4) Keep your freezer temperature steady and avoid opening the door too often.
My ice cream tastes weak. How can I make the coffee flavor stronger?
You have a few great options. First, you can increase the instant espresso powder to 1.5 or even 2 tablespoons. Second, try using a dark roast instant coffee. Third, you can steep 2 tablespoons of whole coffee beans in the warm cream and milk mixture for an hour before straining them out and proceeding with the recipe. This gives a fantastic, rounded coffee flavor.
Is it safe to eat because of the raw eggs?
The eggs in this recipe are cooked into a custard, reaching a safe temperature of at least 160°F (71°C). The mixture thickens enough to coat a spoon, which means the eggs are fully cooked. You are not consuming raw eggs. If you have concerns, you can use pasteurized egg yolks available in some grocery stores.
Can I double this recipe?
You can, but check your ice cream maker’s capacity first. Most home models hold between 1.5 and 2 quarts. This recipe makes about 1 quart. Doubling it might overflow a standard machine. If your machine is large enough, go for it! Just use a larger saucepan for cooking the custard, and expect the chilling and churning times to be slightly longer.
What’s the difference between using milk and all cream?
Using all cream (2 cups of heavy cream and no milk) will make an incredibly rich, decadent ice cream. It will also feel heavier and freeze harder. The mix of cream and milk gives a beautiful balance—rich and creamy, but still light enough to enjoy a full bowl. I prefer the balance, but trying it with all cream once is a fun, luxurious experiment.
How long will it last in the freezer?
For the best texture and flavor, enjoy your homemade coffee ice cream within 2-3 weeks. After a month, it’s still safe to eat, but it will likely develop larger ice crystals and may pick up other freezer smells. It rarely lasts more than two weeks in my house anyway, as it’s the first thing we go for after dinner!
Can I make this into popsicles instead?
That’s a fantastic idea! Pour the chilled custard base directly into popsicle molds. Insert the sticks and freeze for at least 6 hours, or until solid. You might want to increase the sugar slightly, as things taste less sweet when frozen solid. You’ll have the creamiest, most amazing coffee popsicles your friends have ever tasted.
Ready, Set, Scoop!
There you have it—your guide to the creamiest, dreamiest homemade coffee ice cream. It’s a recipe that feels fancy but is truly simple at heart. The smell of coffee and vanilla cooking together is pure happiness. The pride of serving something you made from scratch is even better. So go ahead, freeze that bowl, whisk that custard, and get ready for the most satisfying scoop of your life. Happy churning, friends!
Rib Plate Delights
Ingredients
Equipment
Method
- Make sure your ice cream maker's bowl is completely frozen solid.
- In a medium saucepan, whisk together the cream, milk, sugar, egg yolks, instant coffee, and salt until smooth.
- Heat the mixture over medium, whisking constantly until it thickens and coats the back of a spoon, then remove from heat and stir in the vanilla.
- Strain the warm custard through a fine-mesh strainer into a clean bowl, cover with plastic wrap, and chill in the fridge for at least 4 hours or overnight.
- Pour the chilled mixture into your ice cream maker and churn for 20-30 minutes until it reaches a soft-serve consistency.
- Transfer the churned ice cream to a freezer-safe container, smooth the top, cover with parchment, seal, and freeze for at least 4-6 hours to firm up.