Is there anything cozier than the smell of baking apples and spices filling your home? I don’t think so. Every fall, when the leaves start to turn, my family begins asking for this very cake. It’s not just a dessert; it’s a warm, spiced hug on a plate. This baked apple cake is my absolute go-to for holiday gatherings or any Sunday that needs a little extra sweetness. With its moist crumb, creamy filling, and spiced apple topping, it’s a showstopper that tastes as incredible as it looks.
A Slice of Comfort: The Story Behind Baked Apple Cake
This cake is my personal twist on a classic German “Apfelkuchen.” I first had something similar at a friend’s Christmas market party years ago. It was love at first bite! I spent the next few winters tweaking recipes in my own kitchen, combining a spiced sponge, a tangy curd cream, and a glossy apple topping. The goal was to create a dessert that felt both festive and familiar. My version is a bit more indulgent, with that creamy quark layer, which makes it perfect for special occasions. It’s my little tradition now, and I’m so happy to share it with you.
Why This Apple Cake Will Steal Your Heart
You’ll adore this recipe for so many reasons! First, the flavors are a perfect harmony: sweet, tart, spicy, and creamy all in one forkful. It’s also surprisingly versatile. You can make the components ahead of time, which is a lifesaver during the busy holiday season. While it looks like it came from a fancy bakery, the steps are simple and forgiving. Most importantly, it has that magical “wow” factor. Serving this cake always brings smiles and requests for seconds (and the recipe!).
When to Bake This Beautiful Apple Treat
This cake is a star for any event that calls for something special. It’s a must for Thanksgiving dessert tables and Christmas Eve dinners. I love bringing it to autumn potlucks or serving it after a Sunday roast. It’s also the perfect birthday cake for anyone who loves apples more than chocolate. Honestly, any gray day becomes brighter with a slice of this cake and a cup of coffee.
Gathering Your Ingredients
Here’s what you’ll need to create this masterpiece. Using room temperature ingredients, especially the butter and eggs, is key for a perfect batter!
For the Spiced Sponge Dough:
- 130 g soft butter
- 120g sugar
- 1 tsp gingerbread spice (or pumpkin pie spice)
- 1 pinch of salt
- 3 eggs
- 100 g all-purpose flour (Type 405 or plain flour)
- 50 g ground almonds
- 1 tsp baking powder
For the Apple Filling:
- 800 g firm apples (like Topaz, Cox Orange, or Granny Smith)
- 2 tbsp sugar
- 2 tbsp lemon juice
- 150 ml apple juice
- 1 pack (about 40g) vanilla pudding powder (or custard powder)
- 50ml water
For the Cream Layer:
- 250 g low-fat quark (or Greek yogurt)
- 70g sugar
- 500 g heavy whipping cream
- 2 packs of cream stiffener (or 2 tsp cream of tartar)
For the Garnish:
- 1 apple
- 1 tbsp sugar
- 1 pack of bourbon vanilla sugar (or 1 tsp vanilla extract + 1 tsp sugar)
- 50 ml apple juice
- Some ground cinnamon
Easy Ingredient Swaps
Don’t worry if you’re missing something! Here are some handy substitutions:
- Quark: Full-fat Greek yogurt is the best substitute. It gives a similar tangy creaminess.
- Ground Almonds: You can use an equal amount of additional flour or ground hazelnuts.
- Vanilla Pudding Powder: Cornstarch (about 3 tbsp) mixed with 1 tsp of vanilla extract will work to thicken the apples.
- Cream Stiffener: Cream of tartar or simply making sure your cream and bowl are very cold works wonders.
- Apple Types: Use any firm baking apple you love. A mix of tart and sweet is fantastic.
Let’s Bake! Your Step-by-Step Guide
Step 1: Prep and Preheat
Start by getting your oven ready. Preheat it to 180°C (350°F) for top/bottom heat, or 160°C (320°F) if you’re using a fan oven. This ensures a consistent bake. Take your 26 cm (10-inch) springform pan and line the bottom with a round of parchment paper. There’s no need to grease the sides. This little paper circle is your best friend for a clean cake release later. Get your ingredients measured and ready to go.
Step 2: Create the Spiced Sponge
In a large bowl, beat the soft butter with the sugar, gingerbread spice, and that pinch of salt. Beat it until it’s light, fluffy, and almost white. This incorporates air for a lovely cake texture. Now, add the eggs one at a time, beating well after each addition. If the mixture looks a bit curdled, don’t panic! In a separate bowl, whisk together the flour, ground almonds, and baking powder. Gently fold this dry mix into the wet ingredients until just combined. You’ll have a thick, fragrant batter. Pour it into your prepared tin, smooth the top, and bake for 25-30 minutes. A toothpick should come out clean. Let it cool completely in the pan. Pro tip: Letting the cake cool prevents the creamy topping from melting later.
Step 3: Cook the Apple Filling
While the cake cools, tackle the apples. Peel, core, and cut them into small, even cubes. Toss them in a large pot with the 2 tbsp of sugar and lemon juice. The lemon keeps them bright. Steam them over medium heat for 3-4 minutes, stirring often. You’ll smell that wonderful apple aroma. Pour in the apple juice and bring it to a gentle simmer. In a small cup, mix the vanilla pudding powder with the 50ml of water until it’s completely smooth. While stirring the apple mixture, pour in the slurry. Keep stirring as it bubbles and thickens beautifully into a glossy apple pie-like filling. Set it aside to cool slightly.
Step 4: Assemble the First Layers
Once your sponge is completely cool, carefully remove the springform ring. Place the cake base, still on its parchment paper, onto your serving plate. Clean the springform ring and place it back around the cake—this creates walls to hold our filling. Now, spoon the still-warm apple filling onto the sponge base. Spread it into an even layer right to the edges. Pop the whole thing into the fridge for at least 15 minutes. This chills the apple layer and sets it, making the next step much easier.
Step 5: Whip Up the Dreamy Cream
For the creamy layer, start by mixing the quark with the sugar in a medium bowl until smooth. Now, in a large, chilled bowl, pour the cold cream. Add the cream stiffener (or cream of tartar). Whip it on high speed until you have firm, beautiful peaks. Be careful not to over-whip it into butter! Gently fold the sweetened quark into the whipped cream until you have a uniform, luscious mixture. Take your chilled cake out of the fridge. Spread this cream over the apple layer, creating lovely swoops and swirls on top. Return the cake to the fridge to set firmly for at least 1 hour, but longer is better.
Step 6: Create the Caramelized Apple Garnish
About 30 minutes before serving, make the stunning topping. Peel, core, and cube the remaining apple evenly. Heat a non-stick pan over medium heat and add the tablespoon of sugar. Let it melt without stirring until it turns a light amber color—this is your caramel. Carefully add the apple cubes and the vanilla sugar. They will sizzle! Stir to coat the apples in the caramel. Deglaze the pan with the apple juice; it will bubble up and loosen any caramel bits. Let the apples simmer for 2-3 minutes until they are tender but still hold their shape and are glossy with caramel. Set them aside to cool.
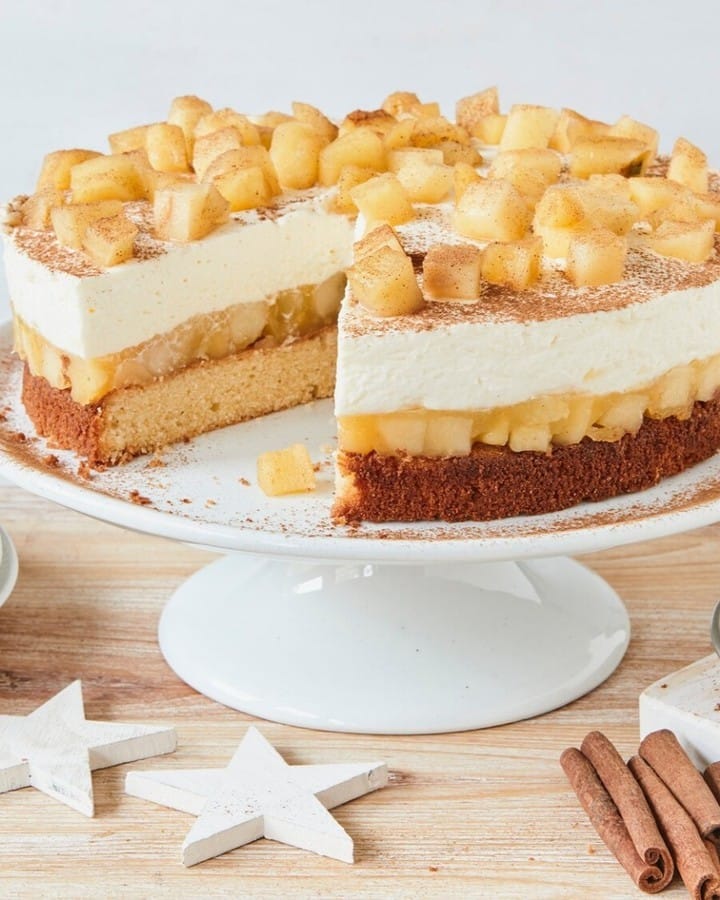
Step 7: The Grand Finale
It’s time to unveil your creation! Carefully unclasp and remove the springform ring from around the cake. If you like, dust the top very lightly with a sprinkle of cinnamon for a warm, festive touch. Artfully arrange the cooled caramelized apple cubes on top of the cream. You can cluster them in the center or scatter them around. Chef’s tip: For a truly pro look, brush the apple cubes with a little of the leftover caramel syrup from the pan for extra shine.
Your Baking Timeline
Good baking is all about timing. Here’s a breakdown for this cake:
- Prep Time: 45 minutes
- Baking Time: 30 minutes
- Cooling & Chilling Time: 2 hours (minimum)
- Total Time: About 3 hours 15 minutes
I highly recommend making this cake the day before your event. The flavors meld together wonderfully overnight in the fridge.
My Secret for the Best Baked Apple Cake
My #1 secret is in the sponge: use ground almonds. Even if you’re not a nut person, they don’t make the cake taste nutty. Instead, they add an incredible moisture and a delicate, almost frangipane-like texture that regular flour alone can’t achieve. It keeps the base from getting soggy under the juicy apple filling. Trust me on this one—it’s a game-changer!
A Fun Apple Fact
Did you know there are over 7,500 varieties of apples grown worldwide? Using a firm, tart-sweet variety for baking, like Cox Orange or Braeburn, is crucial. They hold their shape and flavor when cooked, preventing your beautiful filling from turning into applesauce. It’s worth seeking out a good baker at your farmers’ market!
Tools You’ll Need
- 26 cm (10-inch) springform pan
- Parchment paper
- Stand mixer or hand mixer
- Large mixing bowls
- Whisk and spatula
- Medium saucepan
- Vegetable peeler and sharp knife
- Cooling rack
Storing Your Masterpiece
Because of the creamy topping, this cake must be stored in the refrigerator. Cover it loosely with plastic wrap or place a cake dome over it. It will keep beautifully for up to 3 days. The sponge may firm up a little when cold, but the flavors will continue to deepen, making it even more delicious.
I do not recommend freezing the fully assembled cake. The cream layer and the juicy apples do not thaw well and can become watery. However, you can absolutely freeze the baked and cooled sponge base by itself. Wrap it tightly in plastic wrap and then foil. It will keep for up to 2 months.
If you need to make it ahead, assemble the cake with the sponge, apple filling, and cream up to a day in advance. Keep it covered in the fridge. Prepare the caramelized apple garnish separately and store it in a small container in the fridge. Right before serving, decorate the top of the cake with the cold apples. This keeps the garnish perfectly textured and glossy.
Tips for Baking Success
- Ensure all ingredients, especially for the sponge and cream, are at room temperature unless specified (the cream itself must be cold).
- When folding the flour and whipped cream, use a gentle hand to keep the batter and cream light and airy.
- If your apple filling seems too runny after thickening, just cook it for another minute or two while stirring. It will continue to set as it cools.
- For clean slices, dip your knife in hot water and wipe it clean between each cut.
Making it Look Stunning
Presentation is part of the joy! Here are a few ideas:
- Dust the rim of the plate with cinnamon or cocoa powder before placing the cake.
- Add a few fresh mint leaves alongside the caramelized apples for a pop of color.
- Serve each slice with a small drizzle of warm caramel sauce or a dollop of lightly sweetened whipped cream.
- Place the whole cake on a cake stand decorated with autumn leaves or cinnamon sticks.
Health-Conscious Variations
Love the idea but want a lighter twist? Try one of these delicious variations:
- Whole Wheat & Maple Version: Swap the all-purpose flour for whole wheat pastry flour. Use pure maple syrup in the sponge and reduce the liquid slightly.
- Dairy-Free Delight: Use a plant-based butter and a coconut-based whipping cream. Substitute the quark with a thick, unsweetened coconut yogurt.
- Refined Sugar-Free: Sweeten the entire cake with coconut sugar or a monk fruit blend. The color will be darker but the flavor deep and rich.
- Nut-Free Sponge: Simply replace the ground almonds with an extra 50g of flour or rolled oats blitzed into a fine powder.
- Single Layer Simplicity: Skip the cream layer. Just top the cooled sponge and apple filling with the caramelized apples for a simpler, rustic dessert.
- Mini Cake Treats: Bake the sponge in a muffin tin to create individual portions. Layer the filling and cream in small glasses for pretty, portion-controlled parfaits.
Common Mistakes to Avoid
Mistake 1: Using Warm Ingredients for the Sponge
It’s tempting to soften butter in the microwave, but if it’s melted or too warm, it won’t cream properly with the sugar. This results in a dense, greasy cake instead of a light, fluffy one. Your eggs should also be at room temperature. Cold eggs can cause the beautiful creamed butter and sugar to seize up and look curdled. Plan ahead! Take these ingredients out of the fridge about an hour before you start baking.
Mistake 2: Overmixing the Batter
Once you add the flour, your mixing should be gentle. Overmixing develops the gluten in the flour, leading to a tough, rubbery sponge. You want to fold the dry ingredients in just until no streaks of flour remain. A few small lumps are better than a tough cake. Use a spatula and a light hand for the best texture.
Mistake 3: Not Letting Layers Cool Before Assembling
Adding the warm apple filling or the cream to a warm cake base is a recipe for disaster. The heat will melt the cream and make the bottom sponge soggy. Patience is key here. Let the sponge cool completely on a rack. Let the apple filling cool until it’s just warm, not piping hot. This ensures every layer stays distinct and perfect.
Mistake 4: Under-whipping or Over-whipping the Cream
The cream layer should be pillowy and hold its shape. If it’s under-whipped, it will be runny and won’t sit nicely on the cake. If you go too far and over-whip it, it becomes grainy and turns into butter. Watch it closely! Whip on high speed until the beaters leave firm, defined trails and the peaks stand straight up when you lift the beaters.
Mistake 5: Burning the Caramel for the Garnish
Making caramel can be intimidating. The sugar goes from perfect amber to burnt very quickly. Use medium heat and don’t walk away. Let the sugar melt without stirring. Once it’s a light golden color, it’s ready for the apples. If you see dark specks, it’s starting to burn. Having your apple cubes measured and ready to go right next to the stove is the best way to prevent this.
Your Baked Apple Cake Questions, Answered
Can I make this cake a day ahead?
Absolutely! In fact, I highly recommend it. Making it a day ahead allows all the flavors to meld together beautifully. Just keep it covered in the refrigerator. I suggest adding the caramelized apple garnish on top right before you serve it. This keeps the apples from softening and maintains their gorgeous glossy look.
What’s the best apple to use for baking?
You want an apple that holds its shape when cooked and has a balance of sweet and tart flavor. My top picks are Granny Smith for tartness, Honeycrisp for sweetness and crunch, or Braeburn for a perfect mix. Avoid very soft apples like Red Delicious, as they will turn to mush in the filling.
I can’t find quark. What’s the best substitute?
Full-fat Greek yogurt is the closest and best substitute. It has a similar thick, tangy quality that works perfectly with the sweet cream. You could also use farmer’s cheese or even a well-drained ricotta. The key is thickness, so avoid regular runny yogurt.
My sponge didn’t rise much. What went wrong?
This is usually due to old baking powder, overmixing the batter after adding the flour, or not creaming the butter and sugar long enough. Baking powder loses its power over time. Make sure yours is fresh. Cream the butter and sugar for a good 3-5 minutes until it’s very pale and fluffy—this creates air pockets for the cake to rise.
Can I freeze this cake?
I don’t recommend freezing the fully assembled cake because the cream and apple layers will become watery when thawed. However, you can freeze the baked and completely cooled sponge base very successfully. Wrap it tightly in plastic and foil for up to 2 months. Thaw at room temperature before assembling.
How do I prevent a soggy bottom?
The three keys are: 1) Let the sponge cool completely. 2) Let the apple filling cool until just warm, not hot. 3) The ground almonds in the sponge act as a barrier to moisture. If you skipped them, that could be why. Also, make sure your pudding/cornstarch mixture has fully thickened the apple filling before you spread it.
What is cream stiffener and do I need it?
Cream stiffener is a stabilizer, often containing sugar and starch, that helps whipped cream hold its shape longer. It’s very helpful for a cake that needs to be chilled. If you can’t find it, use 1-2 teaspoons of cream of tartar per cup of cream. The most important thing is to start with very cold cream and a cold mixing bowl.
Can I make this without a springform pan?
A springform pan is ideal because the removable sides make it easy to assemble and serve. In a pinch, you could use a regular cake pan. You’d need to carefully lift the cooled sponge out to plate it, then create a collar out of acetate or parchment paper to line the pan again for the fillings, which is tricky.
Is there a way to make this less sweet?
Yes! You can reduce the sugar in the sponge by 20-30 grams. Use a tart apple like Granny Smith for the filling. You can also slightly reduce the sugar in the quark mixture. Taste as you sweeten the quark cream. The cake balances sweet and tart, so adjust to your taste.
How long will leftovers keep?
Leftover cake will keep well, covered, in the refrigerator for up to 3 days. The sponge may firm up a bit, but the flavors will still be wonderful. The caramelized apples on top may soften, but they’ll still be tasty. It’s best enjoyed within 2 days for peak texture.
And there you have it—my all-time favorite baked apple cake recipe. It’s a labor of love that pays off with every single bite. The journey from mixing the spiced batter to placing that final caramelized apple cube is so rewarding. I can’t wait for you to experience the compliments and happy sighs this cake brings. So, preheat that oven, gather your apples, and get ready to bake a memory. Don’t forget to save a slice for yourself with a big cup of coffee. Happy baking!
Tropical Pineapple Treats
Ingredients
Equipment
Method
- Preheat the oven to 180°C (350°F) for top/bottom heat (160°C/320°F for fan oven) and line a 26 cm (10-inch) springform pan with parchment paper.
- Beat the soft butter with sugar, gingerbread spice, and a pinch of salt until light and fluffy.
- Add eggs one at a time, mixing well after each.
- In another bowl, whisk together flour, ground almonds, and baking powder; fold into the wet mixture until just combined.
- Pour the batter into the prepared tin and bake for 25-30 minutes until a toothpick comes out clean; cool completely in the pan.
- Peel, core, and cube the apples; toss with sugar and lemon juice and steam over medium heat for 3-4 minutes.
- Add apple juice to the apple mixture and simmer; mix pudding powder with water and stir into the mixture until thickened.
- Place the cooled sponge on a plate and return the springform ring; spoon the warm apple filling onto the sponge and refrigerate for at least 15 minutes.
- Mix quark and sugar until smooth; whip the cold cream with cream stiffener until firm.
- Fold together whipped cream and quark; spread over the chilled apple layer and return to the fridge to set for at least 1 hour.
- Caramelize the remaining apple cubes in a pan with sugar until amber, then add apple juice and simmer for 2-3 minutes until tender; let cool.
- Unclasp the springform ring, dust the top with cinnamon, and arrange the caramelized apples before serving.