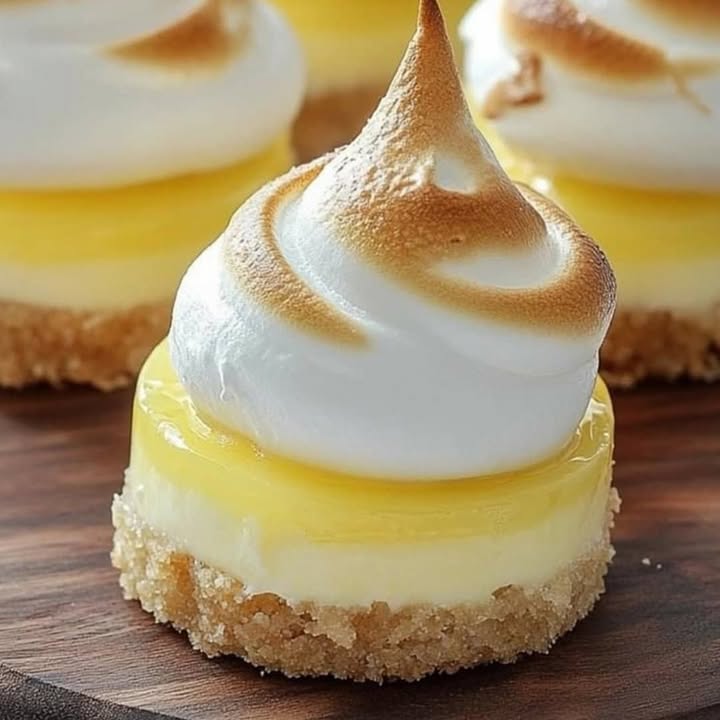
Mini Lemon Meringue Cheesecakes: Sunshine in Every Bite
Let’s be honest, life can get a bit sour sometimes. But I found my perfect antidote! It’s a tiny, creamy, tangy, and sweet little pie that smiles back at you. I first made these Mini Lemon Meringue Cheesecakes for a friend’s baby shower. The moment I saw those happy faces biting into them, I knew this recipe was a winner. It’s like a classic lemon meringue pie met a cheesecake, fell in love, and decided to have adorable mini babies. They are the perfect party pick-me-up.
The Sweet Story Behind the Dish
My love for lemon desserts started with my grandma’s old-fashioned lemon meringue pie. It was a giant, glorious masterpiece. But serving it was always a messy adventure! The modern twist? Turning that grand pie into cute, single-serving cheesecakes. This version gives you all the beloved flavors—the buttery crust, the creamy tangy filling, the fluffy meringue—but without the slice-and-serve drama. It’s a fun mash-up of two classic desserts, perfect for today’s get-togethers where everyone wants their own perfect little treat.
Why You’ll Adore This Recipe
You will love these mini cheesecakes for so many reasons! They are individual servings, so no fighting over who got the bigger slice. They are incredibly balanced in flavor—not too sweet, not too tart. They look absolutely professional and gorgeous with that toasted meringue top. And honestly, they’re simpler than making a full-sized pie. You get all the applause for a stunning dessert with a fraction of the usual stress. It’s a surefire way to impress your guests and your own taste buds.
Perfect Times to Whip Up These Mini Cheesecakes
These little sunshines are versatile stars! They shine at:
- Spring and Summer Gatherings: Picnics, garden parties, or any sunny day celebration.
- Brunch or Ladies’ Lunch: They add a bright, elegant finish to a midday meal.
- Holiday Parties: Think Easter, Mother’s Day, or even a festive Christmas dessert table.
- Just Because You Need Joy: A Tuesday night deserves a mini cheesecake too.
What You’ll Need: Ingredients List
Gather these simple ingredients. I promise, most are pantry staples!
- Crust: 24 Nilla wafer cookies (any type), 3 tbsp unsalted butter (melted)
- Filling: 12 oz cream cheese (softened), 1/2 cup granulated sugar, 2 tbsp sour cream, 1/4 tsp salt, 2 tbsp fresh lemon juice, 1 tsp lemon zest, 1 large egg, 1/2 cup lemon curd (store-bought or homemade)
- Meringue: 2 large egg whites, 1/2 cup granulated sugar, 1/4 tsp cream of tartar, 1/4 tsp vanilla extract
Smart Swaps: Substitution Options
Don’t fret if you’re missing something. Here are easy swaps:
- Nilla Wafers: Use any plain vanilla wafer or even graham crackers.
- Sour Cream: Plain full-fat yogurt works just fine.
- Lemon Curd: A good quality store-bought jar is my shortcut, but homemade is amazing.
- Cream of Tartar: A tiny pinch of white vinegar or lemon juice can help stabilize the egg whites.
Let’s Get Baking! The Preparation Steps
Step 1: Preheat and Prep the Pan
Start by setting your oven to 350°F (175°C). This gives it time to get perfectly hot. Take your mini cheesecake pan and lightly grease it. I use a bit of butter or a quick spray of cooking oil. This little step guarantees your cheesecakes will release smoothly later. Get your food processor or a zip-top bag ready for the crust. You’re building the foundation for your delicious towers!
Step 2: Make the Buttery Crust
Place your Nilla wafers into the food processor. Pulse them until they become fine, sandy crumbs. You’ll hear a lovely crunching sound. Pour in the melted, golden butter. Pulse again until it all looks like wet sand. The aroma is sweet and buttery. Pro tip: If you don’t have a processor, put cookies in a bag and crush with a rolling pin. Then mix with butter in a bowl. Use a small cookie scoop to divide this mixture among the pan cavities. Press down firmly with your fingers or a small glass to create a solid, even layer. This compact crust won’t crumble when you eat it.
Step 3: Bake the Crust Briefly
Place the pan with just the crusts into your preheated oven. Bake for only 5 minutes. This short bake helps set the crust so it stays together. After 5 minutes, reduce the oven temperature to 325°F (165°C). This lower temperature is key for the next step. It ensures our creamy cheesecake filling cooks gently without cracking or puffing up too much. Let the pan sit on the counter while you make the filling.
Step 4: Create the Luscious Lemon Cheesecake Filling
In your stand mixer bowl, add the soft cream cheese and sugar. Beat them on medium speed until the mix is completely smooth and pale. No lumps allowed! Then add the sour cream, fresh lemon juice, and bright yellow lemon zest. Mix again until combined. Finally, add the egg. Mix on low just until the batter is smooth and streak-free. Overmixing can add too much air. The filling will be thick, creamy, and smell like a lemon grove.
Step 5: Fill and Bake the Cheesecakes
Spoon a heaping medium scoop of filling into each crust-lined cavity. Try to fill them evenly. The filling will be slightly higher than the crust. Gently tap the pan on the counter to settle the filling. Place the pan in the 325°F oven. Bake for 15-18 minutes. The centers should be set but still have a slight jiggle when you gently shake the pan. Chef’s tip: A slight jiggle means they’re perfect. Overbaking makes them dry. Let them cool completely in the pan on a wire rack. Then, transfer them to the fridge for at least 6 hours, ideally overnight. This chill time makes them firm and sliceable.
Step 6: Prepare the Fluffy Meringue Topping
This step is a bit fancy but totally doable! In a metal bowl, combine egg whites, sugar, and cream of tartar. Place this bowl over a pot of simmering water (don’t let the bowl touch the water). Whisk for 3-4 minutes until the sugar dissolves and the mixture feels warm. This step stabilizes the meringue. Transfer the bowl to your stand mixer. Beat on low, then increase to high speed. Beat until stiff, glossy peaks form, about 5 minutes. Add vanilla and mix. You’ll have a cloud-like, shiny meringue. Transfer it to a piping bag fitted with your favorite tip.
Step 7: Assemble and Toast Your Mini Masterpieces
Carefully remove the chilled cheesecakes from the pan. Peel off the bottom disc from each. Now, the fun assembly! Spoon or pipe about 1-2 teaspoons of sunny yellow lemon curd onto the center of each cheesecake. Then, pipe your fluffy white meringue on top, covering the curd. You can make swirls, peaks, or a simple dollop. Finally, use a kitchen torch to lightly brown the meringue. Move the torch slowly to create beautiful golden spots. The smell of toasted sugar is incredible! Your mini lemon meringue cheesecakes are ready to dazzle.
Timing Your Cheesecake Success
Here’s your time plan to avoid rush:
- Prep Time: 25 minutes (crust and filling)
- Cooking Time: 23-25 minutes (crust + cheesecake bake)
- Chilling Time: 6-12 hours (crucial!)
- Meringue & Assembly Time: 15 minutes
- Total Time (with chilling): About 7 hours
Plan to make these the day before your event. The chilling time is non-negotiable for perfect texture.
Chef’s Secret: The Lemon Zest Trick
My secret weapon is the lemon zest. Don’t skip it! The zest holds intense lemon oil. It gives the filling a deep, aromatic lemon flavor that the juice alone can’t provide. Use a fine microplane zester. Only zest the bright yellow outer part. Avoid the white pith underneath, as it’s bitter. This tiny step makes your mini cheesecakes taste like real, fresh lemons.
A Little Extra Sweet Info
The meringue topping here uses a “Swiss” method. You warm the egg whites and sugar together over water. This makes the meringue extra stable and less likely to weep or deflate later. It’s a trick from professional pastry chefs. But it’s simple enough for home cooks! It ensures your beautiful toasted tops stay picture-perfect for hours.
Necessary Equipment Checklist
You don’t need fancy tools, but these help:
- Mini cheesecake pan (with removable bottoms)
- Food processor or zip-top bag + rolling pin
- Stand mixer or hand mixer
- Metal bowl for meringue
- Pot for simmering water
- Piping bag and tip (optional, a spoon works too)
- Kitchen torch
- Cookie scoop (for easy portioning)
Keeping Your Treats Fresh: Storage Tips
Once assembled with meringue, these cheesecakes are best eaten within a few hours. The meringue can start to soften over time. If you need to store them before serving, keep the components separate. Store the plain baked and chilled cheesecakes (without curd and meringue) in an airtight container in the refrigerator for up to 3 days.
The lemon curd can be stored in its jar or container in the fridge. The meringue can be made ahead and kept in the piping bag at room temperature for a few hours before you need it. Assemble and torch just before your event for the freshest, crispest meringue experience.
I do not recommend freezing the assembled cheesecakes. The meringue does not freeze well. You could freeze the plain cheesecakes (without toppings) for up to a month. Thaw in the refrigerator overnight before adding curd and meringue.
Helpful Tips and Advice
Here are my best pointers for smooth sailing:
- Soft Cream Cheese is Key: Let it soften at room temperature for 1-2 hours. This prevents a lumpy filling.
- Don’t Overmix After Adding Egg: Mix just until combined to avoid too much air, which can cause cracking.
- Chill Thoroughly: The long chill sets the structure. Rushing this leads to messy servings.
- Toast Meringue Safely: Use the kitchen torch in short bursts. Hold it a few inches away to avoid burning.
Presentation Ideas to Make Them Sparkle
Make your mini cheesecakes the star of the table!
- Serve on a contrasting dark plate or a rustic wooden board.
- Add a tiny fresh mint leaf or edible flower next to each one.
- Dust the plate with a little powdered sugar for a snowy effect.
- Use different piping tips for varied meringue shapes—stars, roses, simple peaks.
- Place them on individual small napkins or doilies for a vintage touch.
Healthier and Fun Variations
You can play with this recipe in many ways! Here are six inspired twists:
- Gluten-Free Mini Cheesecakes: Use gluten-free vanilla cookies or almond flour for the crust.
- Low-Sugar Version: Reduce sugar in the filling by 25% and use a sugar-free lemon curd.
- Berry Burst Cheesecakes: Swap lemon curd for a layer of fresh raspberry or strawberry compote.
- Key Lime Twist: Use key lime juice and zest instead of lemon for a tropical flavor.
- No-Torch Option: Skip the torch and use whipped cream instead of meringue for a simpler topping.
- Chocolate Lemon Fusion: Add a tablespoon of cocoa powder to the crust mix for a chocolatey base.
Each variation keeps the mini cheesecake fun but gives you a new flavor adventure.
Common Mistakes to Avoid
Mistake 1: Using Cold, Hard Cream Cheese
This is the biggest cause of lumpy, uneven filling. Cold cream cheese doesn’t blend smoothly with the sugar. You end up with chunks in your batter. To avoid this, let your cream cheese soften on the counter for at least an hour. If you forget, you can microwave it for 10-15 seconds on low power. But room temperature softening is best. A smooth start means a smooth, creamy cheesecake.
Mistake 2: Skipping the Long Chill Time
I know it’s tempting to serve these right after baking. But cheesecake needs time to set! The fridge time is not just cooling. It’s when the structure firms up. Skipping this leads to a filling that’s too soft. It might collapse when you add toppings. It won’t have that perfect cheesecake texture. Plan ahead. Make them the day before. Your patience will be rewarded with perfect little bites.
Mistake 3: Overbaking the Cheesecake Filling
We want a slight jiggle in the center when we take them out of the oven. No jiggle means they’re overbaked. Overbaked cheesecakes become dry, dense, and can crack on top. They lose that lovely creamy mouthfeel. Set your timer for 15 minutes and check. If the edges are set but the center still moves a bit like Jello, they’re done. Trust the jiggle! It will firm up perfectly in the fridge.
Mistake 4: Getting Water in Your Meringue Bowl
When you warm the egg whites over simmering water, keep the bowl dry. If the simmering water touches the bottom of the bowl, or if steam condenses and drips into the mix, it can ruin your meringue. Water prevents the egg whites from whipping up properly. Use a bowl that fits snugly over your pot but doesn’t touch the water. A dry, warm mixture is the secret to glossy, stiff peaks.
Your Questions Answered: FAQ
Can I make these without a mini cheesecake pan?
Yes, you can! Use a regular muffin tin lined with parchment paper squares or foil liners. The crust and filling steps are the same. The baking time might be similar. However, removing them from a muffin tin can be trickier. The special pan with removable bottoms is designed for easy release. If you use a muffin tin, let the cheesecakes chill fully first. Then, gently run a knife around the edge to help lift them out.
My meringue is deflating. What went wrong?
Deflated meringue often comes from two issues. First, your bowl or whisk might have had a tiny bit of grease or fat on it. Fat kills meringue. Ensure everything is impeccably clean. Second, you might not have whipped it long enough. The meringue should reach stiff peaks. When you lift the whisk, the peak should stand straight up without bending over. Also, make sure you dissolved the sugar fully during the warming step. Undissolved sugar grains can cause weeping and collapse.
Can I use bottled lemon juice instead of fresh?
I highly recommend fresh lemon juice. The flavor is brighter and more vibrant. Bottled juice often has a processed, flat taste. For a dessert where lemon is the star, fresh makes a big difference. Plus, you need the fresh lemon for the zest too! Squeezing a couple of lemons is quick. You’ll taste the difference in your final mini cheesecakes. It’s worth the tiny extra effort.
How long do assembled cheesecakes last?
Once you’ve added the lemon curd and toasted the meringue, eat them within 4-6 hours for the best experience. The meringue topping can start to soften, weep, or lose its crisp texture over time. They are still safe to eat for a day or two if refrigerated, but the texture won’t be ideal. For the absolute perfect bite, assemble and serve them the same day, ideally within a few hours of topping.
What if I don’t have a kitchen torch?
No torch? No problem. You have two good options. First, you can skip the toasting. The white meringue is still beautiful and tasty. Second, you can use your oven. Pipe the meringue on the cheesecakes. Place them on a baking sheet. Put them in a preheated 400°F oven for just 3-5 minutes. Watch them closely! The meringue should brown lightly. This method works, but be careful not to melt the cheesecake or over-brown the meringue.
Can I make the lemon curd myself?
Absolutely! Homemade lemon curd is fantastic. It uses fresh lemon juice, zest, sugar, egg yolks, and butter. It cooks into a thick, sunny spread. Making it adds about 20 minutes to your recipe. If you love cooking, I encourage you to try it. It gives you full control over the sweetness and tang. For a busy day, a high-quality store-bought curd is a perfectly fine shortcut. Both paths lead to delicious mini cheesecakes.
Why do I need to reduce the oven temperature?
We start at a higher temperature (350°F) to quickly set the crust. This gives it a sturdy base. Then we lower it to 325°F for the cheesecake filling. Cheesecake is delicate. Baking it at a lower, gentler temperature prevents it from rising too fast, cracking on top, or becoming dry. It allows the creamy center to cook slowly and evenly. This two-temperature method is a simple trick for a flawless texture.
How do I know when the meringue sugar is dissolved?
When you whisk the egg whites and sugar over the simmering water, you need to dissolve the sugar granules. Rub a bit of the mixture between your fingers. It should feel smooth, not gritty. If you feel sugar grains, keep whisking for another minute. This usually takes about 3-4 minutes of constant whisking. Dissolved sugar makes a stable meringue that whips up glossy and holds its shape beautifully.
Can I freeze these mini cheesecakes?
You can freeze the plain baked cheesecakes (without toppings) successfully. Wrap them well in plastic wrap and place in an airtight container. Freeze for up to a month. Thaw in the refrigerator overnight. Then add your lemon curd and meringue fresh. Do not freeze the assembled cheesecakes with meringue. The meringue does not survive freezing well. It becomes soggy and collapses when thawed.
What’s the best way to remove them from the pan?
After chilling, the cheesecakes should be firm. Gently push up the removable bottom disc from underneath. The cheesecake should lift out easily. If it sticks a bit, run a thin knife around the very edge between the cheesecake and the pan wall. The chilling step contracts the cheesecake slightly, which helps release it. Always chill first before trying to remove them. This prevents breakage.
A Sweet Final Thought
These Mini Lemon Meringue Cheesecakes are more than just a dessert. They’re little packages of joy. They combine the best parts of two classic treats into one easy, shareable bite. I love making them for people I care about. Seeing the delight when they taste that first tangy, creamy, sweet spoonful is my reward. Give this recipe a try. It might become your new favorite way to bring a ray of sunshine to any table. Happy baking!
Ingredients
Equipment
Method
- Preheat oven to 350°F (175°C) and grease the mini cheesecake pan.
- Crush Nilla wafers into fine crumbs and mix with melted butter.
- Press the crust mixture into the cavities of the mini cheesecake pan.
- Bake the crust for 5 minutes; then lower the oven temperature to 325°F (165°C).
- Beat cream cheese and sugar until smooth; add sour cream, lemon juice, lemon zest, and egg.
- Fill each crust with the cheesecake batter and bake for 15-18 minutes.
- Cool completely on a wire rack, then chill in the fridge for at least 6 hours or overnight.
- Prepare meringue by warming egg whites, sugar, and cream of tartar over simmering water; then beat until stiff peaks form.
- Assemble cheesecakes by adding lemon curd and topping with meringue.
- Torch the meringue until lightly browned before serving.