Why This Easy Oreo Mug Cake Will Change Your Late-Night Cravings
Last Tuesday night, I found myself staring into my pantry at 10 PM with a serious chocolate craving. I didn’t want to wait an hour for cookies to bake or drive to the store for ice cream. That’s when I spotted a pack of Oreos sitting on the shelf. Five minutes later, I was eating the most amazing chocolate cake straight from a mug. That’s the magic of an easy Oreo mug cake.
This dessert changed everything for me. You don’t need fancy baking skills or a kitchen full of ingredients. You just need a few simple items, a microwave, and about three minutes of your time. The result is a warm, gooey cake that tastes like you spent an hour making it.
I started making mug cakes about two years ago when I lived in a tiny apartment with no oven. My sister sent me a recipe, and I was hooked after the first bite. Since then, I’ve tested dozens of versions, but this Oreo version wins every time. It’s perfect for those moments when you need something sweet right now.
The best part is how quick this dessert comes together. From the moment you decide you want cake to the moment you’re eating it, only five minutes pass. No mixing bowls to wash. No pans to scrub. No waiting around while something bakes. Just pure chocolate satisfaction in a mug.
I love making these when friends come over unexpectedly. Everyone gets their own personal cake, and people always act like I performed some kind of kitchen miracle. Little do they know how ridiculously simple it is. I’ve made this Oreo mug cake for birthday parties, late-night study sessions, and even as a quick breakfast treat on weekends.
The texture is what really gets me. The cake comes out soft and fluffy with little pockets of melted Oreo pieces throughout. The top gets slightly firm while the middle stays moist and tender. If you eat it right away, it’s almost like a warm chocolate pudding cake. Let it cool for a minute, and it firms up into proper cake texture.
Kids absolutely love this recipe too. My nephew asks me to make it every time he visits. He’s seven, and even he can help measure ingredients and stir everything together. It’s become our special thing to make together.
Ingredients You’ll Need for Your Oreo Mug Cake
One reason I make this Oreo mug cake recipe so often is the ingredient list. You probably have everything in your kitchen right now. I keep these items stocked at all times because you never know when a chocolate emergency will strike.
Here’s what you need to gather before you start:
- 4 Oreo cookies (regular or Double Stuf work great)
- 3 tablespoons all-purpose flour
- 3 tablespoons milk (any kind you have works)
- 2 tablespoons sugar
- 2 tablespoons vegetable oil (or melted butter if you prefer)
- 1/4 teaspoon baking powder
- 1/8 teaspoon vanilla extract
- A pinch of salt
That’s it. Eight simple ingredients that most people already have sitting around. No specialty items from fancy grocery stores. No expensive chocolate or exotic spices. Just basic pantry staples and a few Oreos.
Let me share some notes about these ingredients that I’ve learned through trial and error. First, the Oreos. I usually use regular Oreos because that’s what I buy for snacking. But I’ve tried this with almost every Oreo variety out there. Golden Oreos make a vanilla version. Mint Oreos create a chocolate-mint cake. Birthday cake Oreos turn this into a party in a mug. They all work beautifully.
For the milk, I’ve used whole milk, skim milk, almond milk, and even chocolate milk. The chocolate milk version takes this cake to another level of chocolatey goodness. If you’re dairy-free, oat milk or soy milk work just fine. The cake might be slightly less rich, but it still tastes amazing.
The oil keeps the cake moist and prevents it from getting rubbery. I’ve made this with vegetable oil, canola oil, and melted butter. Butter adds a richer flavor, but oil makes the texture slightly better. Use whatever you have on hand.
Some people ask me if they can skip the sugar since Oreos are already sweet. I tried this once, and the cake tasted flat. Those two tablespoons make a real difference in the overall sweetness and texture. Don’t skip them.
The baking powder is crucial. This tiny amount makes the cake rise and get fluffy instead of dense. Without it, you’ll end up with something closer to a chocolate hockey puck. Not fun.
I always add a pinch of salt even though the recipe barely needs it. Salt enhances chocolate flavor in a way that’s hard to explain. It just makes everything taste more like itself. Trust me on this one.
What I love most about this ingredient list is how flexible it is. Forgot to buy milk? Use water and an extra splash of oil. Out of vanilla? Leave it out. The cake still works. This Oreo mug cake is incredibly forgiving, which makes it perfect for beginner bakers or anyone who doesn’t want to stress over precise measurements.
I keep a small container in my pantry with the dry ingredients already mixed together. When a craving hits, I just scoop out what I need, add the wet ingredients, and I’m done. This trick saves even more time and makes the process feel almost effortless.
The simplicity of this recipe is why I make it at least twice a week. No complicated steps. No wondering if you have some weird ingredient hiding in the back of your cupboard. Just grab a few basics, mix them in a mug, and three minutes later you’re eating warm cake.
I’ve taught this recipe to my teenage cousins, my coworkers, and even my grandmother who doesn’t usually bake. Everyone can make this successfully on their first try. That’s the beauty of a good mug cake recipe. It removes all the intimidation from baking and gives you instant results.


Step-by-Step Instructions for Making Your Perfect Oreo Mug Cake
Now that you’ve got everything ready, let me walk you through exactly how to make Oreo mug cake from start to finish. I’m telling you, this process is so simple that you’ll have it memorized after making it just once.
Grab your favorite microwave-safe mug. I like using the big ceramic ones that hold about 12 ounces because the cake rises quite a bit. Don’t use anything with metallic trim or you’ll have fireworks in your microwave, and not the fun kind.
Take your four Oreos and break them into small pieces right into the mug. I usually just crush them with my fingers while they’re still over the mug so nothing goes to waste. Some people put them in a plastic bag and smash them with a rolling pin, but honestly, that’s just creating extra dishes to wash. Keep two or three larger chunks aside if you want some bigger cookie pieces in your finished cake. I almost always do this because biting into a chunk of Oreo while eating warm cake is basically heaven.
Here’s where it gets ridiculously easy. Add your flour, sugar, and baking powder right on top of the crushed Oreos. Then pour in the milk, oil, and vanilla extract. Sprinkle that tiny pinch of salt over everything. The whole thing looks like a mess at this point, but that’s completely normal.
Now stir everything together with a fork or small spoon. I prefer a fork because it helps break up any flour clumps better. Mix until you don’t see any dry flour pockets, but don’t go crazy stirring for five minutes. About twenty seconds of mixing does the job perfectly. Over-mixing can make the cake tough, though honestly, I’ve never managed to mess this up even when I mixed too much.
One thing I learned the hard way is to check the bottom of your mug. Sometimes flour likes to hide down there and not mix in properly. Just scrape the bottom with your spoon once to make sure everything is incorporated. I once skipped this step and ended up with a pocket of plain flour at the bottom of my cake. Not terrible, but not great either.
Pop that mug into your microwave. This is where timing gets personal because every microwave is different. Mine is 1100 watts, and I cook the cake for exactly 90 seconds. If your microwave is less powerful, you might need two full minutes. If it’s a beast of a microwave, start checking at 75 seconds.
Watch through the microwave window during the last thirty seconds. You’ll see the batter start to rise and the top will look set instead of wet. The cake is done when the top looks mostly dry with maybe a few slightly moist spots. Those spots will firm up as it cools. If you overcook it, the cake becomes rubbery and sad. Trust me, I’ve nuked a few mug cakes into oblivion while trying to perfect the timing.
When that microwave beeps, carefully remove your mug. Use oven mitts or a thick towel because that ceramic gets seriously hot. I burned my fingers exactly once before I learned this lesson. Let the cake cool for about a minute before you dig in. I know waiting is torture when you can smell that chocolate goodness, but straight-from-the-microwave cake will absolutely scorch your tongue.
Here’s a pro tip I discovered by accident: if you want an extra gooey center, slightly undercook the cake by about ten seconds. The middle stays almost molten while the edges are fully cooked. It’s like a lava cake situation. Add a scoop of vanilla ice cream on top, and you’ve basically created restaurant-quality dessert in your kitchen.
Sometimes I make two mugs at once when my husband wants one too. Just make each cake in its own mug and microwave them one at a time. Cooking two together messes with the timing and one always comes out wrong. Learned that the hard way during movie night last month.
The whole process from gathering ingredients to eating warm cake takes about five minutes. That includes cleanup time, which is basically just rinsing out your mug. No baking sheets, no mixing bowls, no cake pans. This is exactly why I make this Oreo mug cake more than any other dessert.
By the way, if you love quick desserts like this, you might enjoy my chocolate cottage cheese mousse that comes together just as fast but with a completely different texture. Both satisfy chocolate cravings without requiring you to turn on the oven.
Oreo Mug Cake Variations to Try Tonight
After making the basic version about fifty times, I started getting creative with Oreo mug cake variations. The beautiful thing about this recipe is how well it handles additions and substitutions. You really can experiment without worrying about ruining it.
My favorite variation involves peanut butter. Add one tablespoon of creamy peanut butter to the batter before microwaving. The peanut butter melts into pockets of gooey deliciousness throughout the cake. Sometimes I also swirl a little extra on top right after it comes out of the microwave. The heat melts it into this amazing glossy layer. My husband requests this version specifically because he’s obsessed with anything chocolate-peanut butter.
Different Oreo flavors completely change the game too. I mentioned earlier that various types work, but let me tell you which ones I’ve actually tested. Mint Oreos create this refreshing chocolate-mint combination that reminds me of those fancy after-dinner mints. Birthday Cake Oreos make the whole thing taste like funfetti cake, which is perfect for celebrating literally anything. My friend brought over some Red Velvet Oreos once, and that version tasted like a red velvet cupcake had a baby with a brownie.
Funny enough, Golden Oreos create almost a vanilla pound cake situation. It’s less intensely chocolate but still really comforting. I make this version when I want something sweet but not overwhelmingly rich. Top it with fresh strawberries, and suddenly you’ve got a fancy-looking dessert that took the same five minutes.
Adding chocolate chips is never a bad decision. Toss in a tablespoon of mini chocolate chips or even some chopped dark chocolate. They melt into little pools of extra chocolate throughout the cake. I keep a bag of dark chocolate chips specifically for this purpose. White chocolate chips work beautifully too, especially with regular Oreos. The contrast between dark cookie pieces and white chocolate is really nice.
Here’s something wild I tried last week: adding a teaspoon of instant coffee powder to the batter. Coffee enhances chocolate flavor in this magical way that doesn’t make the cake taste like coffee. It just makes the chocolate taste more chocolatey. My sister thought I’d used some expensive artisan cocoa when really I’d just added some instant coffee granules.
For a more decadent version, push a few squares of chocolate into the center of the batter before microwaving. A piece of Hershey bar, some Nutella, or even a caramel candy works great. The center melts into molten goodness while the cake cooks around it. This creates that lava cake effect I mentioned earlier.
Sometimes I go the opposite direction and try to make it slightly healthier. Using whole wheat flour instead of all-purpose flour works fine, though the texture is a tiny bit denser. Swapping regular milk for Greek yogurt thinned with a splash of water adds protein and makes the cake incredibly moist. If you’re into healthier treats, check out my lemon blueberry yogurt cake that uses similar substitutions for a lighter dessert.
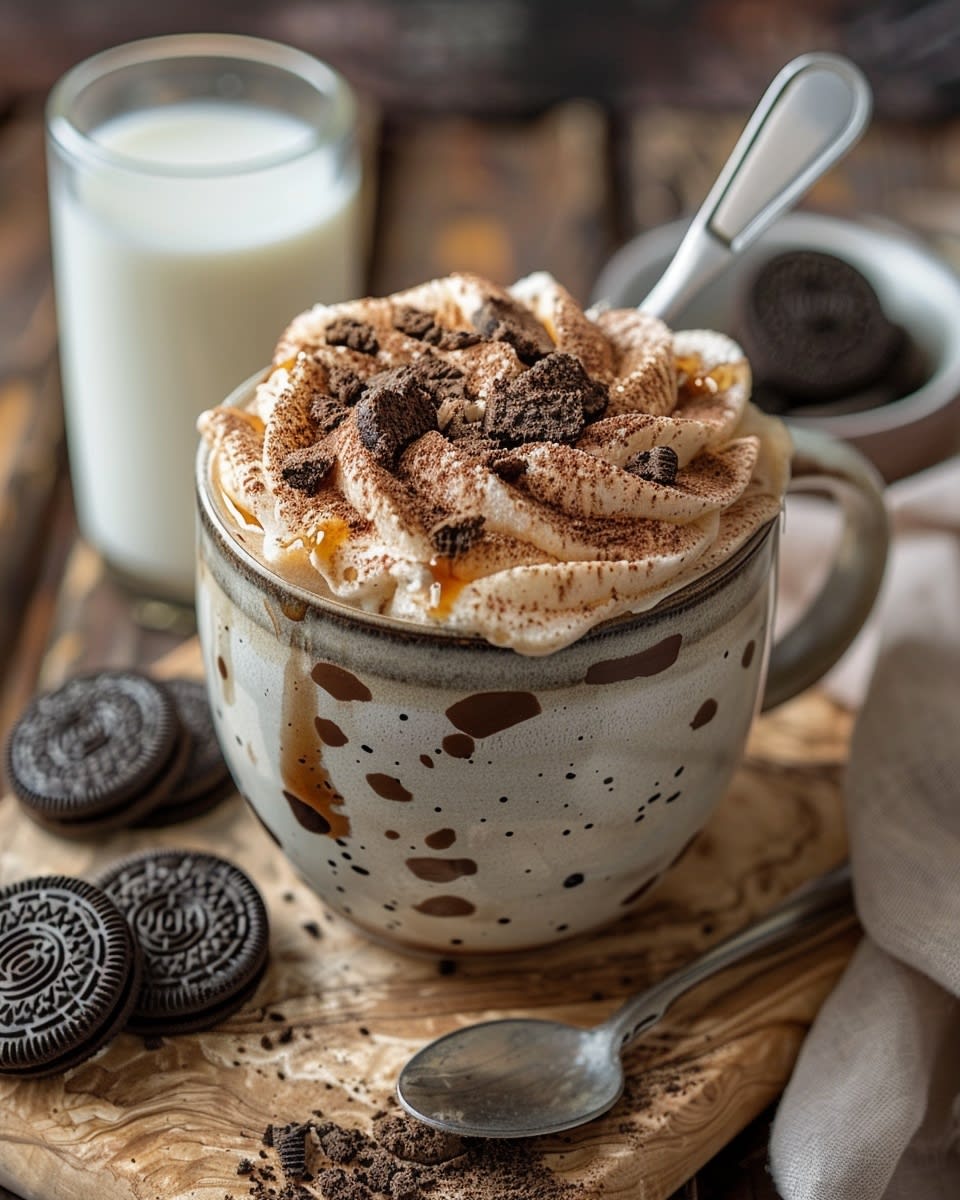
Toppings change everything too. A dollop of whipped cream, a drizzle of caramel sauce, or some crushed nuts on top transforms this simple mug cake into something that looks like it came from a cafe. I keep a can of whipped cream in my fridge basically just for mug cake emergencies. Fresh raspberries on top add a nice tart contrast to all that sweetness.
My nephew loves when I add sprinkles to the batter before cooking. Rainbow sprinkles make it look festive and fun. It doesn’t change the taste much, but it sure makes the cake look happier. Sometimes presentation matters, even when you’re eating dessert alone on your couch at 11 PM.
You can even make this into a cookies and cream situation by adding crushed Oreos to the batter beyond the original four cookies. I’ve gone up to six Oreos total, and the cake becomes incredibly dense and cookie-heavy in the best possible way. It’s almost like eating cookie dough that’s been transformed into cake.
For a s’mores version, I add a few mini marshmallows and some chocolate chips on top during the last fifteen seconds of cooking. The marshmallows puff up and get slightly toasted. Break a graham cracker on top after it’s done, and boom, s’mores cake. Works great during summer when you’re craving campfire vibes but don’t want to go outside.
Here’s the thing about experimenting with this recipe: it’s almost impossible to truly mess it up. The base recipe is so solid that additions just make it more interesting without breaking the fundamental chemistry. Unlike traditional baking where changing one thing can ruin everything, mug cakes are super forgiving.
I encourage everyone to try at least three different variations before settling on a favorite. Write down what you added and how much because when you create something amazing, you’ll want to recreate it exactly. I have a note in my phone with at least fifteen different combinations I’ve tested. Some were just okay, but several became regular rotations in my dessert lineup.
Similar to how you can customize my 3 ingredient banana oat cookies with different mix-ins, this Oreo mug cake welcomes creativity. The simplicity of the base recipe means additions shine through clearly. You’re not trying to balance complex flavors. You’re just enhancing something that already works perfectly.
Even seasonal variations work well. Pumpkin spice Oreos in fall, peppermint Oreos during winter holidays. I made one with candy cane pieces during December, and it tasted like Christmas in a mug. In summer, I sometimes use a bit less sugar and top the cake with fresh fruit similar to my strawberry Greek yogurt bark for something lighter.
The best part about all these variations is that none of them add significant time or complexity. You’re still making a five-minute dessert. You’re just making a five-minute dessert that’s customized exactly to your current craving. That’s the real magic of a good mug cake recipe.


Best Ways to Serve Your Oreo Mug Cake
Honestly, the simplest way to enjoy this dessert is to grab a spoon and eat it straight from the mug while it’s still warm. But if you want to take things up a notch, there are so many amazing Oreo mug cake toppings that transform this quick treat into something truly special.
Ice cream is my go-to topping about seventy percent of the time. A big scoop of vanilla ice cream on top of hot mug cake creates this incredible contrast between temperatures and textures. The ice cream starts melting immediately, creating a creamy sauce that drips down into all the nooks and crannies of the cake. I’ve tried this with chocolate ice cream too, which is basically chocolate overload in the best way possible. Salted caramel ice cream adds this sophisticated sweet-and-salty thing that makes the whole dessert taste way fancier than a five-minute microwave creation should taste.
Whipped cream is the easier, lighter option when you don’t want something as heavy as ice cream. I keep both the canned kind and homemade whipped cream depending on my energy level. The canned stuff works perfectly fine for a quick treat. Just spray a generous amount on top and maybe add a crushed Oreo or two for decoration. When I’m feeling slightly more ambitious, I whip heavy cream with a tiny bit of sugar and vanilla. Takes maybe two minutes with an electric mixer, and it tastes so much better than the canned version.
Chocolate sauce or hot fudge drizzled over the top turns this into a proper sundae situation. I keep a squeeze bottle of chocolate sauce in my fridge basically at all times. Sometimes I warm it up for about ten seconds in the microwave so it’s extra gooey. Caramel sauce works beautifully too, especially if you sprinkle a little sea salt on top. That sweet and salty combination never gets old.
Here’s something I discovered during a random Tuesday night snack session: peanut butter drizzled on top after the cake comes out of the microwave. The heat from the cake makes the peanut butter melt and get all drippy. If you’re into the whole Reese’s flavor profile, this is your move. I sometimes add a few peanut butter chips to the batter and then drizzle more on top for maximum peanut butter impact.
Fresh fruit might seem weird with something as indulgent as an Oreo cake, but hear me out. Sliced strawberries on top add a fresh, slightly tart element that cuts through all that chocolate richness. Raspberries work even better because they’re more tart. I made this for my friend who’s really into “balanced” desserts, and she loved the fruit addition. It made her feel slightly less guilty about eating cake at midnight, which I totally understand.
Crushed candy bars on top are ridiculous in the best way. I’ve tried this with crushed Butterfinger, chopped Reese’s cups, crumbled Kit Kat bars, and even those little Rolo candies. Each one brings its own personality to the dessert. The Kit Kat pieces add a nice crunch. The Rolos melt into caramel pockets. It’s like creating a new dessert every time just by changing the topping.
Nutella is another game-changer. Spread a spoonful on top of the warm cake and watch it melt into this glossy chocolate-hazelnut layer. Sometimes I do half Nutella and half peanut butter for people who can’t decide. My sister calls this combination “the best of both worlds,” and she’s not wrong.
Cookie butter spread works shockingly well too. If you’ve never tried cookie butter, it’s basically spreadable cookies that taste like graham crackers and brown sugar had a baby. Sounds weird, tastes amazing. Spreading this on top of an Oreo mug cake creates this cookie-on-cookie situation that’s almost too much in the best possible way.
For a more sophisticated presentation when I have people over, I sometimes transfer the cake from the mug to a small plate. Dust it with powdered sugar, add a mint leaf for color, and suddenly this microwave dessert looks like something from a restaurant. Nobody needs to know you made it in three minutes. Let them think you slaved away in the kitchen.
Greek yogurt on top might sound healthy and boring, but stick with me here. A dollop of vanilla Greek yogurt adds protein and a tangy contrast to the sweet cake. If you’re trying to balance indulgence with nutrition, this helps justify eating cake for breakfast. Not that I’m encouraging that, but I’m also not not encouraging it. Plus, Greek yogurt contains probiotics that are actually beneficial for gut health, so you’re basically being responsible while eating dessert.
Coffee pairs perfectly with this dessert too, though technically that’s a beverage and not a topping. Still worth mentioning because the bitter notes in coffee balance out all that sweetness. I usually make myself a cup of coffee specifically to eat alongside my mug cake. It’s become this whole ritual that I look forward to at the end of long days.
As far as occasions go, this dessert fits basically any situation. Movie nights are perfect because you can make individual cakes for everyone during a commercial break or while the opening credits roll. Everyone customizes their own with different toppings, which becomes part of the entertainment.
Late-night study sessions were saved by this recipe during my college years. My roommate and I would make these around 2 AM when we needed a break from writing papers or cramming for exams. The sugar rush helped keep us awake, and the warm chocolate comfort made the stress feel more manageable. We called them “survival cakes” because they literally helped us survive finals week.
This works great for parties too, which surprises people. Set up a mug cake bar with different Oreo flavors, various mix-ins, and a whole spread of toppings. Guests make their own cakes and microwave them one at a time. It’s interactive, fun, and everyone gets exactly what they want. I did this for my birthday party last year, and people talked about it for weeks afterward.
Birthday celebrations when you don’t want a whole cake make this perfect. Stick a candle in the mug, sing happy birthday, and boom, you’ve got a personal birthday cake. My friend who lives alone loves this because she can celebrate her birthday without having leftover cake sitting around for a week.
Rainy days practically demand warm chocolate cake. There’s something about gloomy weather that makes you crave comfort food. I’ve made this countless times while watching rain through my kitchen window, wrapped in a blanket with a warm mug of chocolate heaven in my hands.
After bad days at work, this becomes therapy in dessert form. Walk in the door frustrated, make a mug cake, feel better. It’s a simple formula that works every time. The act of making something with your hands and then immediately enjoying the results is surprisingly therapeutic.
Sleepovers with friends or family turn into fun bonding experiences with mug cakes involved. My cousins and I make these whenever we get together. We experiment with weird combinations and judge each other’s creations. Last time someone tried adding hot sauce because they heard chocolate and chili work together. Spoiler alert: it was actually pretty interesting.
Quick breakfasts on weekends when you want something sweet might raise eyebrows, but life is short. Add some fruit on top, maybe that Greek yogurt I mentioned, and call it balanced. I won’t tell anyone if you won’t. Sometimes weekend mornings call for cake, and this recipe delivers without requiring you to be fully awake or functional.
Holiday desserts for small gatherings work great with festive toppings. Crushed candy canes during Christmas, conversation hearts on Valentine’s Day, or orange sprinkles for Halloween. Small touches make it feel special without requiring any extra effort.
The versatility of both the recipe itself and how you can serve it means this dessert never gets boring. Every time you make it, you can change something small and end up with a completely different experience. That’s rare for recipes this simple. If you’re looking for more easy dessert ideas that offer similar flexibility, I’ve got tons of options in my desserts collection that range from quick fixes to slightly more involved treats.
What makes this particular dessert so special isn’t just the taste or the speed. It’s how it makes people feel. Serving someone a warm mug cake shows you care enough to make them something special, even if it only took five minutes. The personal size makes it feel like a gift made just for them. I’ve served these to neighbors who were having tough days, coworkers who needed cheering up, and family members who just needed something sweet. The reaction is always the same: surprise, delight, and then asking for the recipe.
Your choice of toppings really lets you customize the experience for different preferences and dietary needs too. Dairy-free ice cream works just as well as regular. Sugar-free whipped cream for people watching their sugar intake. Fresh fruit for those trying to eat healthier. The base cake stays the same, but toppings let you accommodate pretty much anyone.
Try making your next movie night special by setting up a topping bar with five or six different options. Let everyone build their perfect mug cake masterpiece. It turns dessert into an activity, which somehow makes everything taste even better. Plus, you’ll discover new combinations you never would have thought of on your own.
Making this simple recipe has genuinely brought more joy into my life than I expected from something so basic. It’s taught me that sometimes the best things really are the simplest. You don’t need complicated techniques or expensive ingredients to create something that makes people smile. You just need a few Oreos, a microwave, and about five minutes of your time.
Common Questions About Making Oreo Mug Cakes
What are the ingredients for an Oreo mug cake?
You need four Oreo cookies, three tablespoons each of all-purpose flour and milk, two tablespoons each of sugar and vegetable oil, a quarter teaspoon of baking powder, an eighth teaspoon of vanilla extract, and a pinch of salt. Everything is stuff you probably already have in your kitchen. The whole ingredient list is super basic and inexpensive. You can find all of these items at any grocery store. The simplicity is what makes this recipe so accessible for everyone.
How do you make an Oreo mug cake?
Crush four Oreos into a microwave-safe mug, then add all your dry ingredients followed by the wet ingredients. Stir everything together with a fork for about twenty seconds until well combined. Microwave for 90 seconds to 2 minutes depending on your microwave’s power. Let it cool for about a minute before eating because it comes out extremely hot. The entire process takes less than five minutes from start to finish. It’s seriously the easiest dessert you’ll ever make.
Can you add other flavors to an Oreo mug cake?
Absolutely, this recipe is incredibly versatile and welcomes additions. Try adding a tablespoon of peanut butter, a handful of chocolate chips, or a teaspoon of instant coffee to enhance the chocolate flavor. Different Oreo varieties like mint, birthday cake, or peanut butter Oreos completely change the flavor profile. You can also add extracts like almond or peppermint for different tastes. I’ve experimented with at least twenty different variations, and all of them worked beautifully.
What can you top an Oreo mug cake with?
Ice cream is my favorite topping because the temperature contrast is amazing. Whipped cream, chocolate sauce, caramel drizzle, fresh fruit, or crushed candy bars all work wonderfully. Peanut butter or Nutella spread on top while the cake is warm creates an incredible melted topping. Greek yogurt adds a tangy element and extra protein if you want something lighter. Honestly, almost any dessert topping you enjoy will work great on this cake.
How long does an Oreo mug cake take to cook?
Most microwaves need between 90 seconds and 2 minutes to fully cook the cake. The exact time depends on your microwave’s wattage. Start checking at 75 seconds if you have a powerful microwave. The cake is done when the top looks mostly set with just a few slightly moist spots. Those spots will finish cooking from residual heat as the cake cools. It’s better to slightly undercook than overcook because overcooked mug cakes get rubbery.
Can you make an Oreo mug cake without a microwave?
You can bake it in a regular oven at 350 degrees Fahrenheit for about 12 to 15 minutes in an oven-safe mug or ramekin. The texture comes out slightly different, more like traditional cake and less like the soft microwave version. Check it with a toothpick to make sure it’s cooked through. I’ve done this when my microwave was broken, and it definitely works. Just takes a bit longer than the microwave method.
Is an Oreo mug cake better with butter or oil?
Both work well, but they create slightly different results. Oil makes the cake a bit more moist and tender with a lighter texture. Butter adds richer flavor and creates a slightly denser cake. I usually use oil for convenience since I don’t have to melt anything. When I want something that tastes more indulgent, I go with melted butter. Try both and see which texture you prefer for your personal taste.
Can you make Oreo mug cake dairy-free?
Yes, just swap regular milk for any non-dairy alternative like almond milk, oat milk, or soy milk. Use regular Oreos since they’re actually dairy-free despite having that cream filling. Replace the butter if you’re using it with vegetable oil or coconut oil. The cake turns out just as delicious with these substitutions. I make the dairy-free version for my lactose-intolerant friend all the time, and she can’t tell the difference.
Why did my Oreo mug cake come out rubbery?
This usually happens from overcooking or using too much flour. Microwave times vary significantly, so you might need less time than the recipe suggests. Make sure you’re measuring flour correctly by spooning it into your measuring spoon rather than packing it in. Over-mixing can also contribute to a tough texture, though this is less common. Try reducing your cooking time by 15 seconds next time and see if that helps.
Can you prepare Oreo mug cake batter ahead of time?
You can mix the dry ingredients together and store them in a container for quick assembly later. I don’t recommend mixing the complete batter ahead because the baking powder starts reacting with the liquid ingredients immediately. The cake won’t rise properly if the batter sits for more than a few minutes before cooking. Pre-mixing just the dry ingredients is a great time-saver though. I keep a jar of the dry mix in my pantry for emergency dessert situations.
So go ahead and make this cake tonight. Seriously, right now. It takes five minutes, and I promise you won’t regret it. Start with the basic recipe, pick your favorite topping, and see where it takes you. Who knows, this might become your new favorite way to end the day.
Ingredients
Equipment
Method
- Écrasez 4 Oreos en petits morceaux directement dans le mug.
- Ajoutez la farine, le sucre et la levure sur les Oreos écrasés.
- Versez le lait, l'huile et l'extrait de vanille, puis ajoutez une pincée de sel.
- Remuez avec une fourchette ou une petite cuillère jusqu'à ce que tout soit juste combiné, sans poches de farine sèches.
- Faites chauffer au micro-ondes à puissance maximale pendant 90 secondes à 2 minutes, en vérifiant à 75 secondes si c'est cuit.
- Retirez soigneusement le mug du micro-ondes et laissez refroidir pendant environ une minute avant de déguster.