Silky Smooth Panna Cotta: Your Secret Weapon Dessert
You know that panicked feeling when guests are coming and you need a show-stopping dessert? I’ve been there. Then I found my hero: panna cotta. This Silky Smooth Panna Cotta Delight is the answer. It looks like you spent all day in a fancy kitchen. But the secret? It’s unbelievably simple. Let me show you how to make this creamy dream come true.
A Little Story About This Creamy Dream
Panna cotta means “cooked cream” in Italian. It comes from the beautiful Piedmont region. Originally, chefs used fish bones to set it! Thankfully, we have gelatin now. This dessert is a beautiful mix of old tradition and modern ease. You can keep it pure and simple with vanilla. Or you can dress it up with all sorts of flavors. It’s a blank canvas for your creativity. Every time I serve it, I feel like I’m sharing a little piece of Italian sunshine.
Why You’ll Fall in Love With This Recipe
This recipe is a true friend in the kitchen. First, it’s almost impossible to mess up. No baking, no tricky techniques. Just gentle heating and stirring. Second, it’s a make-ahead dream. You can prepare it the day before your party. This means zero stress when your doorbell rings. Finally, the texture is pure magic. It’s firm enough to hold its shape but melts on your tongue like a cloud. It’s the dessert that makes everyone ask, “How did you make this?”
When to Whip Up This Panna Cotta Delight
This dessert is perfect for so many moments! Here are my favorites:
- Dinner Parties: It’s elegant and lets you chat with guests instead of fussing in the kitchen.
- Summer Brunches: A cool, creamy treat is so refreshing on a warm day.
- Holiday Meals: After a heavy dinner, its lightness is a welcome change.
- Just Because Tuesdays: Sometimes, you just deserve a silky smooth delight.
Gathering Your Ingredients
Simple ingredients make extraordinary results. Here’s what you’ll need:
- 2 cups heavy cream
- 1 cup whole milk
- 1/2 cup granulated sugar
- 1 teaspoon vanilla extract
- 1 packet (0.25 oz) unflavored gelatin
- 3 tablespoons water (for blooming the gelatin)
- Fresh berries or fruit sauce, for topping
No Heavy Cream? Try These Swaps!
Don’t worry if you’re missing an item. You have options!
- Heavy Cream: For a lighter version, use half-and-half. The texture will be slightly less firm but still delicious.
- Whole Milk: Any milk you have on hand will work, even 2%.
- Granulated Sugar: Honey or maple syrup are lovely alternatives. Use the same amount.
- Vanilla Extract: The seeds from one vanilla bean pod will give incredible flavor.
Let’s Make Some Magic: Step-by-Step Instructions
Step 1: Wake Up Your Gelatin
First, grab a small bowl. Sprinkle the packet of unflavored gelatin over the three tablespoons of cool water. Watch it turn into a soft, spongy mat. This is called “blooming.” It takes about five minutes. This step is crucial. It ensures your gelatin dissolves smoothly later. No one wants lumpy panna cotta! Pro tip: Always use cool water for blooming. Hot water can clump the gelatin.
Step 2: Sweeten the Creamy Base
Now, take a medium saucepan. Pour in the heavy cream, whole milk, and sugar. The mixture will look thick and luxurious. Place it over medium heat. Stir it occasionally with a wooden spoon. You’ll see the sugar crystals slowly disappear into the cream. The goal is to heat it until it’s just about to simmer. You’ll see tiny bubbles form around the edge. Do not let it boil. Boiling can change the texture. Pro tip: Swirl the pan instead of stirring constantly to prevent too much air from getting in.
Step 3: Combine and Flavor
Remove the warm cream mixture from the heat. It should be steaming and fragrant. Immediately add your bloomed gelatin. Whisk it gently but thoroughly. You want every bit of that gelatin to melt away into the cream. Now, stir in the vanilla extract. That wonderful aroma will fill your kitchen. Take a moment to breathe it in. Chef’s tip: Strain the mixture through a fine-mesh sieve into a jug. This catches any undissolved gelatin bits for the smoothest texture ever.
Step 4: Chill and Set
Carefully pour the liquid panna cotta into your serving glasses or ramekins. I love using clear glasses so you can see the perfect layers later. Let them cool on the counter until they are no longer warm. Then, cover the tops with plastic wrap. Gently place them in the refrigerator. The waiting game begins! They need at least four hours to transform into a wobbly, set delight. Overnight is even better. Pro tip: For a super smooth top, lightly spray your glasses with cooking spray before pouring.
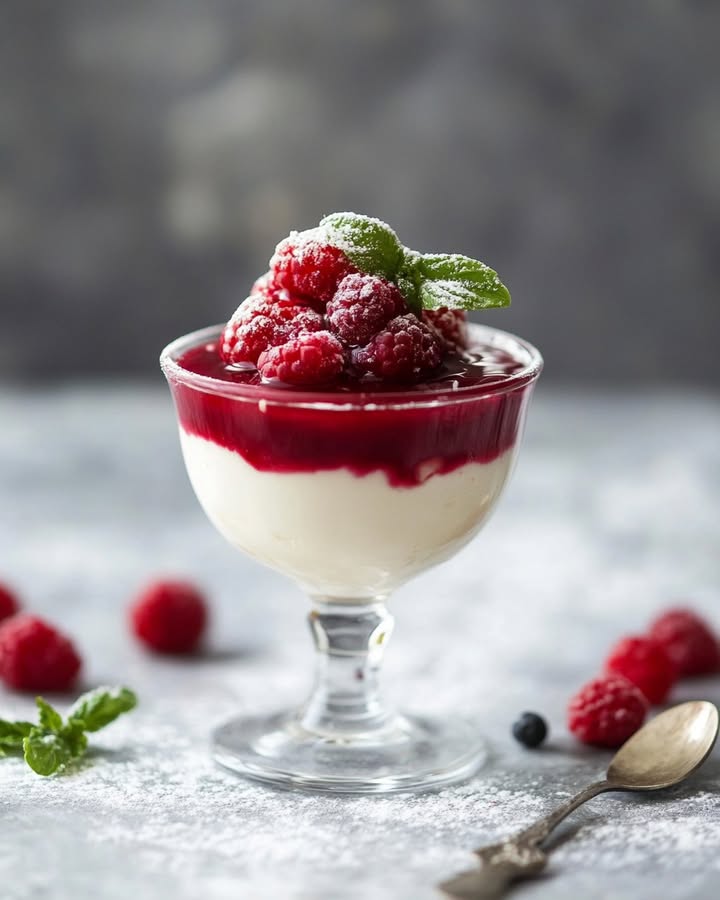
Step 5: The Grand Finale Topping
This is the fun part! Pull your set panna cottas from the fridge. They should jiggle like a happy little cloud. Now, crown them with your favorite topping. I adore a mix of fresh, juicy berries. A simple strawberry sauce or a tangy raspberry coulis is also fantastic. The bright red of berries against the white cream is stunning. Serve immediately and listen for the happy sighs.
Timing is Everything
This dessert is all about smart timing, not hard work.
- Prep Time: 10 minutes (mostly measuring and stirring)
- Cook Time: 5 minutes (gentle heating)
- Chill Time: At least 4 hours (perfect for doing other things!)
- Total Time: About 4 hours 15 minutes
- Servings: 4 generous portions
My Chef’s Secret for the Best Texture
My secret weapon is a pinch of salt. Yes, really! Add a tiny pinch of fine sea salt to the cream mixture with the sugar. You won’t taste saltiness. Instead, it makes the vanilla flavor sing. It balances the sweetness perfectly. It turns a great dessert into an unforgettable one. Try it just once. You’ll never skip it again.
A Fun Fact About Gelatin
That little packet of gelatin is more than a thickener. It comes from collagen, a protein found in animal bones and skin. When heated and cooled, it forms a delicate mesh that holds liquid. This is what gives panna cotta its famous jiggle. It’s a cool bit of kitchen science that makes something beautiful!
What You’ll Need to Make It
You don’t need fancy tools. Just a few basics:
- A medium saucepan
- A small bowl for blooming gelatin
- A whisk or wooden spoon
- Measuring cups and spoons
- 4 serving glasses or ramekins
- A fine-mesh sieve (highly recommended for silkiness)
How to Store Your Silky Creation
Panna cotta stores beautifully. Once set, keep it covered with plastic wrap in the refrigerator. It will stay perfect for up to 3 days. The texture remains silky smooth.
I do not recommend freezing it. Freezing changes the texture of the cream and gelatin. It can become grainy and separate when it thaws. It’s best enjoyed fresh from the fridge.
If you’ve already added fruit sauce on top, store it anyway. The colors might bleed a little into the cream. But it will still taste wonderful. For the prettiest presentation, add fresh toppings right before serving.
My Best Tips and Advice for You
- For a clean unmolding, dip the ramekin in hot water for 5-10 seconds. Then run a thin knife around the edge and invert onto a plate.
- Want a stronger vanilla flavor? Use vanilla bean paste instead of extract. You’ll see those lovely little black specks.
- If your mixture seems lumpy after adding gelatin, gently reheat it on low while whisking. Don’t boil it.
- Letting it come to room temperature for 10 minutes before serving softens the texture perfectly.
Presentation Ideas to Impress Your Guests
Make it look like it came from a restaurant!
- Layer it: Pour half the mixture, let it set, add a layer of fruit puree, then top with the rest of the cream.
- Garnish with herbs: A tiny mint or basil leaf adds a pop of color and fresh flavor.
- Add crunch: Sprinkle some chopped pistachios or toasted almonds on top.
- Use fun molds: Make them in heart shapes for Valentine’s Day or small jars for a rustic feel.
Healthier & Fun Variations to Try
You can change this recipe in so many ways. Here are six ideas:
- Coconut Dream: Use coconut milk instead of regular milk. It gives a tropical, dairy-free twist.
- Chocolate Indulgence: Whisk in 3 tablespoons of cocoa powder with the sugar. Top with chocolate shavings.
- Citrus Zing: Add the zest of one lemon or orange to the cream. It’s bright and refreshing.
- Matcha Green Tea: Whisk 1 tablespoon of matcha powder into the sugar first for a beautiful green hue.
- Honey Lavender: Use honey instead of sugar. Add 1 teaspoon of culinary lavender buds to the warm cream, then strain them out.
- Espresso Shot: Dissolve 1 tablespoon of instant espresso in the warm cream for a coffee-flavored delight.
Common Mistakes to Avoid
Mistake 1: Boiling the Cream Mixture
This is the biggest error. Boiling the cream can cause it to separate or develop a skin. It can also make the final texture rubbery instead of silky. You only need to heat it until it’s hot and the sugar is dissolved. Look for small bubbles around the edge of the pan. That’s your sign to take it off the heat. A gentle approach wins here.
Mistake 2: Not Blooming the Gelatin Properly
Sprinkling gelatin directly into hot liquid will cause clumps. These clumps won’t dissolve. You’ll end up with weird, rubbery bits in your smooth dessert. Always bloom it first in cool water. Let it sit for a full five minutes until it looks like a soft, solid sponge. This prepares it to melt smoothly into your warm cream.
Mistake 3: Skipping the Strain Step
It seems like an extra dish to wash. But straining the mixture is a game-changer. It catches any undissolved sugar, gelatin bits, or skin that formed on the milk. Pouring it through a fine-mesh sieve guarantees that legendary silky smooth texture. Trust me, it’s worth the 30 seconds of extra effort.
Mistake 4: Not Letting It Chill Long Enough
Impatience is the enemy of panna cotta. Four hours in the fridge is the absolute minimum. If it’s not fully set, it will be a soupy mess when you try to serve it. For the perfect, clean wobble, let it chill overnight. Plan ahead. Your future self will thank you for the perfect dessert.
Your Panna Cotta Questions, Answered
Can I make panna cotta without gelatin?
Traditional panna cotta needs gelatin to set. For a vegetarian option, you can try agar-agar, a seaweed derivative. The substitution is not one-to-one. Usually, you need less agar-agar than gelatin. Follow the instructions on your agar-agar package carefully. The texture will be slightly different—more firm and less creamy-wobbly. It’s a good alternative if you don’t use animal products.
Why did my panna cotta turn out rubbery?
A rubbery texture usually means too much gelatin was used. Always use one standard packet (0.25 ounces or about 2 1/4 teaspoons). Or, you may have overheated the mixture after adding the gelatin. High heat can break down the gelatin’s structure. It then seizes up and gets rubbery as it sets. Gentle heat is key. Also, make sure you are using “unflavored” gelatin, not a flavored Jell-O mix.
Can I double this recipe for a crowd?
Absolutely! This recipe doubles or even triples very easily. Just use a larger saucepan. Make sure you bloom all the gelatin separately in the correct ratio of water. One packet of gelatin needs three tablespoons of water. So for two recipes, use two packets and six tablespoons of water. Stir very well to ensure the gelatin is evenly distributed throughout the larger volume of cream.
How far in advance can I make panna cotta?
This is its superpower! You can make panna cotta up to two days before you plan to serve it. In fact, it often tastes better the next day. The flavors have more time to meld. Keep it covered tightly with plastic wrap in the refrigerator. Add any fresh fruit, sauce, or garnish right before you serve it. This keeps everything looking and tasting fresh.
What’s the best way to unmold panna cotta?
The secret is a quick hot water bath. Fill a bowl with hot tap water. Carefully dip the bottom of the ramekin into the water for about 10 seconds. Don’t get water on top of the dessert. Then, run a thin, sharp knife around the very edge of the panna cotta. Place your serving plate on top, hold them together firmly, and flip it over in one confident motion. Give the ramekin a little shake. It should slide right out.
My panna cotta didn’t set. What can I do?
Don’t panic! If it’s still liquid after 4 hours, the gelatin may not have dissolved completely. Or the mixture wasn’t warm enough to activate it. You can fix it. Pour the unset mixture back into a saucepan. Gently warm it over low heat while stirring. Do not let it boil. Once it’s liquid again and warm, make sure any gelatin is dissolved. Then re-pour it into your glasses and chill again. It should set properly the second time.
Can I use flavored gelatin instead of unflavored?
I don’t recommend it. Flavored gelatin like Jell-O already contains sugar, color, and artificial flavors. It will completely change the taste and texture of your delicate panna cotta. The result will be more like a firm Jell-O dessert, not a silky, creamy custard. Stick with plain, unflavored gelatin. It lets the pure flavor of the cream and vanilla shine through.
Is panna cotta gluten-free?
Yes, this classic panna cotta recipe is naturally gluten-free. The main ingredients are cream, milk, sugar, and gelatin. None of these contain gluten. Always check your vanilla extract label to be certain, but most pure extracts are gluten-free. It’s a wonderful, safe dessert to serve to friends with gluten sensitivities. Just ensure any toppings you use are also gluten-free.
Can I use low-fat milk to make it lighter?
You can, but it will change the texture. Heavy cream gives panna cotta its rich, luxurious mouthfeel. Using lower-fat milk or cream will make the final dessert less creamy and more firm. The fat in the cream contributes to that famous silky texture. For the best results, use the full-fat ingredients. Serve a smaller portion if you are watching calories. The experience is worth it.
What other toppings work besides berries?
The topping possibilities are endless! Try a drizzle of warm caramel or chocolate sauce. Toasted coconut flakes add great texture. A spoonful of lemon curd is tangy and bright. In the fall, a spiced apple compote is amazing. You can even use a balsamic glaze reduction for a sophisticated, sweet-and-sour touch. Let the season and your mood guide you.
The Joy of a Simple, Perfect Dessert
That’s the story of my Silky Smooth Panna Cotta Delight. It’s more than a recipe. It’s a little bit of kitchen confidence. It’s the joy of creating something beautiful without stress. The next time you need a dessert that whispers “elegance” but shouts “easy,” remember this one. Whip it up, let it chill, and get ready for the compliments. Happy cooking, and enjoy every creamy, dreamy bite!
Strawberry Crescent Rolls
Ingredients
Equipment
Method
- Sprinkle the packet of unflavored gelatin over the three tablespoons of cool water and let it bloom for about 5 minutes.
- In a medium saucepan, combine the heavy cream, whole milk, and sugar, and heat over medium until just about to simmer.
- Remove from heat and add the bloomed gelatin, whisking gently until dissolved. Stir in vanilla extract.
- Pour the mixture into serving glasses or ramekins and cool on the counter. Cover with plastic wrap and refrigerate for at least 4 hours, preferably overnight.
- Before serving, top with fresh berries or fruit sauce.