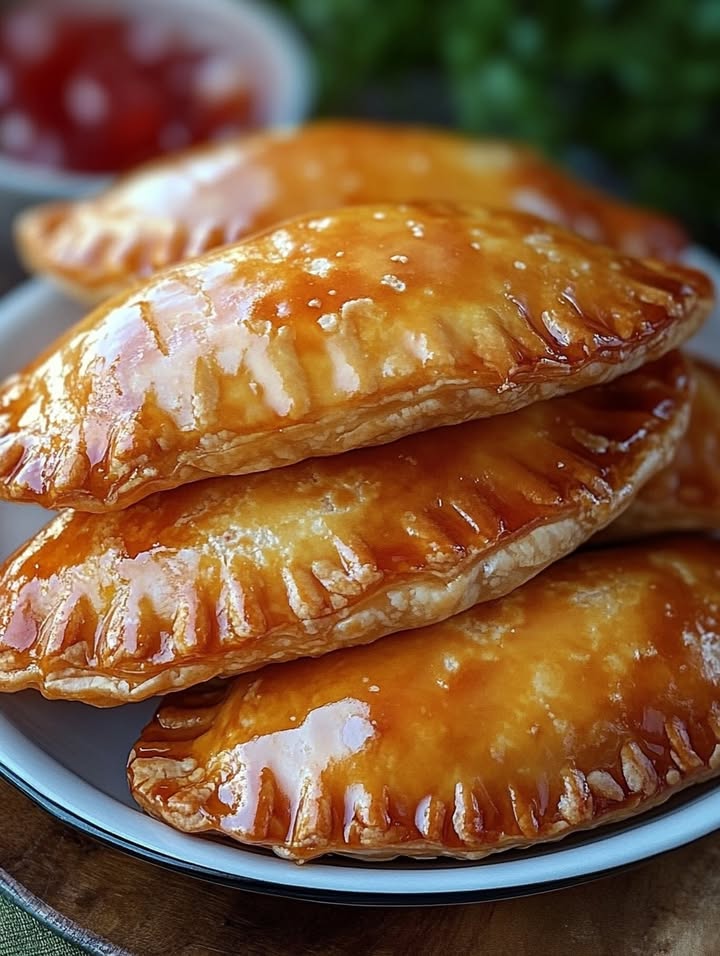
My Secret Weapon for a Sweet, Crispy Treat
Let me tell you about my favorite kitchen shortcut. It turns a simple can of pie filling into something magical. I’m talking about peach hand pies. They are little pockets of joy. The crust gets so golden and flaky. The warm peach filling inside is like a hug. My kids call them “mom’s magic pies.” They disappear faster than I can make them. Today, I’ll share my foolproof method.
A Little History of Handheld Comfort
Hand pies are old friends. Travelers and workers loved them centuries ago. They were a portable meal. My version is a sweet twist on that idea. It uses ready-made pie crust. This is my modern take on a classic. It honors the tradition of a homemade treat. It also respects a busy schedule. The cinnamon-spiced peach filling feels both timeless and new.
Why You’ll Love These Peach Hand Pies
You will love these for three reasons. First, they are incredibly easy. The pie crust is already made. The filling is ready to go. Second, they fry up crispy and light. The texture is divine. Third, the powdered sugar glaze adds a sweet finish. It makes them look bakery-perfect. They are a guaranteed crowd-pleaser.
Perfect Occasions for These Crispy Pies
These pies shine at many events. Pack them for a picnic. Serve them at a backyard barbecue. Bring a batch to a potluck. They are perfect for school bake sales. Make them for a cozy movie night at home. They even work as a special weekend breakfast.
What You’ll Need: The Ingredients
- 2 boxes (14.1 oz each) refrigerated pie crust
- 1 can (21 oz) peach pie filling
- 1 teaspoon cinnamon
- 2 cups powdered sugar
- ¼ cup milk
- 1 egg white, beaten
If You Need to Make a Swap
You can easily substitute ingredients. Use apple or cherry pie filling instead of peach. A homemade pie dough works if you have time. Almond milk can replace regular milk. A whole beaten egg can be used instead of just the white. It will give a slightly richer color.
Crafting Your Crispy Peach Hand Pies
Step 1: Cut Your Circles
Roll out your refrigerated pie crusts on a clean surface. Use a round cookie cutter or a glass. Cut out circles about 4 inches wide. You will see the soft, pale dough ready for filling. Save any scraps to re-roll.
Step 2: Spice Up the Filling
Open your can of peach pie filling. The smell is sweet and fruity. Stir in one teaspoon of cinnamon. Watch the golden peaches get cozy with the warm brown spice. This simple step adds a lovely depth of flavor.
Pro tip: If your filling seems too syrupy, you can add a tablespoon of flour to thicken it.
Step 3: Fill the Pockets
Place a spoonful of your peach-cinnamon mixture in the center of each dough circle. Be careful not to overfill. About a tablespoon is perfect. You want a nice mound of peaches sitting ready to be wrapped.
Step 4: Seal the Deal
Top each filled circle with another empty dough circle. Gently press the edges together. Use your fingers or a fork to crimp the seal tightly. This creates a neat little pouch that will hold the filling safely during frying.
Step 5: Brush with Egg White
Lightly brush the top of each sealed pie with the beaten egg white. This creates a shiny, golden finish when fried. It also helps the glaze stick later. The egg white will look glossy and wet on the pale dough.
Step 6: Fry to Golden Brown
Heat about an inch of oil in a deep skillet to 350°F. Carefully place a few pies in the hot oil. Fry for about 2-3 minutes per side. Watch them turn a beautiful, deep golden brown. The crust will become wonderfully crispy.
Chef’s tip: Keep your oil at a steady heat. Too hot burns them. Too cool makes them soggy.
Step 7: Make the Sweet Glaze
While the pies cool slightly, whisk powdered sugar and milk together. The mixture will go from cloudy to smooth and creamy. This simple glaze adds a final touch of sweetness and a pretty white drizzle.
Step 8: The Final Touch
Drizzle your glaze over the warm, crispy pies. Use a spoon or fork to make pretty lines. The white glaze on the golden pies is a stunning contrast. It signals that these treats are ready to eat.
Timing Your Treat
Prep time: 20 minutes. Cooking time: 15 minutes. Total time: 35 minutes. No resting time is needed. You can serve them warm right away.
My Secret for Extra Crispy Hand Pies
My secret is in the seal. After crimping with a fork, I run a knife very lightly around the edge again. This ensures no tiny openings exist. It keeps all the juicy filling inside. It also prevents any oil from sneaking in during frying.
A Fun Fact About Hand Pies
In many cultures, these are called “turnovers.” But my grandma always called them “pocket pies.” She said they held happiness inside. I think she was right. The joy is literally wrapped up in the dough.
Tools You’ll Need
- Round cutter (like a cookie cutter or glass)
- Large skillet for frying
- Slotted spoon or tongs
- Small bowl for egg white
- Whisk for glaze
- Pastry brush (optional, you can use a spoon)
Keeping Your Leftovers
Store any leftover pies in an airtight container. They keep at room temperature for one day. For longer storage, place them in the refrigerator. They will stay good for up to three days there.
The glaze may soften over time. You can re-crisp the pies in a warm oven for a few minutes. Do not microwave them. This can make the crust soft.
I do not recommend freezing them after frying. The texture of the crust can become less pleasing.
Tips for the Best Results
- Let your pie crust circles rest for 5 minutes after cutting. This prevents shrinking.
- Test your oil temperature with a small dough scrap. It should sizzle and brown gently.
- Drain fried pies on a paper towel-lined plate. This removes excess oil.
- Add a pinch of salt to the powdered sugar glaze. It balances the sweetness perfectly.
Presenting Your Beautiful Pies
Stack them on a rustic wooden board. Drizzle the glaze in a zigzag pattern. Place them on individual napkins for a picnic. Serve them with a dollop of whipped cream. Arrange them on a pretty plate with fresh mint leaves.
Try These Other Fun Variations
- Cinnamon Apple: Use apple pie filling and extra cinnamon. It tastes like autumn.
- Cherry Almond: Cherry filling with a drop of almond extract in the glaze.
- Blueberry Lemon: Blueberry filling with a lemon zest added to the dough.
- Savory Chicken: Use a cooked chicken and gravy filling in a savory crust.
- Nutella Banana: Fill with sliced banana and Nutella for a dessert twist.
- Pumpkin Spice: Pumpkin pie filling with pumpkin spice in the dough.
Common Mistakes to Avoid
Mistake 1: Overfilling the Pie
Putting too much filling in the center is a common error. It makes the pie hard to seal. The filling can burst out during frying. This creates messy, leaky pies. Use just a tablespoon of filling. Keep it centered.
Mistake 2: Not Sealing the Edges Tightly
A loose seal is a problem. It lets hot oil into the pie. The filling can also escape. Press the edges firmly together. Crimp them with a fork. Double-check your work. A good seal makes a crispy, neat pie.
Mistake 3: Frying at the Wrong Temperature
Oil that is too cool makes soggy, greasy pies. Oil that is too hot burns the outside. The inside stays cold. Use a thermometer. Aim for 350°F. If you don’t have one, test with a dough scrap. It should brown in about 60 seconds.
Mistake 4: Glazing While Too Hot
Drizzling glaze on piping-hot pies melts it away. It becomes a thin, invisible syrup. Let the pies cool for five minutes after frying. The glaze will then set into beautiful white lines you can see.
Your Questions Answered
Can I bake these instead of frying?
Yes, you can bake them. Bake at 375°F for about 20-25 minutes. Brush with egg white as directed. They will be less crispy but still delicious. The texture will be more like a traditional pie crust.
What kind of oil is best for frying?
A neutral oil with a high smoke point is best. I use vegetable or canola oil. They do not add flavor. They also heat well. Avoid olive oil. It has a lower smoke point and a stronger taste.
Can I make these ahead of time?
You can assemble them ahead. Seal the pies and keep them on a tray in the refrigerator. Do not glaze them. Fry them just before serving. This keeps the crust crispy.
How do I know when they are done frying?
The pies will be a uniform golden brown. They float slightly in the oil. The crust looks crisp. Usually, 2-3 minutes per side is enough. Use your sight. A deep golden color is your sign.
My glaze is too thick. What can I do?
Add a tiny bit more milk. Start with one extra teaspoon. Whisk it in. Repeat until you get a drizzle-friendly consistency. It should flow slowly from a spoon.
My glaze is too thin. How can I fix it?
Add a little more powdered sugar. Sprinkle in a tablespoon at a time. Whisk well. Let it sit for a minute. The sugar will absorb the milk and thicken the mix.
Can I use a different fruit filling?
Absolutely. Any canned pie filling works. Cherry, apple, and blueberry are great choices. Follow the same method. The cinnamon can still be added. It pairs well with most fruits.
Why use only egg white, not the whole egg?
The egg white gives a shiny, light finish. The yolk can make the color darker. It also has more fat. The white creates the perfect golden look without extra browning.
How do I prevent them from absorbing too much oil?
Ensure your oil is at the correct temperature. Drain the pies immediately on paper towels. Do not let them sit in the oil after cooking. A hot, correct temperature seals the crust quickly.
Can children help make these?
Yes! This is a fun family recipe. Kids can help cut circles. They can spoon the filling. They love crimping the edges with a fork. Supervision is needed near the hot oil. The assembly steps are safe and engaging.
A Sweet Finish
These crispy peach hand pies are a celebration of simple joys. They bring old-fashioned comfort to your modern kitchen. The process is easy. The result is impressive. I hope this recipe becomes your secret weapon too. Share them with someone you love. Watch the smiles appear. Happy cooking!
Crispy Garlic Wedges
Ingredients
Equipment
Method
- Roll out your refrigerated pie crusts on a clean surface and cut out circles about 4 inches wide.
- Open the can of peach pie filling and stir in one teaspoon of cinnamon.
- Place a spoonful of the peach-cinnamon mixture in the center of each dough circle, about a tablespoon each.
- Top each filled circle with another empty dough circle and press the edges together, crimping with fingers or a fork.
- Lightly brush the top of each sealed pie with the beaten egg white.
- Heat about an inch of oil in a deep skillet to 350°F and fry the pies for about 2-3 minutes per side until golden brown.
- While the pies cool, whisk powdered sugar and milk together to make the glaze.
- Drizzle the glaze over the warm, crispy pies just before serving.